Resolving relationships is a core aspect of designing templates in the DocumentsCorePack Template Designer. By making use of the Relationship Designer, you can, for example, display related data in the form of presentable, organized tables, which are handy for quotes or invoice documents.
This article covers how to get started with resolving relationships, details the process behind creating tables, and explores some of the more advanced topics in-between. For demonstration purposes, the examples within this article will be based on the Quote entity.
How to add a relationship to related records?
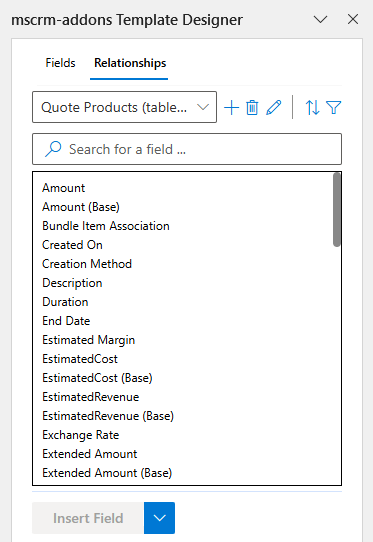
To resolve a relation, you will need to begin by opening the Relationship Designer. The designer is accessed through the Relationships tab of the Template Designer within the Insert Fields task bar.
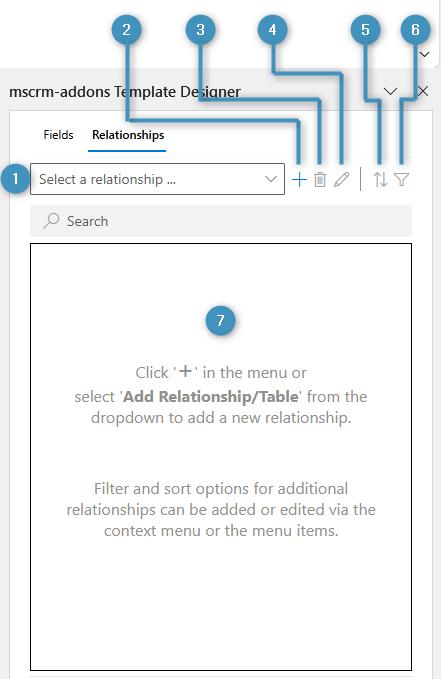
The tab consists of the following elements:
- ❶ The relationship dropdown: If you have multiple configured relationships, they will be shown here. You can pick one by selecting one from the list.
- ❷ Add relationship/entity: Clicking this button will open the Relationship Designer, allowing you to add relationships.
- ❸ Delete relationship: Deletes the relationship selected in the dropdown. This will also delete any tables associated with the relationship.
- ❹ Edit relationship: Opens the Relationship Designer for the selected relationship.
- ❺ Sort: Allows you to edit or add sorting fields (e.g. sort by amount of quote line-items)
- ❻ Filter: Allows you to edit or add filters (e.g. filter by product group)
- ❼ Field list: The fields of the selected relationship will be shown here.
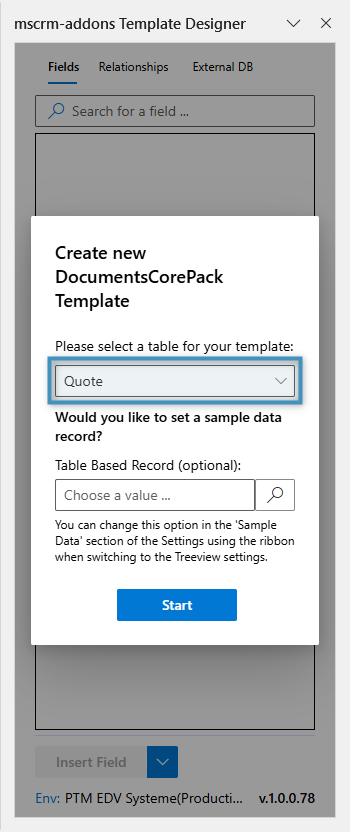
Note: If you have not selected a table for your template yet, you will be prompted to do so when opening the Template Designer.
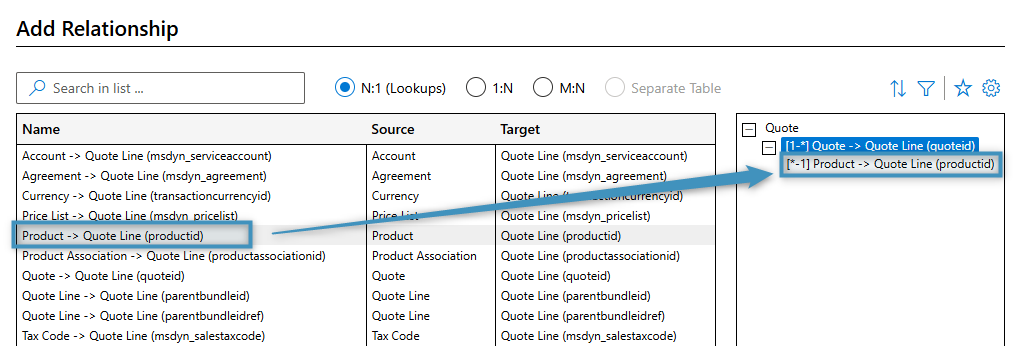
Open the Relationship Designer by clicking the “+” button. The following window will appear.
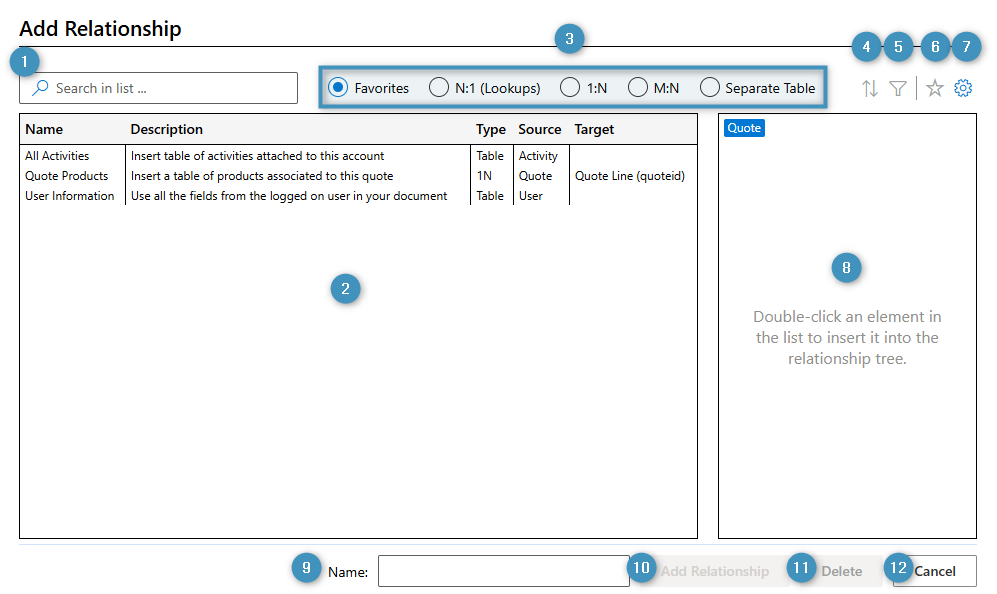
The window contains the following controls:
- ❶ Search bar: Searches the currently selected relationship list (❸) and displays all relationships that match the entered term.
- ❷ Relationship list: Displays all relationships connected to the base entity based on the kind of relationship selected in ❸ . Double-clicking a relationship will add it to the tree view.
- ❸ Relationship type selection: Determines what kind of relationships are displayed depending on the selection chosen. Favorites is selected by default.
- ❹ Edit sort order: Allows the user to adjust how the relationship should be sorted
- ❺ Edit filters: Allows the user to set what fields the relationship should be filtered by
- ❻ Save Relationship as favorite: Saves the currently configured relationship to the Favorites tab
- ❼ Display query (FetchXML) relationship settings: Displays query and aggregation settings.
- ❽ Tree view: Displays the relationship hierarchy.
- ❾ Name: Shows the name of the relation.
- ❿ Add Relationship: Saves all changes and
- ⓫ Delete: Deletes the relationship selected in the tree view.
- ⓬ Cancel: Closes the Relationship Designer.
To add a relationship, double-click on any of the relationships in the ❷ relationship list to add it to the tree view. Then, when you’re finished, click Add Relationship to save your changes and close the window. This will add it to the dropdown and populate the field list with the related fields. If you set a sample data record earlier, any fields with data will display their data.
Tables
A table is a placeholder representation of a list of records from a related table. Tables allow users to dynamically display data in an organized structure. They are handy for quotes, as they allow users to display a quote’s related products.
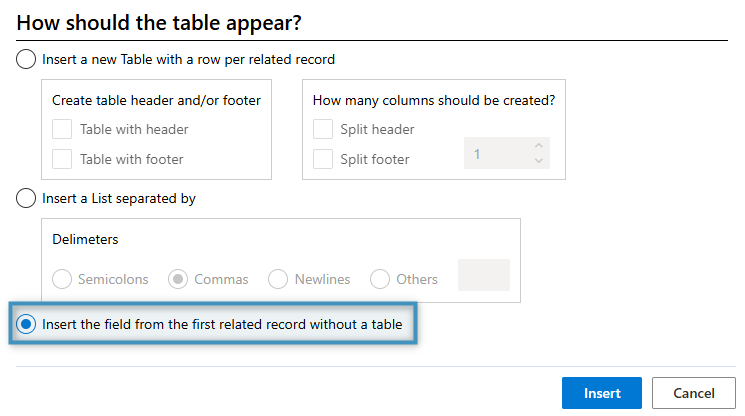
A table can be automatically created from a (1:N and M:N) relationship. By double-clicking a field from the fields list of the relationship, the following window will appear.
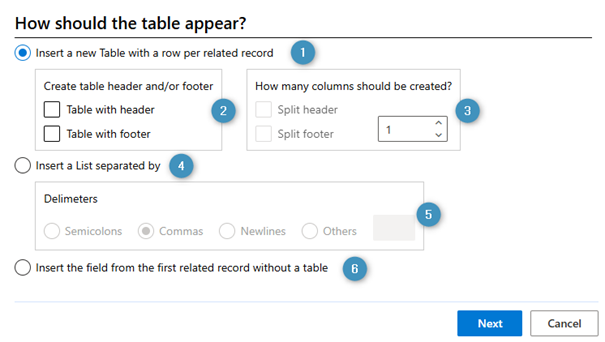
This window determines how the table should appear in the template. The following controls are available:
- ❶ Insert a new table with a row per related record: Inserts a placeholder table in the template. When the document is generated, the table will display a row for each related record. You can decide if the table should have ❷ a header and/or footer and ❸ if the header or footer should be split, alongside how many columns should be created.
- ❹ Insert a list separated by: Instead of inserting a table, a placeholder list is inserted into the template. In the result document, each related record is separated by a ❺ delimiter, which can be configured here.
- ❻ Insert the field from the first related record without a table: No table is inserted when this option is selected. When this placeholder is inserted, the result document will display only the first related record.
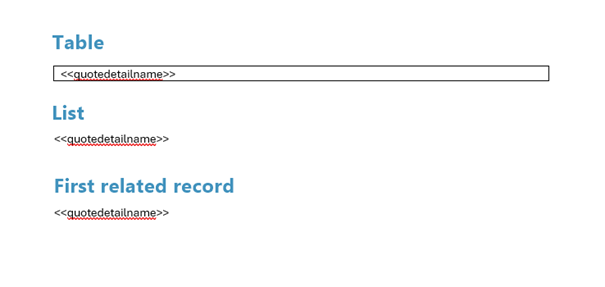
If we double-click the Name field from our Quote Product relationship, this is how each option will be displayed by default without any changes to the above settings.
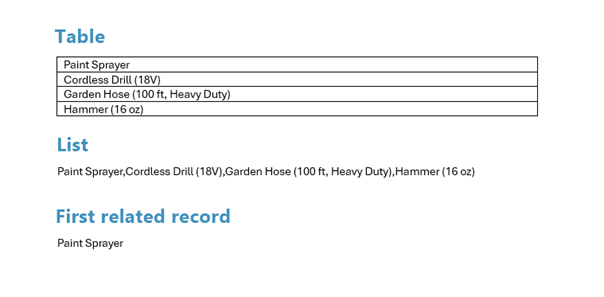
Merging our template with data will provide the following result:
As tables have great flexibility in how they can be displayed in a template, we will be focusing on them for the rest of this article.
Adding fields and table formatting
Tables can display additional data by adding fields from our relationship. If a table has multiple columns, we can add a field by placing our cursor in another cell and double-clicking the field from the fields list.
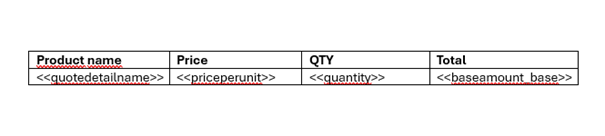
As mentioned above, tables can be created with headers, footers, or multiple columns. This helps facilitate the creation of more complicated tables. For example, this Quote Product table contains a split header and additional fields from our relationship.
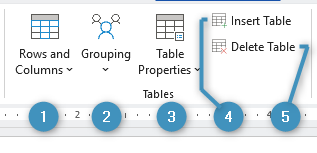
However, we can adjust and format this table as needed by taking advantage of the controls in the Tables group of the DocumentsCorePack tab.
The controls are summarized as follows:
- ❶ Rows and Columns: Allows the user to adjust the rows and/or columns of the selected table. This includes the ability to add or remove header or footer rows, merge columns, or split columns.
- ❷ Grouping: Applies grouping to the selected field (further information coming soon).
- ❸ Table Properties: Opens the Table Properties window. You can open it as either a taskpane or dialog.
- ❹ Insert Table: Displays a window that provides the user with general information on inserting a table.
- ❺ Delete Table: Deletes the selected table. This will not delete the corresponding relationship in the Template Designer.
Note: Your cursor must be placed within a table to use any (except ❹ ) of the above controls.
Additionally, just like standard fields, tables can be formatted using Word’s own formatting tools.
Advanced topics
Beyond adding simple relationships and creating tables, the Relationship Designer has other features to expand how you can present your data.
Sorting
Sorting is important when it comes to organizing and presenting your data. If you want to sort a table alphabetically, for example, you can enable sorting to do just that.
If we were to generate a document based on the above table, we would get the following result:
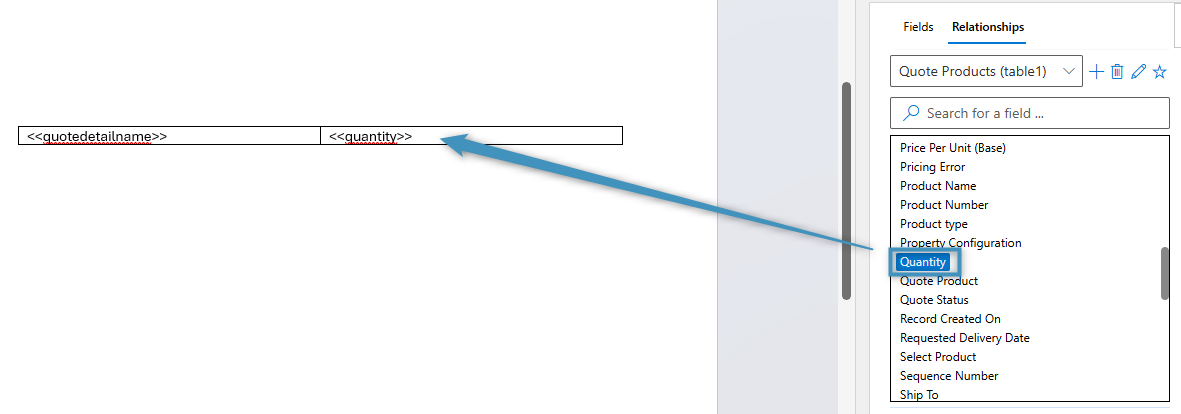
For this example, we would like to sort the product names in alphabetical order. To do this, we need to seek out the corresponding field from our fields list. In our case, we locate and right-click on the ❶ Name field, go to ❷ Sort Query By and select ❸ Ascending.
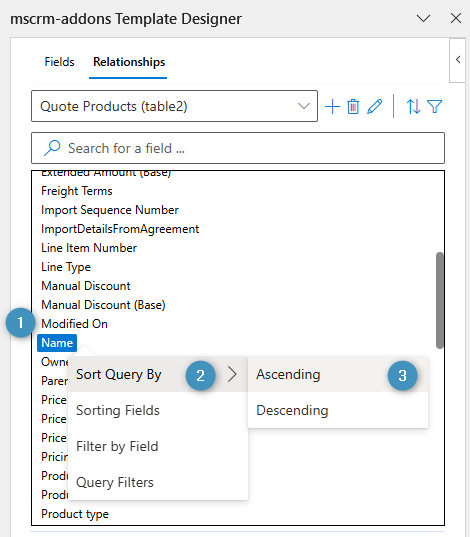
Alternatively, you can click the Edit sort order button and select the field from there.

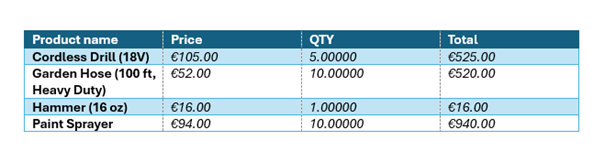
This will set the table to sort by this field. If we then generate a document, we can see that the products have been sorted properly.
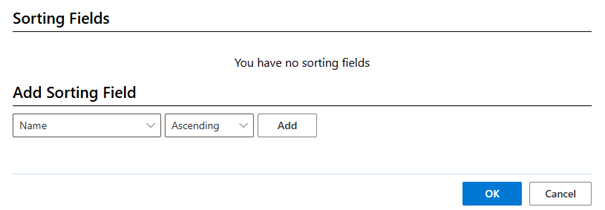
To remove sorting from a field, right-click on the same field and select Sorting Fields or click on the Edit sort order button. Clicking on the Delete button will remove it.

Nested relationships
Nested relationships allow you to retrieve related data from relationships at deeper levels. If you already have resolved a relationship, you can select the relationship and resolve another one.
For example, if you have resolved a relationship to the Quote Line table from the Quote entity, you can resolve another relationship to Quote Line from the Product entity.
You can continue to nest relations several levels deep, achieving complicated structures such as this:
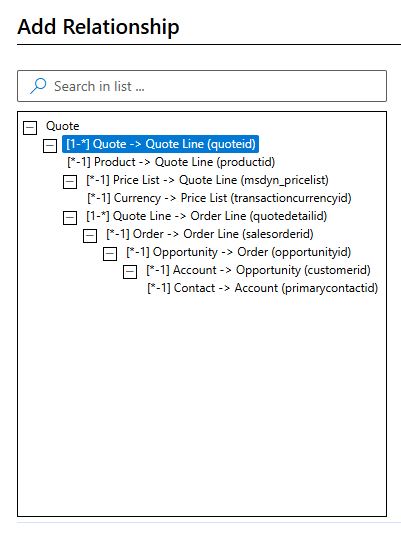
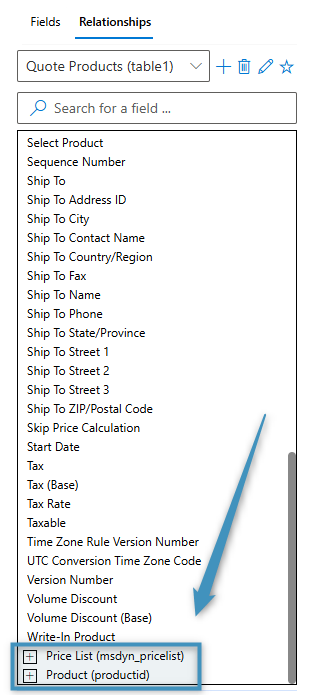
To insert related data from a nested relationship, scroll down to the bottom of your fields list and expand the relationship.
Filtering
Filters can be applied to relationships to permit only certain data in a table. This can be convenient for omitting irrelevant information from a document or for removing items from a table based on price.
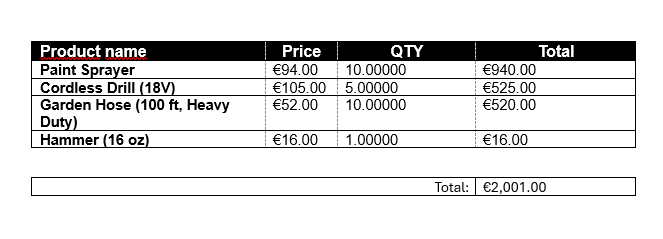
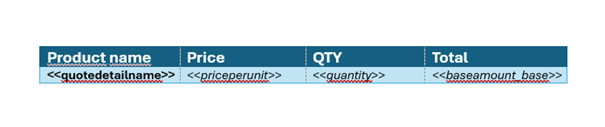
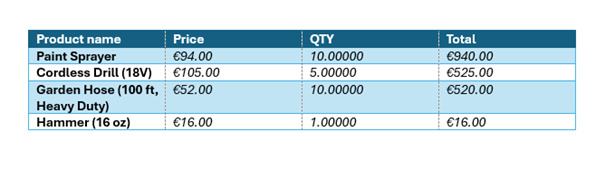
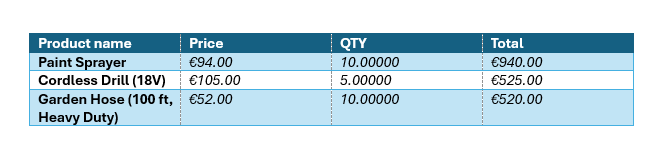
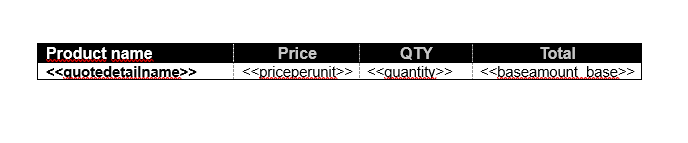
In the following example, we have a table of quote products. Take note of their total price.
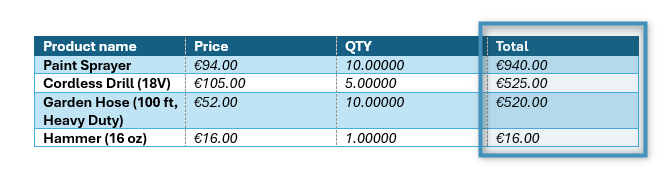
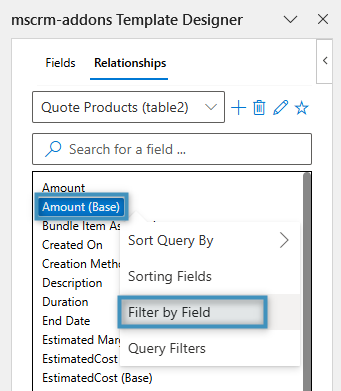
Let’s say we would like to filter out all products whose total price is less than €50. We can start by navigating to the field we want to filter by. Since we want to filter by the total price, we locate the field in the fields list, right-click on it, and select Filter by field.
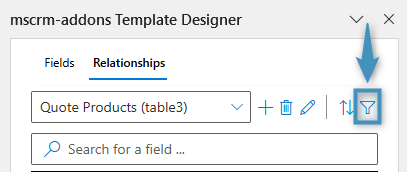
Alternatively, you can click the Edit filters button instead.
This will cause the Filters window to appear.
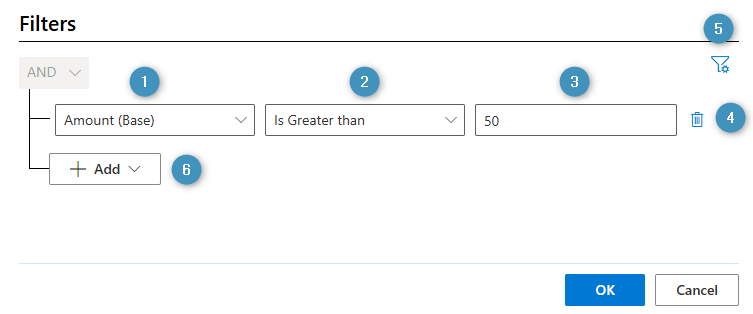
The controls are as follows:
- ❶ Field: Sets the field the relationship should be filtered by. It is automatically set to the selected field.
- ❷ Operator: Determines which operator the filer should use.
- ❸ Value: The value the filter is based on.
- ❹ Delete: Deletes the associated filter.
- ❺ Display filters for Column Compare and Dynamic Filters: Enables Column Compare and/or Dynamic Filters to be used.
- ❻ Add: Adds another row, group, or related entity to the filter.
In the above example, we set the relationship to be filtered by the Amount (base) field, which corresponds to the quote product’s total price. This filter ensures that the associated table will only display quote products whose total price is greater than €50.
Once our changes have been saved, we can generate a new document to see that the result has been altered.
Aggregation
Aggregation allows users to aggregate data in tables. The feature can be used to calculate averages, sum up values, or even provide a count of a given set of records.
In the following example, we will use the feature to get the final total of our products. In this quote template, we have a table of quote products based on an existing relationship:
This table will provide us with some general information on each product, but not the final total. We can use aggregation to calculate that total.
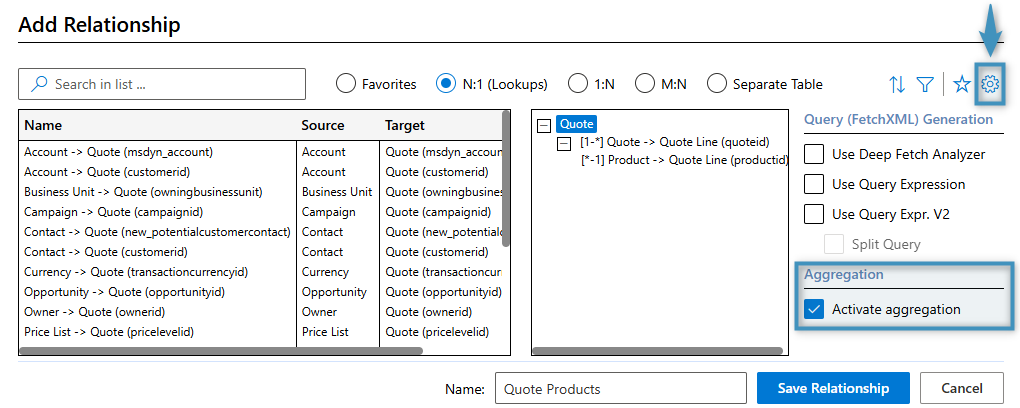
We will need to create a new Quote -> Quote Product relationship in the Relationship Designer and activate aggregation. Aggregation can be enabled in the Relationship Designer within the Display query (FetchXML) relationship settings.
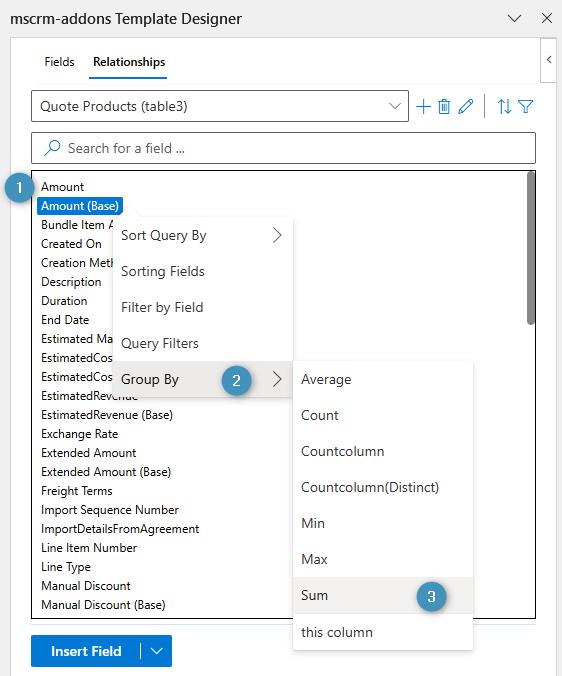
When you have saved the relationship, navigate to the fields list of your relationship. Right-click on the ❶ field to aggregate (in this case the Amount (Base) field), go to ❷ Group By and select ❸ Sum. This will mark the field as an aggregation field.
Since this field comes from a relationship, the following window will appear when attempting to insert it. We only want to display the field itself, so choose Insert the field from the first related record without a table and continue.
We will insert the field into a Word table under our relationship table.
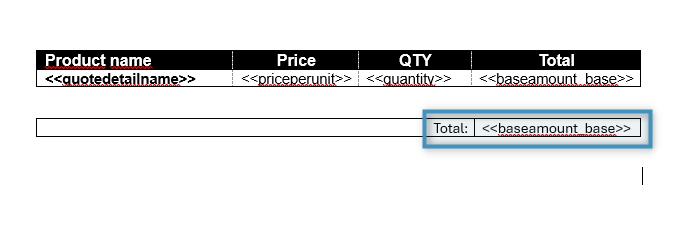
The result will look like this: