Dynamic Documents is a feature within the MultiPart capabilities of DocumentsCorePack. It allows users to configure a query and retrieve records you want to generate and add a document for as part of your multipart configuration. Using this feature would allow one to include documents from other entities in a Multipart outside of the entity the Multipart-OCA itself is configured for.
Example: In a document package created for an Account, one could also include documents based on the Contact entity.
To demonstrate this feature, we will be walking through a particular use case as shown below.
Note: This article assumes a general understanding of the following topics:
- Multipart documents
- One-Click-Actions (aka OCAs)
- Concatenation in DocumentsCorePack
- Creating FetchXML (see “How to create the Fetch XML” section)
Prerequisites
Before setting up our Multipart, we must enable this feature. To enable it, a SettingsKey must first be created as follows:
- Name: ShowDynamicDocumentsOption
- Value: true
- Product: AutoMerge
Additionally, the service and solution must be updated to the following versions:
- DocumentsCorePack Server 2020.121 or higher
- AutoMergeGlobalButton 2020.168 or higher
Note: Depending on the complexity of the query, this feature may not work as intended when using the New DCP WebConfiguration version 2025.6 or older. It is recommended to use the classic version of the DCP WebConfiguration for configuring ‘Dynamics Documents’ parts for now.
This issue will be solved with version 2025.7 where it will be fully supported in the New DCP WebConfiguration.
Our use case
We want to create a document package for a customer based on an opportunity within our Dataverse environment. This document package should have the following elements:
- a Cover page,
- a terms and conditions document
- and a document for quotes related to this opportunity we deem relevant to this package.
Note: We want the user to be able to select the relevant quotes when creating the proposal in the DocumentsCorePack dialog.
Configuring our Multipart OCA
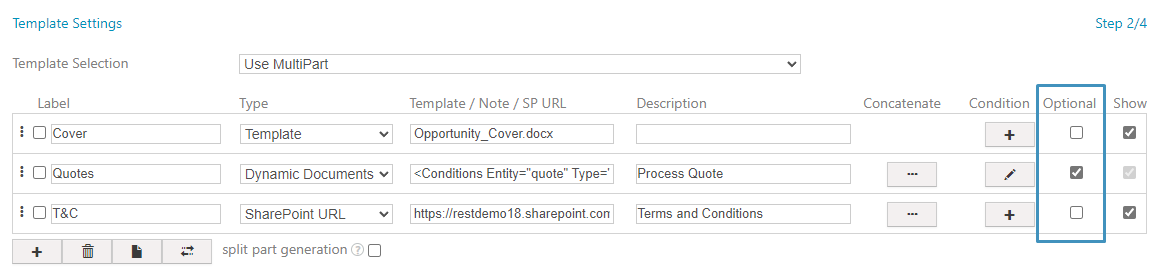
Our OCA will be based on the Opportunity entity. When creating the OCA, ensure that to select “Use Multipart” in the template settings. We’ll set up our cover page and terms & conditions document as well.
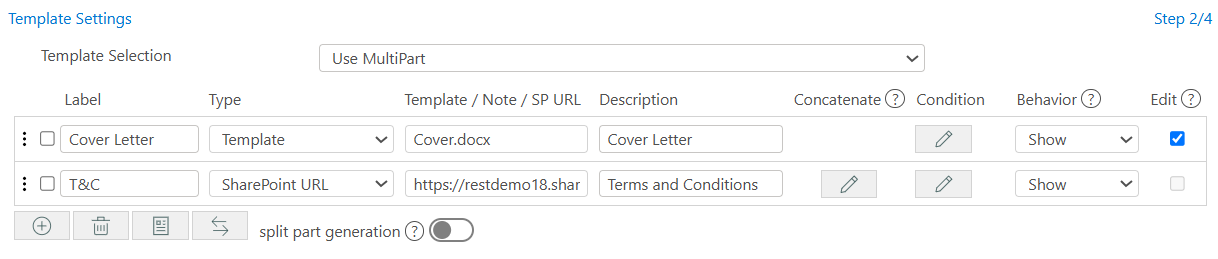
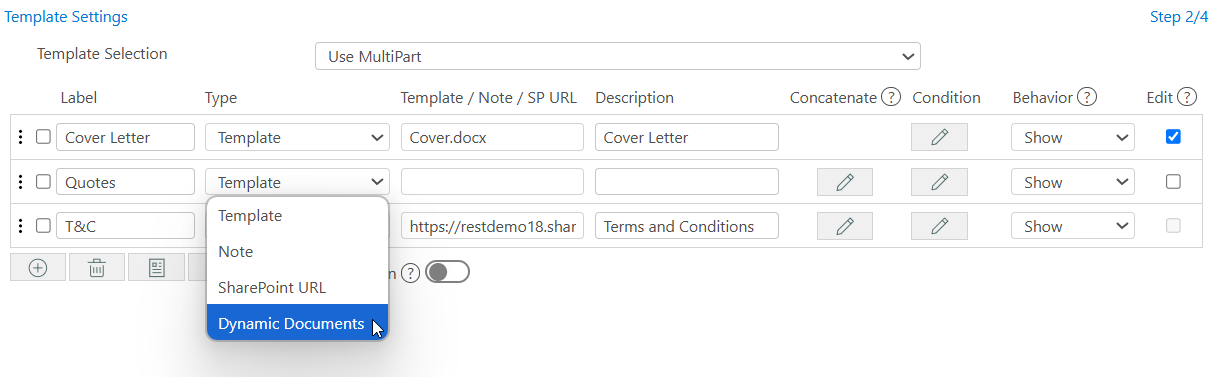
Then, we’ll add another section to our document. Once added, select Dynamic Documents from the type list.
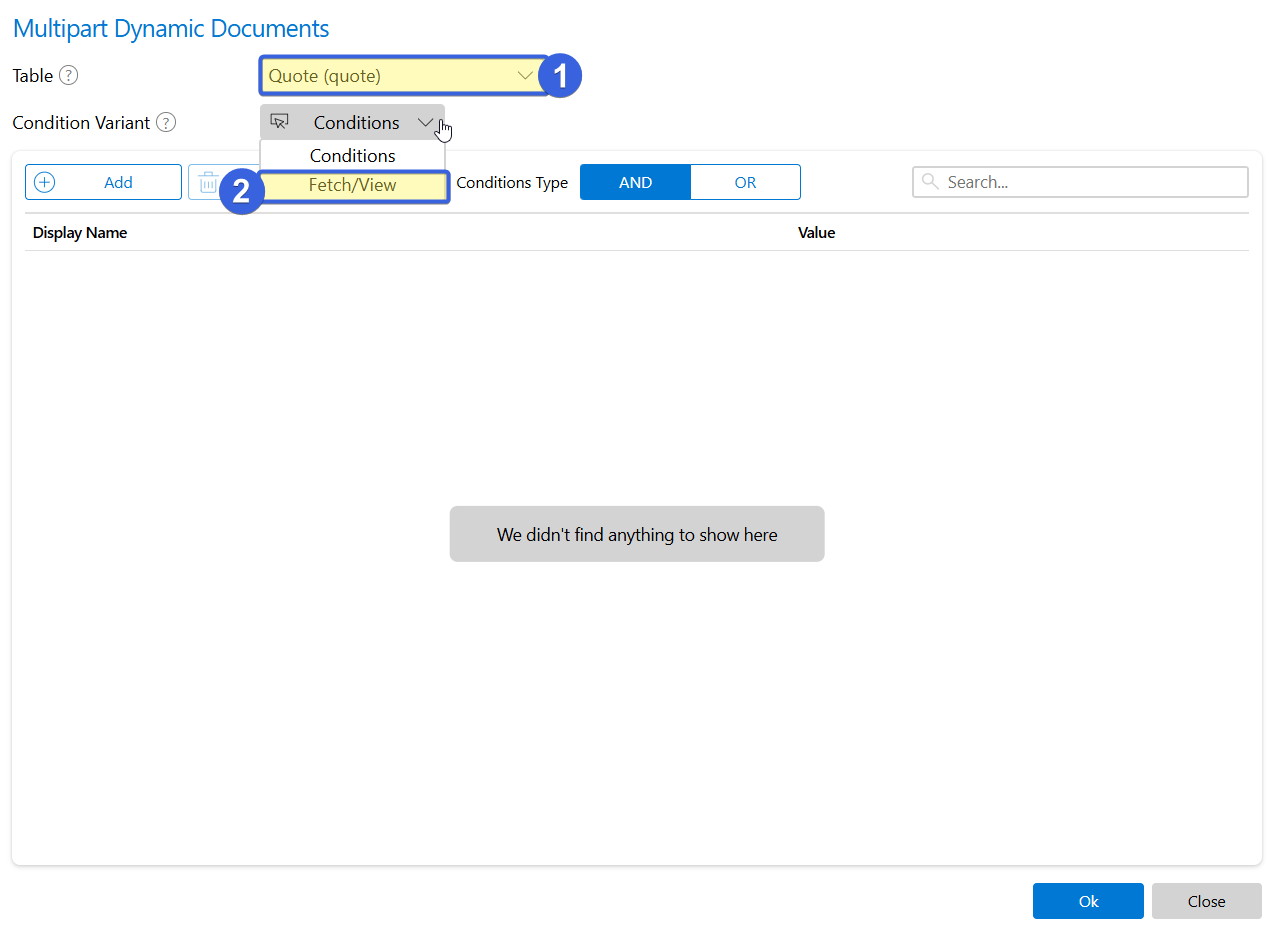
When selected, a new window will pop up, called “Multipart Dynamic Documents.” In this window, you can define the query for records you want to create a document for. First, we define the entity to retrieve records from (1). Below, you can set if you want to retrieve the records based on a fetch or based on conditions (2). For this example, we will select the Quote entity and retrieve our records via fetch.
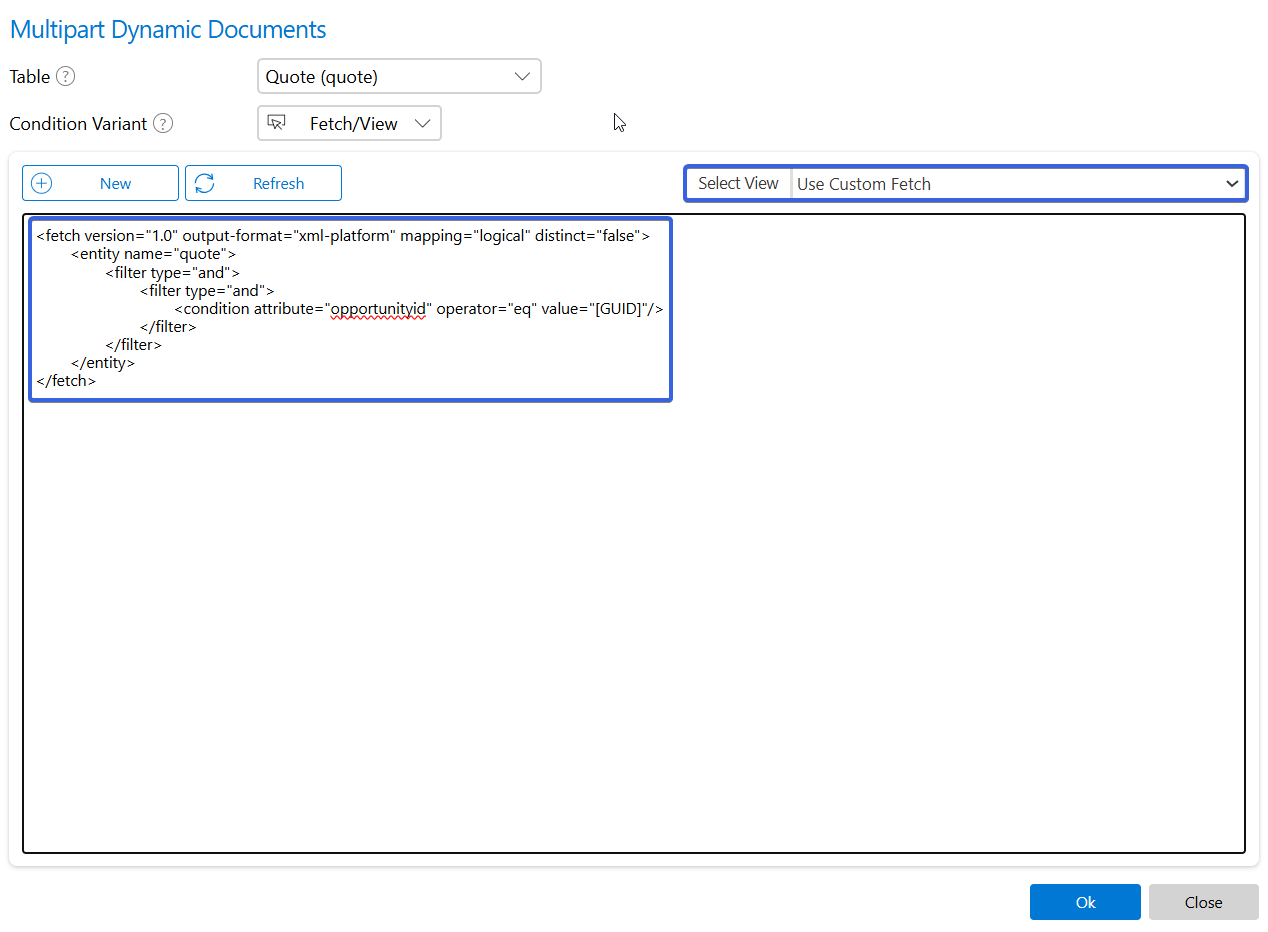
We want to retrieve all quotes related to the opportunity we are launching this OCA from. To do that, we will set the selected view to Use Custom Fetch. We can then add the following fetch to the textbox:
<fetch version="1.0" output-format="xml-platform" mapping="logical" distinct="false">
	<entity name="quote">
		<filter type="and">
			<filter type="and">
				<condition attribute="opportunityid" operator="eq" value="[GUID]"/>
			</filter>
		</filter>
	</entity>
</fetch>
The value “[GUID]” is important here. When this value is set, the guid of the parent record (in our case, our opportunity record), will be dynamically retrieved when this fetch is executed. This means that the quotes we retrieve will only be the quotes related to our opportunity record.
This is what our fetch looks like in the window:
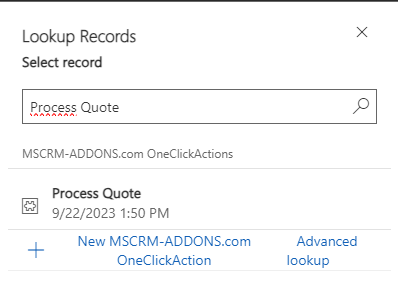
Once our fetch has been added, we can click ‘OK’ and return to the Multipart. From there, click into the “Description” textbox of our Dynamic Document row (see Figure 1). This will open an OCA lookup prompt. Here, you will need to select an OCA based on the entity we are retrieving records from. In this case, we will select an OCA based on the quote entity.
Note: Dynamic Documents only uses the templates defined within the selected OCA. Other settings in the selected OCA, such as document processing and preview settings, are ignored.
With the OCA selected, we can return to the Multipart. Before saving the Multipart, we will set the Dynamic Documents row to be optional. This way, users can later choose which quotes they want to include as part of this document package in the DocumentsCorePack Dialog.
Once saved, go to the opportunity you would like to create a document package for and launch the DCP Dialog.
Launching our OCA
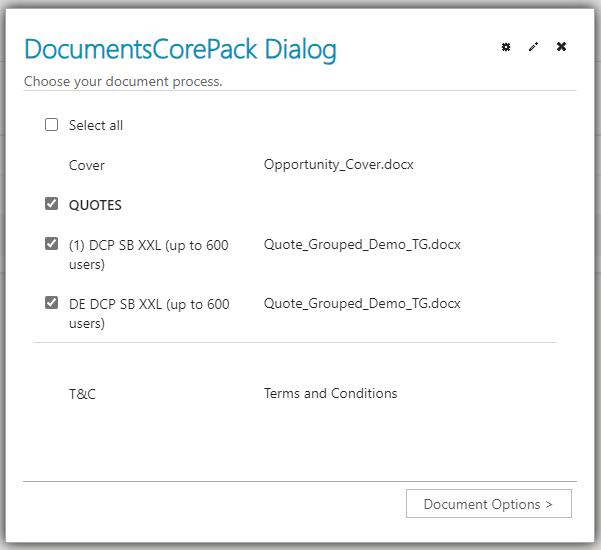
When launching the OCA we created, you will notice that the related quotes are displayed under the “QUOTES” section, along with the template taken from our “Process Quote” OCA. Since we set the Dynamic Documents row to be optional, we can choose which quote or quotes we want to include in the document package.
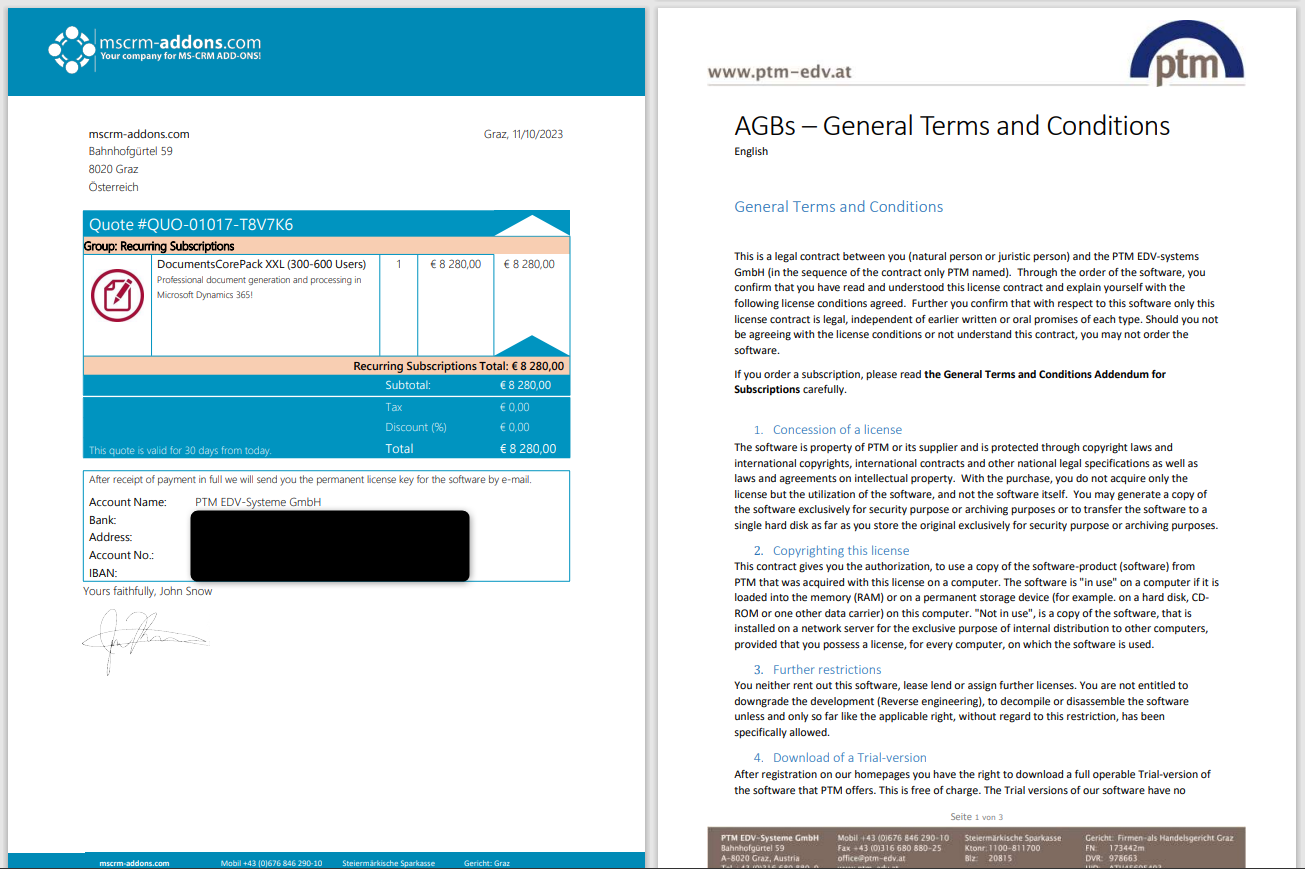
After proceeding, we obtain our result document package.

That´s it! We appreciate your feedback! Please share your thoughts by sending an email to support@mscrm-addons.com.