• Archive
  • Back to www.mscrm-addons.com
  • Archive
  • Back to www.mscrm-addons.com
home/Knowledge Base/SmartBar (SB)

How do I configure navigation buttons to system views with SmartBar?

31 views 0

Written by Administrator
July 7, 2017

SmartBar facilitates navigation between related Dynamics 365 records and with the latest features, it allows you easier handling of multiple views and smoother handling of count/color based buttons. For further information on how to add a range to color-coded buttons, have a look at this article.

Add Multiple Views button

It is possible to move the same entity button more than once to the ‘current on-site’-section in the SmartBar settings. This allows you to rename the button and to add a specific view to it. This makes it possible for you to, e.g. create an [Activities-ALL]-button next to an [Activities-Closed]-button.

To add a specific view to your button, you can simply edit an Entity Button (with a click on the [Gear icon]-button) and select a view from the Specific View-field, as highlighted on the below screenshot. This feature is available on both – metro and standard styling.


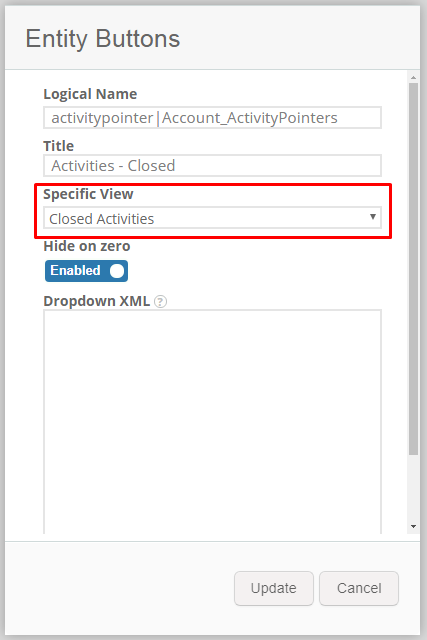
Figure 1: Add Multiple Views button

This example will result in a button that only counts and shows your Closed Activities.


Figure 2: The [Activities Closed]-button

​

That’s it! We appreciate your feedback! Please share your thoughts by sending an email to support@mscrm-addons.com.


Was this helpful?

Yes  No
Related Articles
  • How licenses are counted
  • IMPORTANT information for Dynamics 365 Online customers using ActivityTools, AttachmentExtractor, PowerSearch or SmartBar
  • How to create a SettingsKey manually in MS Dynamics 365
  • Where do I find the Unique Organization name in Microsoft Dynamics 365?
  • How to understand & reduce your license count
  • License Count
Latest Articles
  • How to create a design/custom QR by the example of the SWISS QR-Code
  • Insert QR-Code (Dynamics 365)
  • How to trigger actions from the [Create Document]-dialog
  • How to insert an entity image in Dynamics 365
  • Add a Hyperlink to an existing “Picture-Link-Field”
Popular Articles
  • How to activate the DocumentsCorePack connector for PowerApps & Microsoft Flow
  • How licenses are counted
  • Where do I find the Unique Organization name in Microsoft Dynamics 365?
  • DocumentsCorePack Server Based Load Balancing Services
  • How to work with the new DocumentsCorePack custom connector for PowerAutomate (Microsoft Flow)
Top Rated Articles
  • How to activate the DocumentsCorePack connector for PowerApps & Microsoft Flow
  • Can you save data capacity by moving email content?
  • How to work with the new DocumentsCorePack custom connector for PowerAutomate (Microsoft Flow)
  • Recap of the first virtual eXtreme365 & Community Summit event
  • Step-by-Step: How to configure a One-Click-Action
Categories
  • *News and General Infos* 44
  • Template Designer(DCP 152
  • DocumentsCorePack(DCP 150
  • TelephoneIntegration (TI 62
  • AttachmentExtractor (AE 47
  • PowerSearch (PS 42
  • ActivityTools (AT 54
  • SmartBar (SB 49
  • GroupCalendar (GC 43
Our Vision

“We see it as our purpose to provide products that simplify and speed up our customers’ Microsoft Dynamics 365 experience.”

Knowledgebase
LogIn
mscrm-addons.com
  • Products
  • Online Shop
  • Downloads
  • My Account
About Us
  • About Us
  • Case Studies
  • Newsletter
  • Partner Program
  • Contact
Support
  • Support
  • Terms & Conditions
  • Documentation
  • Webinars
  • Legal Documents
  • Impressum
  • © 2020 www.mscrm-addons.com. All Rights Reserved.