Ordinal numbers represent position or rank in sequential order. The order may be of a size, importance, chronology, etc. These numbers may be written in English with numerals and letter suffixes: 1st, 2nd, 3rd, 4th, 5th, and so on.
Because ordinal numbers can be an essential part of documents, we have created the possibility to add ordinal numbers to templates. This step-by-step tutorial describes how to utilize an already prepared field function in your template(s) in order to place ordinals.
Please note: This article requires an already-created template. If you haven’t created a template before, have a look at this article before continuing. The attached Ordinal Numbers template document is a template that can be merged with an account (see Attached Files below). If you haven’t merged a template before, have a look at this article.
Step 1: Enable the field codes of your template
Open your template. If you do not see the field codes in this template, hit ALT + F9 on your keyboard to toggle the view. General information about field codes can be found here.
Step 2: Delete the current field used
Place your cursor in the <> and hit the delete field in our ribbon.
This is how the <> looks once it is extended:

Please note: The delimeter for methods (such as MOD) is dependent on the localization of your system. For English systems, the delimeter is the comma (“,”) whereas for German systems, the delimeter is the semicolon (“;”). As an example, the above function MOD(day;100) would be correct for German systems, but not English systems. Please modify the delimeters as needed.
Step 3: Copy the whole block and paste it into your template
Copy the block from the actual attached document only.
Please note: Just copying and pasting the above text will not work.
Step 4: Insert a field of your choice
Replace the <> field with a field of your choice. You could add a data field or any other numeric field from the Template Designer TreeView. In this case, only the day is displayed.
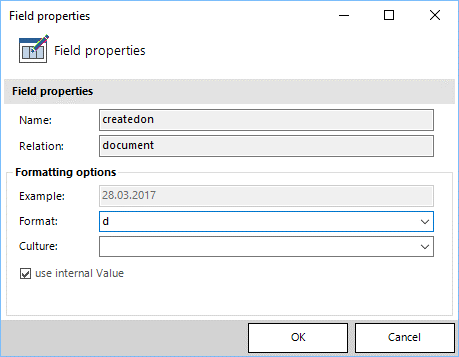
Step 5: Open the field properties
Open the field properties with a right click and insert a ‘d‘ into the Format field.
Please note: Sometimes, it can be necessary to add the month and year after the ordinal as well. In that case, simply add another date field behind the ordinal again and insert the required field properties. Learn how to insert fields here. As the day is already represented as an ordinal, you only have to apply a format that displays the month and year (For example, MM, yyyy). Get more information on how to customize date and time formats here.
For further information about the function’s technical background, look at this article.
That’s it! We appreciate your feedback! Please share your thoughts by sending an email to support@mscrm-addons.com.