This articles explains how you can add custom columns to ActivityTools grids for CRM 2015/2016.
Via a Dynamics 365 settings key additional columns can be added to the ActivityTools grid. For each activity type and column, a separate Dynamics 365 field can be displayed. The custom columns will be inserted between the subject- and date/time-column and can have column headers. This is a global setting and takes effect for all Dynamics 365 users.
Create XML
First of all you need to create an xml including your column information. The base structure looks like this:
 <root>
     <columns header="[define if custom columns should have header (true / false)]">
       <col id="[Id of this custom Column]" width="[Width of this column in pixel (100px)]">
         <header>
           <h id="[lang code of header (1033)]">[Header for 1033 - English (Custom Col)]</h>
           <h id="[lang code of header (1031)]">[Header for 1031 - German (Zusatzspalte)]</h>
            .....
         </header>
         <activities>
           <a id="[activity type name]” field="[used CRM field]"/>
           <a id="[next activity type name]” field="[used CRM field]"/>
           ....
         </activities>
       </col>
      ....
     </columns>
   </root>
The header-attribute of the columns-node is used to define, if the custom columns should have headers or not (possible values: true or false).
For each custom column, one col-node has to be defined. Its id-attribute can be any text, but it is important that no Dynamics 365 field is named similar (e.g. new_custCol1). Its width-attribute controls the column width (value consists of quantity and px).
If the header-attribute was set to show column headers, labels must be defined in the header-node. For each Dynamics 365 language a different label can be defined through adding multiple h-nodes. The id-attribute has to contain the Dynamics 365-language-code (1033 for English) and the preferred text is the value of the node.
The activities-node controls for which activity types the column should be filled and which CRM field should be displayed. To accomplish this, for every activity type one a-node can be inserted. It consists of the id-attribute which contains the activity type name (email, fax, appointment, …) and the field-attribute which contains the logical name of a Dynamics 365 field of this entity.
Add setting to Dynamics 365
The next step consists of creating a new Settingskey.
Please open Dynamics 365 and navigate to Settings > MSCRM-ADDONS.com Products and open ActivityTools. Create a new Settingskey (this article explains this in detail).
Fill in the following values and hit save:
Name: GridCustomColumns
IsCached: Yes
KeyValue: [insert the before created XML]
After reloading ActivityTools, the new columns should be visible.
Sample XML
This example defines two additional columns. Column headers are enabled.
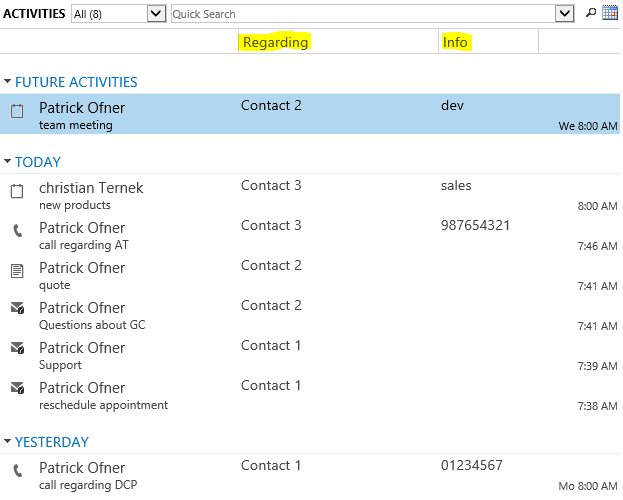
The English header of the first one is Regarding. The column will be filled for email, letter, appointment and phone call. The value will be taken from the regardingobjectid-field for all of them. The column width is 200px.
The header text of the second column is Info. Only for appointment and phone call records this column will be filled. For appointments the category-field will be used and for phone calls the phonenumber-field. Its width is 100px.
   <root>
     <columns header="true">
      <col id="custCol2" width="200px">
       <header>
        <h id="1033">Regarding</h>
        <h id="1031">Zusatzspalte2</h>
       </header>
       <activities>
        <a id="email" field="regardingobjectid"/>
        <a id="letter" field="regardingobjectid"/>
        <a id="appointment" field="regardingobjectid"/>
        <a id="phonecall" field="regardingobjectid"/>
       </activities>
      </col>
      <col id="test1" width="100px">
       <header>
        <h id="1033">Info</h>
        <h id="1031">Info</h>
       </header>
       <activities>
        <a id="appointment" field="category"/>
        <a id="phonecall" field="phonenumber"/>
       </activities>
      </col>
     </columns>
   </root>
Result:
Figure 1: Result (Custom columns added)
That’s it! We appreciate your feedback! Please share your thoughts by sending an email to support@mscrm-addons.com.
