This blog article explains how to add related detail fields to be shown in the TelephoneIntegration (TI) balloon via FetchXML-feature.
How does it work?
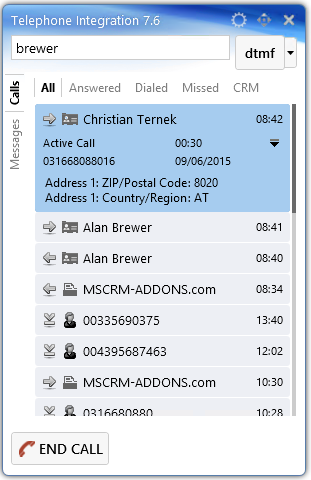
The standard TI Configuration only shows fields from the same entity which can be configured via check boxes in the Server Config.

Figure 1: Standard balloon caller information
TI Server will be equipped with an option to supply one FetchXML command with a GUID placeholder. This placeholder will be replaced with the corresponding entities ID, if a match is resolved.
So we receive 2 groups of detail fields – the original fields (from the originally resolved entity) and related fields (from the related entity).

Figure 2: Additional Fetch result
In our example, we use Contact plus full address. In order to add additional related fields from a different entity, a FetchXML has to be executed.
Therefore, TelephoneIntegration Server and Client need to be updated to the latest version.
Requirements
TelephoneIntegration for MS CRM 2015
Server version: v. 2015.5 or higher
Client version: v. 7.7 or higher
How to add related detail fields to the TI-balloon?
1) First, make sure that you use TI-Server v.2015.5 or higher. If so, please proceed with the next step. If not, download the latest TI Server version.
Once the update has been finished, you will see the following organisation overview. Here, select the appropriate organisation and click on the [Launch config]-button.

Figure 3: TelephoneIntegration Organisation overview.
2) The following window appears. Check the entity you would like to work on (here: Contact) and then click on the [Fields]-button that appears next to the entity.

Figure 4: TelephoneIntegration Server Config.
3) Now the following window appears. In this window, users can specify the details that should be shown with this entity.

Figure 5: Fields details for default TI balloon caller information.
Please note: It is possible to display up to three result fields per resolved record! If additional information from related entitiy is needed, the FetchXML is executed and additional fields are added.
In our example, we also want the FetchXML to return the ticket-number from the last created active case (if the resolved contact is stored in the customer field).
4) To do so, please click on the [Supply custom FetchXML]-button (highlighted in Figure 5)
5) In the newly opened window, please add the below FetchXML. It is supposed to add additional fields.
count=”1″ >
The GUID of the resolved entity record is replaced with {[GIUDPLACEHOLDER]}

Figure 6: CustomXML dialog
Please note: We highly recommend to test the configured FetchXML query. To do so, we recommend the use of FetchXML builder for XrmToolbox http://fxb.xrmtoolbox.com/
6) Click on the [OK]-button in order to proceed.
7) Next, download and install the latest TI Client version. (to be found in our Download area.)
8) Once this is done, please restart the TelephoneIntegration Client and simulate a call from the appropriate contact. To do so, right-click on TI Client Symbol in the StartPane, then click on Setup and search for the Simulator-tab).
A possible result could look like this:

Figure 7: Additional Fetch result
That’s it! We appreciate your feedback! Please share your thoughts by sending an email to support@mscrm-addons.com.
reworkneeded … need graphic update. Need PO for TI Server update part