• Release History
  • Documentation
  • Back to www.mscrm-addons.com
  • Release History
  • Documentation
  • Back to www.mscrm-addons.com
home/Knowledge Base/Template Designer(DCP)/How to build Multilevel-Relationships

How to build Multilevel-Relationships

1098 views 1 Updated on March 16, 2023

In this example, we are building a Multilevel Relationship from Quote > Quote Line (Quote Product) > Product. This may be needed as the Quote Product inherits the name of the parent product. Here you can see a simplified illustration of the structure in CRM:

The structure of a Quote-Product relationship in Dynamics 365.
Figure 1: Structure of a Quote-Product relationship in Dynamics 365

To obtain the values for the product, we first need to resolve the relationship from Quote to Quote Line (Quote Product) and select the desired fields. This is a 1:N (one to many) relationship.

Quote to Quote Line relationship 1:N.
Figure 2: Quote to Quote Line relationship 1:N

Once this is done, we need to add another layer to the relationship by clicking on the Add button. This will open a second dialog, as you can see below.

Add another layer to the relationship.
Figure 3: Add another layer to the relationship

Now we create the second layer of the relationship from Quote Line to Product and select the desired fields as you can see below. This is a N:1 (many to one) relationship.

Quote Line to Product relationship N:1.
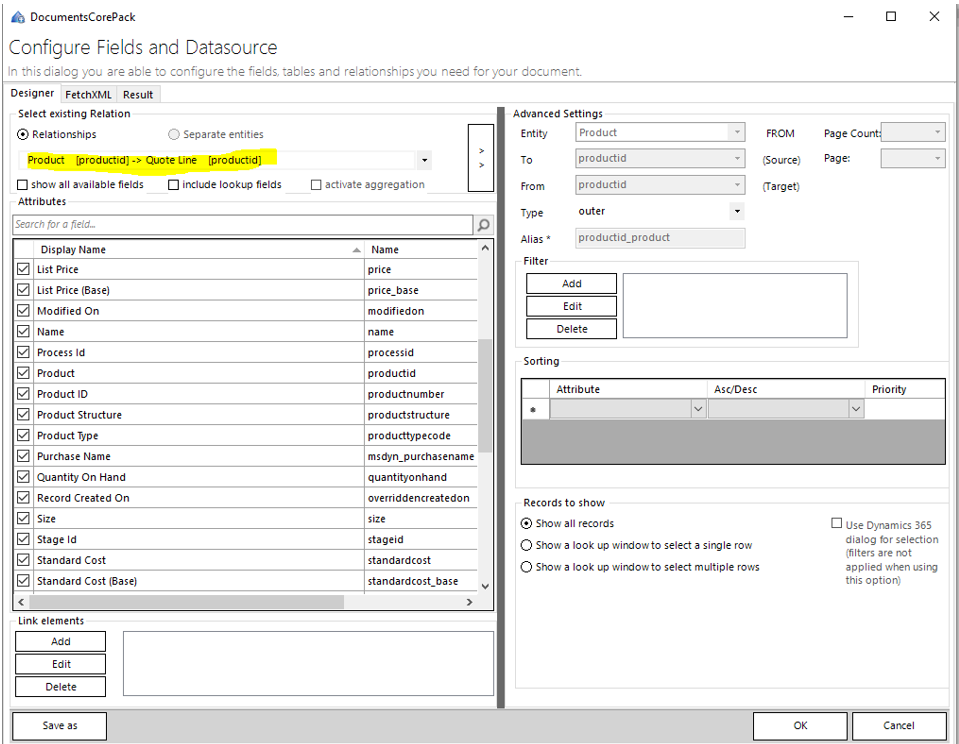
Figure 4: Quote Line to Product relationship N:1

Afterward, we click the OK button on every dialog that has been opened while building the relationship. The newly created Multilevel Relationship has now been saved and can be used to build a DCP table.

That’s it! We appreciate your feedback! Please share your thoughts by sending an email to support@mscrm-addons.com.

Was this helpful?

1 Yes  No
Related Articles
  • Ensuring correct time zone display for DateTime fields
  • How to compare a date-fields with the current date 
  • Create a template for XML or plain text
  • E-Invoicing with DocumentsCorePack
  • How to add content from SharePoint to a document
  • Using MS Word field codes in DocumentsCorePack templates
Latest Articles
  • Document Generation via Copilot in Dynamics 365 Sales using DocumentsCorePack
  • DocumentsCorePack: Best practices for Dynamics 365 on-premises to online migration projects
  • Multilingual Support in DocumentsCorePack
  • Recap: ColorCloud 2025
  • Configure DocumentsCorePack within custom pages
Popular Articles
  • DocumentsCorePack Template Designer – Getting Started
  • Step-by-Step: How to configure a One-Click-Action
  • Application Access for Dynamics 365
  • How to find your environment’s unique name in Microsoft Dynamics 365
  • How licenses are counted
Top Rated Articles
  • “Undefined”-labels in Chrome and Edge 114 and higher
  • Important information for Dynamics 365 online customers using DocumentsCorePack and/or AttachmentExtractor
  • How to activate the DocumentsCorePack Connector for PowerApps & Microsoft Flow
  • How licenses are counted
  • How to insert Condition Fields in DocumentsCorePack Templates designer
Categories
  • *News and General Infos* 62
  • Webinars 45
  • Template Designer(DCP 196
  • DocumentsCorePack(DCP 251
  • TelephoneIntegration (TI 65
  • AttachmentExtractor (AE 72
  • PowerSearch (PS 50
  • ActivityTools (AT 61
  • SmartBar (SB 54
  • GroupCalendar (GC 47
Our Vision

“We see it as our purpose to provide products that simplify and speed up our customers’ Microsoft Dynamics 365 experience.”

Knowledgebase
LogIn
mscrm-addons.com
  • Products
  • Online Shop
  • Downloads
  • My Account
About Us
  • About Us
  • Case Studies
  • Newsletter
  • Partner Program
  • Contact
Support
  • Support
  • Terms & Conditions
  • Documentation
  • Webinars
  • Legal Documents
  • Impressum
  • © 2022 www.mscrm-addons.com. All Rights Reserved.