• Release History
  • Documentation
  • Back to www.mscrm-addons.com
  • Release History
  • Documentation
  • Back to www.mscrm-addons.com
home/Knowledge Base/DocumentsCorePack(DCP)/How to concatenate documents in a classic Dynamics 365 workflow

How to concatenate documents in a classic Dynamics 365 workflow

1037 views 0 Updated on November 6, 2022

This article outlines how to concatenate different documents into one single document using a classic workflow in Dynamics 365.

Using the concatenate step, we can combine two or more documents to create a single Word document, regardless of file format or properties of the individual documents. If you first need more information on how to create workflow in MS Dynamics 365 online, please have a look at this article.

After you have created two or more documents that you would like to concatenate, you may want to give your newly created step a description ❶ to remind you of what it contains. Second, click on the Set Properties button ❷ in order to define the steps’ settings.


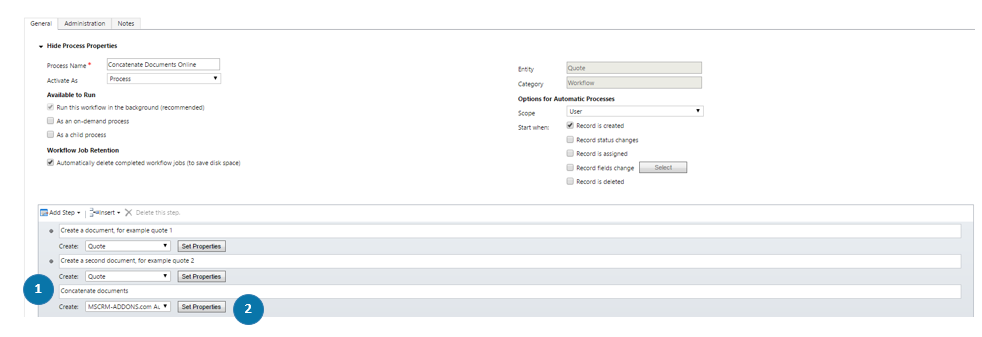
Figure 1: ConcatenateDocuments

The next window provides you with the ConcatenateDocument Properties.


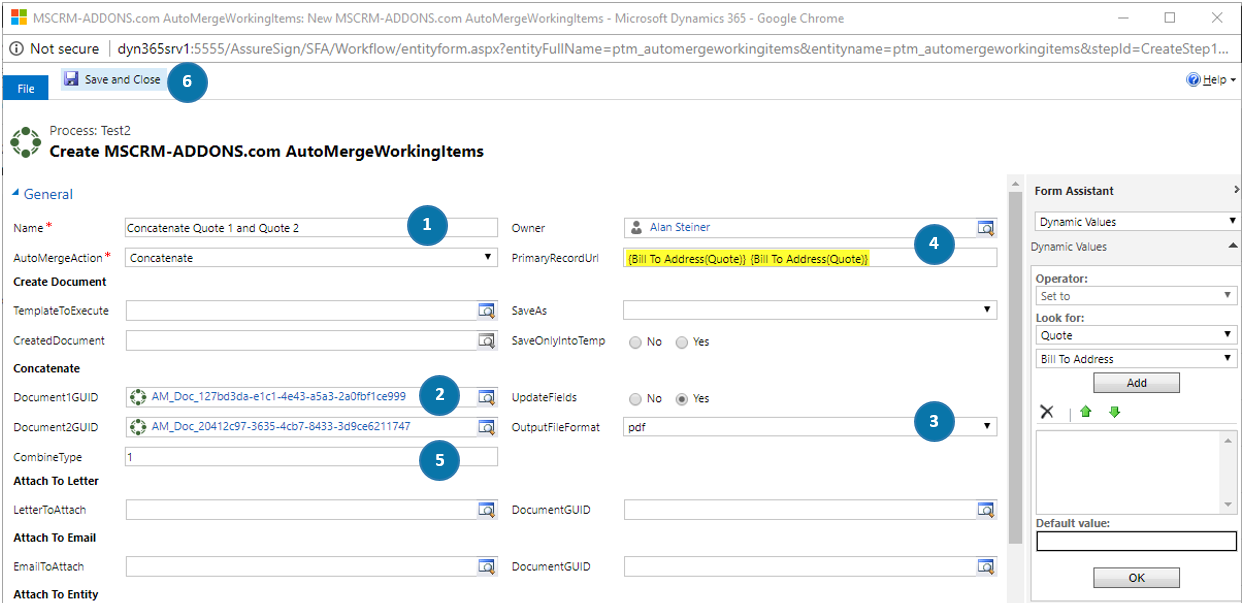
Figure 2: Create MSCRM-Addons.com AutoMerge Working item

The ConcatenateDocument properties provide the following possibilities:

❶ Name & AutoMergeAction
Please name the AutoMergeWorkingItem, which in this example is Concatenate Quote 1 and 2.

In the AutoMergeAction field, please select what you would like to do with this workflow, which in this example is Concatenate.

❷ Document1Guid & Document2Guid 
Document1Guid: This lookup provides the option to select the first document which should be concatenated. You can select an existing document by clicking on the lookup button, or you can use a document created in this workflow (as shown in this example).

Document2Guid: Offering the same functionalities as Document1Guid, but this is the Document GUID for the second document you want to concatenate.

❸ UpdateFields & OutPutFileFormat
UpdateFields: Check Yes if you want to make sure that all the Word fields are updated once again after the merge process.

OutPutFileFormat: This option enables you to define the output file format for the result document.

❹ Owner & PrimaryRecordUrl
Owner: You can enter an owner of the document here.

PrimaryRecordUrl: You can enter a PrivmaryRecordURL by using the Form Assistant on the right side of the screen. To find more information on the PrimaryRecordUrl functionality, please have a look at this article.

❺ CombineType
You can use the CombineType to specify how the second document will be inserted into the first document. Follow this link for more information about different CombineTypes.

Please notice: You must fill in a CombineType – otherwise, there will be an error.

[OPTIONAL: If you want to concatenate more than two documents, simply repeat the above steps. As for the sequence: If you create a new step, the already concatenated documents will always be the first in line. All further documents will be concatenated in a consecutive order.]

❻ Save and Close
Once you have finished, do not forget to save your changes!

That’s it! We appreciate your feedback! Please share your thoughts by sending an email to support@mscrm-addons.com.

​

You have to fill in the field CombineType, otherwise there will be an error
In addition, the link to the previous section is deactivated here.

Was this helpful?

Yes  No
Related Articles
  • DocumentsCorePack: Best practices for Dynamics 365 on-premises to online migration projects
  • Multilingual Support in DocumentsCorePack
  • Configure DocumentsCorePack within custom pages
  • Ensuring correct time zone display for DateTime fields
  • Document Generation Failure from Missing Privileges
  • Building Custom XML for Multipart documents
Latest Articles
  • DocumentsCorePack: Best practices for Dynamics 365 on-premises to online migration projects
  • Multilingual Support in DocumentsCorePack
  • Recap: ColorCloud 2025
  • Configure DocumentsCorePack within custom pages
  • AI-Powered Document Generation with Copilot in Sales
Popular Articles
  • DocumentsCorePack Template Designer – Getting Started
  • Step-by-Step: How to configure a One-Click-Action
  • Application Access for Dynamics 365
  • How to find your environment’s unique name in Microsoft Dynamics 365
  • How licenses are counted
Top Rated Articles
  • “Undefined”-labels in Chrome and Edge 114 and higher
  • Important information for Dynamics 365 online customers using DocumentsCorePack and/or AttachmentExtractor
  • How to activate the DocumentsCorePack Connector for PowerApps & Microsoft Flow
  • How licenses are counted
  • How to insert Condition Fields in DocumentsCorePack Templates designer
Categories
  • *News and General Infos* 62
  • Webinars 44
  • Template Designer(DCP 196
  • DocumentsCorePack(DCP 250
  • TelephoneIntegration (TI 65
  • AttachmentExtractor (AE 72
  • PowerSearch (PS 50
  • ActivityTools (AT 61
  • SmartBar (SB 54
  • GroupCalendar (GC 47
Our Vision

“We see it as our purpose to provide products that simplify and speed up our customers’ Microsoft Dynamics 365 experience.”

Knowledgebase
LogIn
mscrm-addons.com
  • Products
  • Online Shop
  • Downloads
  • My Account
About Us
  • About Us
  • Case Studies
  • Newsletter
  • Partner Program
  • Contact
Support
  • Support
  • Terms & Conditions
  • Documentation
  • Webinars
  • Legal Documents
  • Impressum
  • © 2022 www.mscrm-addons.com. All Rights Reserved.