• Release History
  • Documentation
  • Back to www.mscrm-addons.com
  • Release History
  • Documentation
  • Back to www.mscrm-addons.com
home/Knowledge Base/Template Designer(DCP)/How to create a custom QR Code (Example based on the Swiss QR Code)

How to create a custom QR Code (Example based on the Swiss QR Code)

355 views 0 Updated on March 16, 2023

This article explains how to create a custom QR Code with DocumentsCorePack TemplateDesigner. This example outlines the creation of a QR Code based on the Swiss QR Code design.

How to create a custom QR Code

1. First you need to insert a QR Code field. If you do not know how to insert a field, have a look at this article.

The Insert QR Code Field button.
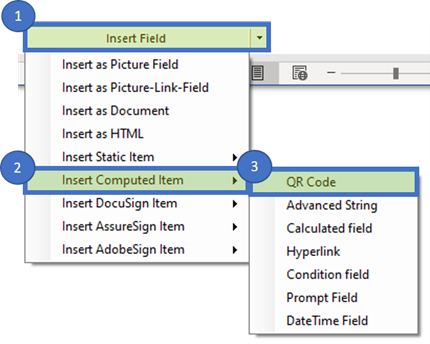
Figure 1: Insert QR Code field

2. The QR Code properties window opens and now you can enter the QR Code content.

❶ In this step you need to add some information to the QR code, such as the information someone would see after scanning the code. If you would like to add a logo to the QR code, it is recommended to use the error correction property.

❷ Error correction in a QR Code helps it remain scannable even if it is damaged up to 30%. You should choose at least level M or higher when adding a logo to your QR Code. This will preserve and enhance the scannability of a high number of rows and columns of data modules in your QR Code.

Continue with OK.

Please note:

  • You have to enter a plus sign (+)  between your entries, otherwise you will receive an error message.
  • Fixed text must be typed manually into the text field and must be enclosed by single quotes ( ‘ ).

Learn more about the DCP Property Syntax here.

Enter content for the QR Code with proper syntax.
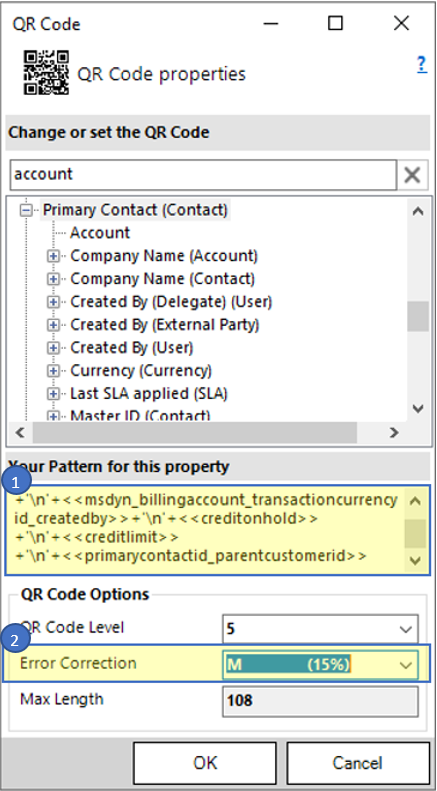
Figure 2: Enter Content to QR code

3. A QR Code will be created in the template.

A sample created QR Code.
Figure 3: Adding content to QR code

How to add a logo image

You first need to insert an image into your template to add a logo to your QR Code.

Please note: Here are the details and specifications that need to be followed for the logo image to work:

  • Format – PNG
  • Hight – 166 pixels (0,7 cm)
  • Width – 166 pixels (0,7 cm)

A sample logo image.
Figure 4: Example Image

You can find a guideline here to define the content of a QR Code that can be used to initiate SEPA credit transfer.

Place the logo image on top of the QR Code. Use the In Front of Text layout option to do this.

Use the "In Front of Text" layout option to place the logo image on top of the QR Code.
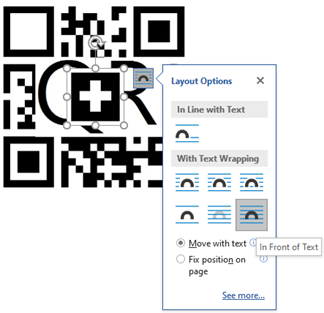
Figure 5: Layout Options

The QR code is now ready to be merged.

Sample QR Code ready to be merged.
Figure 6: Ready to be merged

Save template

Before you can use or test your template, you must save it. You can either save your template locally with the standard Save or Save as functionality of Word, or you use the Save template option of the DocumentsCorePack TemplateDesigner to publish the template to Dynamics 365.

Merge and test template

As you make changes to your template, you may want to test them quickly. Here is a brief explanation of how to do this.

A result QR Code will look like the image below.

Sample result QR Code.
Figure 7: Successful result of a custon/design QR-Code

Now you can read your QR Code with any QR Code reader.

Sample result QR Code on a Mobile device.
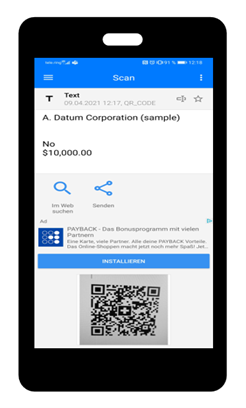
Figure 8: QR-Code result on your mobile device.

That’s it! We appreciate your feedback! Please share your thoughts by sending an email to support@mscrm-addons.com.

Was this helpful?

Yes  No
Related Articles
  • How to update the metadata in the DocumentsCorePack Template Designer
  • Working with Product Properties in DocumentsCorePack
  • How to work with the Relationship Manager
  • Using virtual tables in DocumentsCorePack
  • DocumentsCorePack Template Designer Settings
  • How to solve: Failed to connect to an IPC Port
Leave A Comment Cancel reply

You must be logged in to post a comment.

Latest Articles
  • How to share the Connection of the DocumentsCorePack Connector
  • How to update the metadata in the DocumentsCorePack Template Designer
  • Working with Product Properties in DocumentsCorePack
  • How to work with the Relationship Manager
  • Using virtual tables in DocumentsCorePack
Popular Articles
  • Where do I find the Unique Organization name in Microsoft Dynamics 365?
  • DocumentsCorePack Template Designer – Getting Started
  • mscrm-addons.com Application Access for Dynamics 365 (App Access) – DocumentsCorePack
  • DocumentsCorePack Online Service Configuration
  • Step-by-Step: How to configure a One-Click-Action
Top Rated Articles
  • IMPORTANT information for Dynamics 365 online customers using DocumentsCorePack and/or AttachmentExtractor
  • How to activate the DocumentsCorePack connector for PowerApps & Microsoft Flow
  • Step-by-Step: How to configure a One-Click-Action
  • Online Services: Required Application Permissions
  • Where do I find the Unique Organization name in Microsoft Dynamics 365?
Categories
  • *News and General Infos* 51
  • Webinars 35
  • Template Designer(DCP 179
  • DocumentsCorePack(DCP 192
  • TelephoneIntegration (TI 65
  • AttachmentExtractor (AE 62
  • PowerSearch (PS 48
  • ActivityTools (AT 59
  • SmartBar (SB 53
  • GroupCalendar (GC 46
Our Vision

“We see it as our purpose to provide products that simplify and speed up our customers’ Microsoft Dynamics 365 experience.”

Knowledgebase
LogIn
mscrm-addons.com
  • Products
  • Online Shop
  • Downloads
  • My Account
About Us
  • About Us
  • Case Studies
  • Newsletter
  • Partner Program
  • Contact
Support
  • Support
  • Terms & Conditions
  • Documentation
  • Webinars
  • Legal Documents
  • Impressum
  • © 2022 www.mscrm-addons.com. All Rights Reserved.