• Release History
  • Documentation
  • Back to www.mscrm-addons.com
  • Release History
  • Documentation
  • Back to www.mscrm-addons.com
home/Knowledge Base/DocumentsCorePack(DCP)/How to create a document and sign it with AdobeSign in a Workflow

How to create a document and sign it with AdobeSign in a Workflow

482 views 0 Updated on July 25, 2022

This article shows how to create a Dynamics CRM workflow which creates and sends a document for e-Signing using the Adobe Sign integration of DocumentsCorePack.

Open your Microsoft Dynamics 365, navigate to Settings and select Processes.


Figure 1: Dynamics 365 > Settings > Processes

You are now on the surface below. Here you can generate a new process by clicking the [New]-button (highlighted).


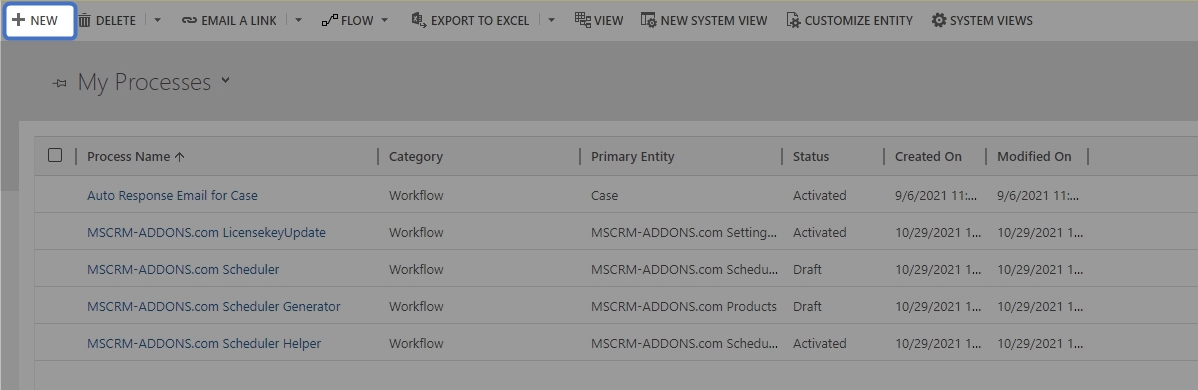
Figure 2: Add new process

You can create your process like you usually do in Dynamics 365. However, it is necessary to select Workflow as Category and proceed by clicking the [OK]-button. 


Figure 3: Create process

After customizing the properties of your Workflow, click on the [Add Step]-button and choose “Create Record“, like you can see below.
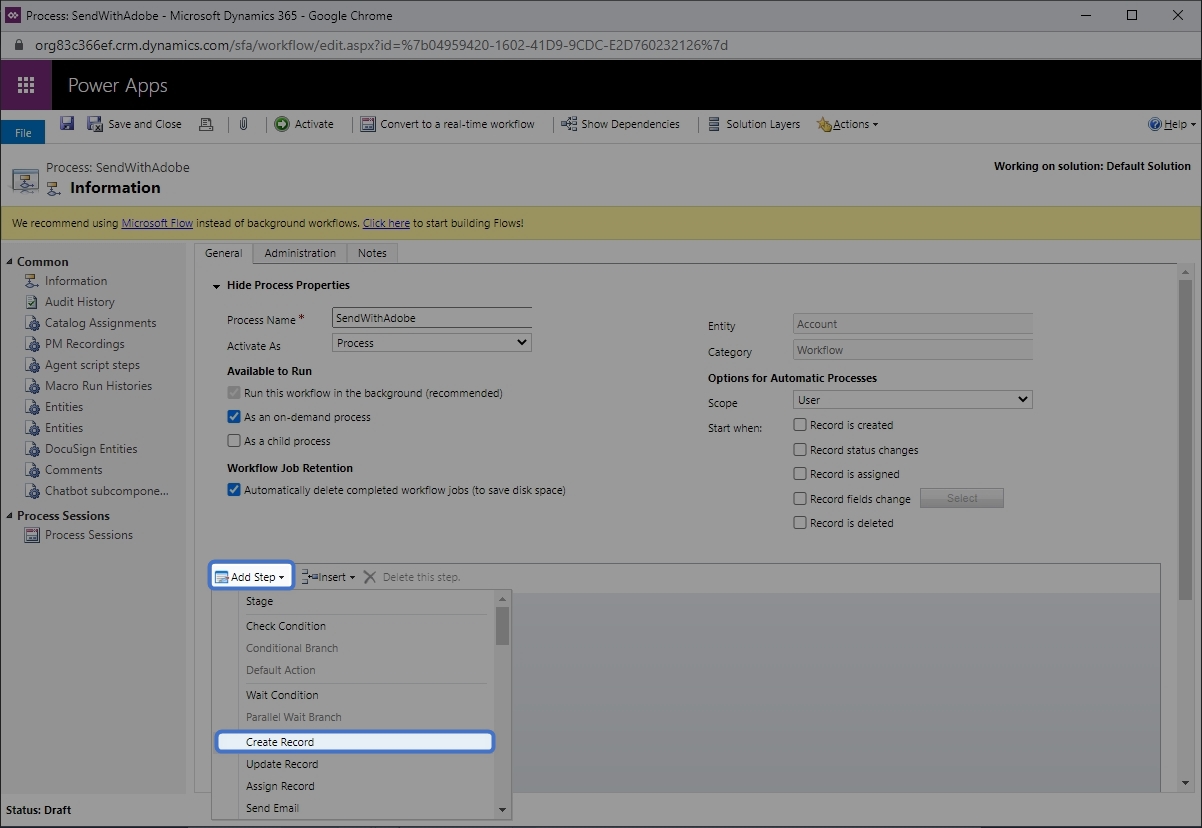

Figure 4: Add step

❶ Next, open the drop-down menu of the Create field and select MSCRM- ADDONS.com AutoMergeWorkingItems. You can also type a description of your step into the highlighted field.


Figure 5: MSCRM- ADDONS.com AutoMergeWorkingItems

A click on the ❷ [Set Properties]-button will provide you with the window below.


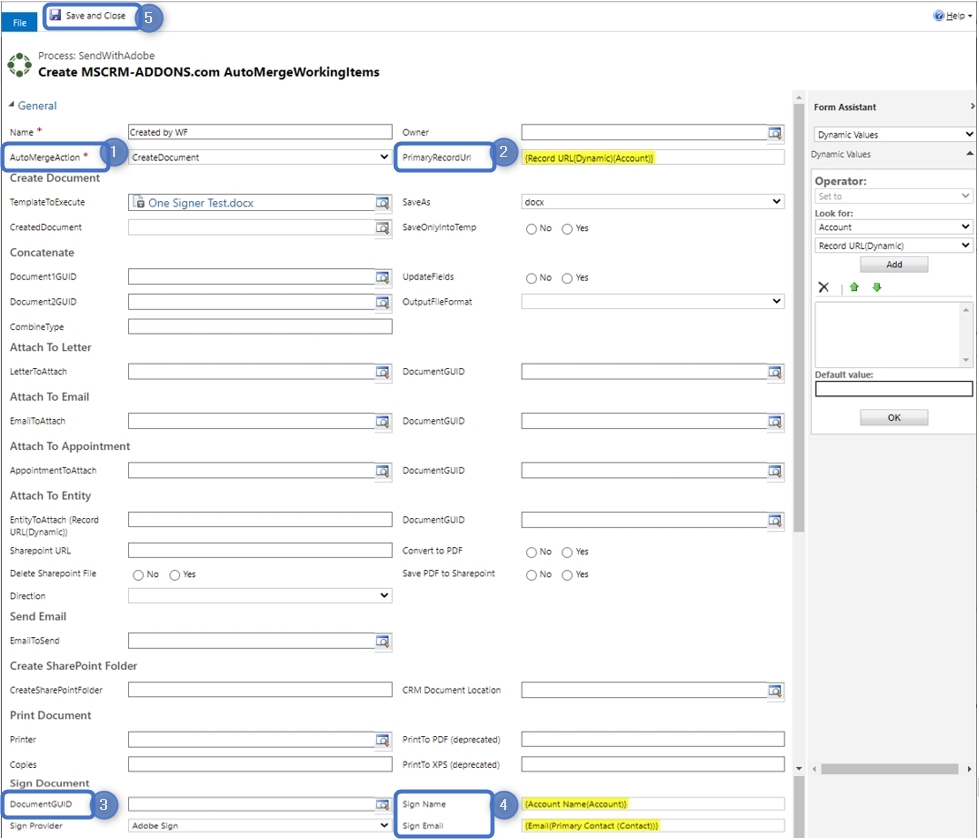
Figure 6: Set properties

❶ Type in the name of your step and select an AutoMergeAction, in this case Create Document.

❷ Next, you will have to define the PrimaryRecordUrl. You will first have to click into the field, which will be unfilled at first. Navigate to the “Form Assistant” on the right side and open the drop-down menu (below Look for) and select “Account“. Then open the drop-down menu below and select Record URL (Dynamic). Click on the [Add]-button and it will be added to the field below. You can also define a default value. Finally click the [OK]-button and your PrimaryRecordUrl will be automatically filled with the right URL, marked in yellow.

❸ Scroll down to the Sign document area and do the same as in step 2 to add the DocumentGUID. Select AdobeSign as Sign Provider.

❹ Then type in the Name and Email of the recipient.
Please note: You can add more than one recipient by using the vertical bar ( | ) between the Names and the Emails, for example Max Power|John Smith. It is important when your template provides more than one person to sign.

❺ This step starts the main signing workflow. “Save and Close” this window.

Finally, you must activate your workflow to use it, because this is just a draft, so, please click the [Activate]-button.


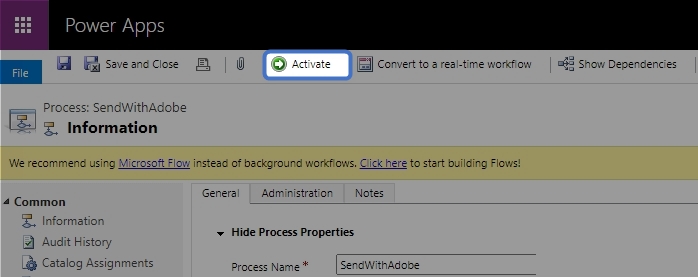
Figure 7: Activate Workflow

That’s it! We appreciate your feedback! Please share your thoughts by sending an email to support@mscrm-addons.com.

Was this helpful?

Yes  No
Related Articles
  • How to share the Connection of the DocumentsCorePack Connector
  • AssureSign for DocumentsCorePack
  • How to conditionally remove a watermark in DocumentsCorePack templates
  • Document Processing with DocumentsCorePack (DCP)
  • How to activate SharePoint in DocumentsCorePack
  • Fillable PDF forms
Leave A Comment Cancel reply

You must be logged in to post a comment.

Latest Articles
  • How to share the Connection of the DocumentsCorePack Connector
  • How to update the metadata in the DocumentsCorePack Template Designer
  • Working with Product Properties in DocumentsCorePack
  • How to work with the Relationship Manager
  • Using virtual tables in DocumentsCorePack
Popular Articles
  • Where do I find the Unique Organization name in Microsoft Dynamics 365?
  • DocumentsCorePack Template Designer – Getting Started
  • mscrm-addons.com Application Access for Dynamics 365 (App Access) – DocumentsCorePack
  • DocumentsCorePack Online Service Configuration
  • Step-by-Step: How to configure a One-Click-Action
Top Rated Articles
  • IMPORTANT information for Dynamics 365 online customers using DocumentsCorePack and/or AttachmentExtractor
  • How to activate the DocumentsCorePack connector for PowerApps & Microsoft Flow
  • Step-by-Step: How to configure a One-Click-Action
  • Online Services: Required Application Permissions
  • Where do I find the Unique Organization name in Microsoft Dynamics 365?
Categories
  • *News and General Infos* 51
  • Webinars 35
  • Template Designer(DCP 179
  • DocumentsCorePack(DCP 192
  • TelephoneIntegration (TI 65
  • AttachmentExtractor (AE 62
  • PowerSearch (PS 48
  • ActivityTools (AT 59
  • SmartBar (SB 53
  • GroupCalendar (GC 46
Our Vision

“We see it as our purpose to provide products that simplify and speed up our customers’ Microsoft Dynamics 365 experience.”

Knowledgebase
LogIn
mscrm-addons.com
  • Products
  • Online Shop
  • Downloads
  • My Account
About Us
  • About Us
  • Case Studies
  • Newsletter
  • Partner Program
  • Contact
Support
  • Support
  • Terms & Conditions
  • Documentation
  • Webinars
  • Legal Documents
  • Impressum
  • © 2022 www.mscrm-addons.com. All Rights Reserved.