It is possible to automate the creation of SharePoint folders and subfolders with DocumentsCorePack (DCP). This article shows how to setup automatic folder creation via classic Dynamics 365 on-premise workflows.
Step-by-Step description: Automatically generate folders for created accounts.
Step 1: Create a new Workflow for the Account table.

Step 2: Define the following settings.
- Process Name: CreateFolder
- Activate as: Process
- Entity: Account
- Category: Workflow

Step 3: This window opens. Add the next step Create Record to your workflow and name it (for example, Create Folder) and look for the AutoMergeWF:CreateSharePointFolder.

Step 4: Open the [Set Properties]. In the following window, define the SharePoint location, folder(s) and subfolder(s).

Syntax:
- “;” separate list of folders
- “/” creates subfolders
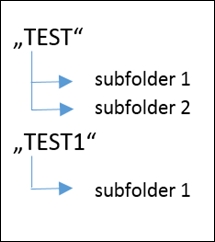
Example:
TEST/subfolder 1;TEST/subfolder 2;TEST1/subfolder 1
Creates folders as follows:
Step 8: Now you have to activate the process.

Then click the [Activate] button again to confirm the process.

Execute workflow:
Create a new account in your system. Once the workflow is finished you should see the following folder structure on the newly created document location for the account.

That’s it! We appreciate your feedback! Please share your thoughts by sending an email to support@mscrm-addons.com.