• Release History
  • Documentation
  • Back to www.mscrm-addons.com
  • Release History
  • Documentation
  • Back to www.mscrm-addons.com
home/Knowledge Base/PowerSearch (PS)/How to enable debugging for PowerSearch

How to enable debugging for PowerSearch

54 views 0 Updated on July 27, 2022

+++++++++++++++++++++++++++++++++++++++++++++++++++
Please note:
This article applies to PowerSearch in MS Dyn CRM 2015/2016.
+++++++++++++++++++++++++++++++++++++++++++++++++++

How to activate debugging via the MSCRM-ADDONS.com Settingskeys
Step-by-step description

Navigate to Settings in Microsoft Dynamics CRM.

image

Figure 1: MsDynCRM Settings

In the Settings, select MSCRM-ADDONS.com Products in the extension area.

image

Figure 2: Settings extension

This action will open a list of active MSCRM-ADDONS.com Products. Select PowerSearch with a double-click.


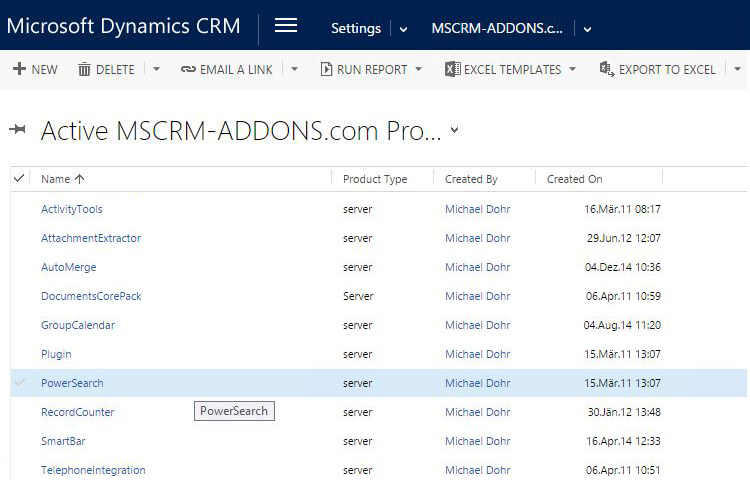
Figure 3: Select PowerSearch

In the so opened window, look for debugPlugin.

image

Figure 4: PowerSearch debugPlugin

If a result is found double click on it and set the KeyValue on true.

image

Figure 5: Set the KeyValue

If no setting with this name is found, you have to create a new Settingskey. To do so, please click on the drop-down-button next to PowerSearch in the CRM ribbon and select MSCRM-ADDONS.COM Settingskey.
In the so opened window, click on the [+ADD NEW MSCRM-ADDONS.com Settingskey]-button.

image

Figure 6: Add new mscrm-addons.com settingskey

Now create a new Settingskey with the following values and save your settings.

image

Figure 7: Newly created settingskey

Step-by-step description on how to acces the log files

The log files will be stored in the MSCRM-ADDONS.com Debug-entity. The easiest way to access it, is by using the Advanced Find.

image

Figure 8: Advanced Find

Open the Advanced Find. Select the MSCRM-ADDONS.com Debug-entity and include the following condition Name must Contain PTMPowerSearch. This ensures that only PowerSearch log files will be retrieved. Then click on Results.

image

Figure 9: Configure Advanced Find

The following window opens.

clip_image002

Figure 10: Edit Columns window

Use the Add Columns-functionality and add the ptm_message-field to the grid. Press the [OK]-button in order to proceed.

clip_image004

Figure 11: Add Columns window

Back in the main dialog, click on the [Results]-button.

Next, delete all retrieved debug records. Another way is to select the debug file by the Created On-date. Then reproduce the error and refresh the result list of this Advanced Find. This ensures that you only have the latest and relavant log files. Select all records and hit Export MSCRM-ADDONS.com Debug.

image

Figure 12: Select the debug file by the created on-date

In the next dialog, check Static worksheet … and press the [Export]-button.

Please send the excel log-file with a short error description and a screenshot to our support address support@mscrm-addons.com

That’s it! We appreciate your feedback! Please share your thoughts by sending an email to support@mscrm-addons.com.

Was this helpful?

Yes  No
Related Articles
  • How to activate per User Licensing in CRM 2011
  • Final PowerSearch installation steps after MS AppSource download
  • How to use Tolerance Control for number search fields in PowerSearch
  • PowerSearch – How to install license with subscription number/ID 
  • PowerSearch – How to install the license key for perpetual License
  • How to access mscrm-addons product settings in Dynamics 365
Latest Articles
  • New DocumentsCorePack Connector features for Power Automate
  • Office Theme Support of DocumentsCorePack
  • AssureSign for DocumentsCorePack
  • Dynamic Document Properties
  • How to conditionally remove a watermark in DocumentsCorePack templates
Popular Articles
  • Where do I find the Unique Organization name in Microsoft Dynamics 365?
  • DocumentsCorePack Online Service Configuration
  • mscrm-addons.com Application Access for Dynamics 365 (App Access) – DocumentsCorePack
  • DocumentsCorePack Template Designer – Getting Started
  • Step-by-Step: How to configure a One-Click-Action
Top Rated Articles
  • IMPORTANT information for Dynamics 365 online customers using DocumentsCorePack and/or AttachmentExtractor
  • How to activate the DocumentsCorePack connector for PowerApps & Microsoft Flow
  • Step-by-Step: How to configure a One-Click-Action
  • Online Services: Required Application Permissions
  • How licenses are counted
Categories
  • *News and General Infos* 51
  • Webinars 35
  • Template Designer(DCP 173
  • DocumentsCorePack(DCP 191
  • TelephoneIntegration (TI 65
  • AttachmentExtractor (AE 62
  • PowerSearch (PS 48
  • ActivityTools (AT 59
  • SmartBar (SB 53
  • GroupCalendar (GC 46
Our Vision

“We see it as our purpose to provide products that simplify and speed up our customers’ Microsoft Dynamics 365 experience.”

Knowledgebase
LogIn
mscrm-addons.com
  • Products
  • Online Shop
  • Downloads
  • My Account
About Us
  • About Us
  • Case Studies
  • Newsletter
  • Partner Program
  • Contact
Support
  • Support
  • Terms & Conditions
  • Documentation
  • Webinars
  • Legal Documents
  • Impressum
  • © 2022 www.mscrm-addons.com. All Rights Reserved.