This article explains how to enable the Click2Dial-functionality of TelephoneIntegration (TI) for CRM 2013/2015/2016 and Dynamics 365 without using the CallNumber button in the ribbon.
This feature allows you to start an outgoing call through hitting directly on a telephone number in the CRM form via the TI Client. CRM already has a builtin Click2Dial feature, but its use is limited only to Skype or Skype for Business (Lync) client.
Instead of calling via the default Skype or Lync client, we can alter it so that the call is triggered over our TI Client/default communication plugin.
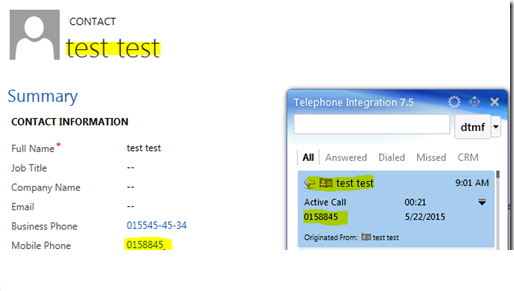
Figure 1: Extended Click2Dial functionality (example)
How to extend the Click2Dial functionality for TI?
1) To enable the functionality, open CRM > Settings > Customizations > Customize the System.
In the next window select Web Resources in the tree-view and click on the [New]-button.

Figure 2: Web Resources Window in CRM
2) Use the next window to create a new web resource. The name does not really matter. Here, we use new_ PTMTIReplaceCallHandler. The important settings are the Type and the Script.
3) Next, download the below file, unzip it and upload the script.
For Dynamics 365 v. 9 new UCI only – take this: PTMTIReplaceCallHandlerDyn365v9_UCI.zip
For Dynamics 365 – take this: PTMTIReplaceCallHandlerDyn365.zip
For older CRM versions – take this:: PTMTIReplaceCallHandler.zip
4) Once done so, click on the [Save]-button and afterward on the [Publish]-button.

Figure 3: Create new web resource
5) Next, open a CRM record for which you want to enable this feature. (here: Contact) Here, open the Form-Editor.

Figure 4: Open form-editor in the entity Contact
6) Now click on the [Form Properties]-button.

Figure 5: Open the Form Properties – dialog
7) In the Form Properties-dialog, the before created web resource must be selected. Click on the upper [+Add]-button (in the Form Libraries – section) and a Look-up record-window will pop up.
After the web resource has been selected, click on the [Add]-button in the Look-up record-window.

Figure 6: Form Properties-dialog (background) and Look-up record-window
8) Back in the Form Properties-dialog, we must define the Start-function of the script. To do so, click on the lower [+Add]-button (in the Event Handlers-section). Now select the web resource and type in the function name (here PTM_TIStartReplaceCallHandler).
If you use the script for “Dynamics 365 v. 9 new UCI only” it is important to check “Pass execution context as first parameter“.
Click on the [OK]-button.

Figure 7: Handler Properties
9) Finally, the Form Properties-dialog will look like this:

Figure 8: Customized Form Properties-dialog
10) To complete the configuration, click on the [OK]-button. Then click on the [Save]-button and afterward on the [Publish]-button in the form editor.

Figure 9: Save and Publish
After reloading Contact in CRM (press F5), the Click2ToDial-functionality will be enabled.
Please note: If you want to enable this feature on additional forms, you simply have to select the corresponding web resource and define the corresponding start-function.
Trouble Shooting
This section is only relevant for you if dialing out does not work as expected when clicking a number directly in the form.
First please make sure that dialing out by hitting the default TI button works as expected:
Only if this is the case it has to be a problem with the Click2Dial script.
Then follow these steps to get more information.
Add the “debug:true” text to the function call, as you can see in the figure below:
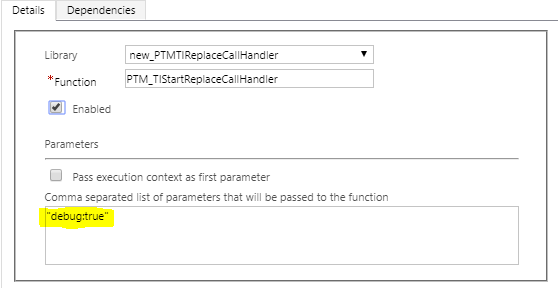
Figure 11: Add the “debug:true” text to the function call
Next, save and publish.
After reloading the entity record you will see alerts on page load and on click of a number, like:

Please note that every CRM user using this form will get these alerts.
That’s it! We appreciate your feedback! Please share your thoughts by sending an email to support@mscrm-addons.com.
reworkneeded … it needs to be updated with pictures for Dynamics 365 – the call number button and the balloon.