• Release History
  • Documentation
  • Back to www.mscrm-addons.com
  • Release History
  • Documentation
  • Back to www.mscrm-addons.com
home/Knowledge Base/Template Designer(DCP)/How to group tables in DocumentsCorePack Templates

How to group tables in DocumentsCorePack Templates

1470 views 2 Updated on March 2, 2023

This blog article outlines how to group tables in DocumentsCorePack (.docx) templates. Grouping a table allows you to separate the line items within the table by a specific attribute, such as e.g. Product type.

Example: Our Product catalog consists of Product licenses as well as Services. When printing a quote, we want the items to be grouped in separate sections within a table.

Please note: If the grouping headers are displayed repeatedly or are mixed, you need to ensure that the line items are sorted by the grouping attribute. In short, you have to make sure that the grouping field is also the selected sorting field (See this article for details).

If you need more information on creating relationships using the DocumentsCorePack (DCP) TemplateDesigner, have a look at this article.

Step-by-step description

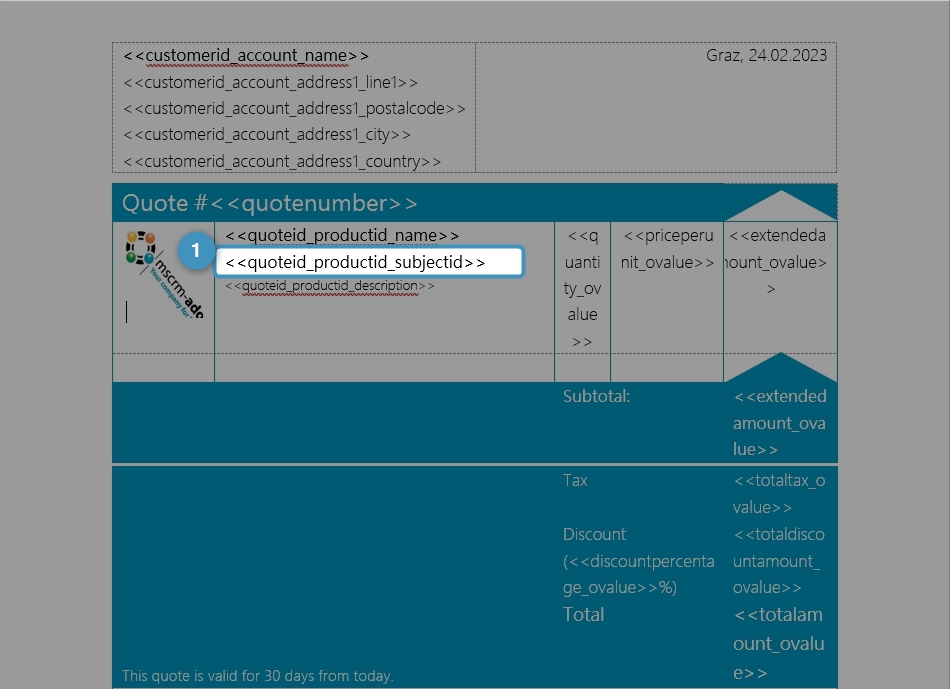
Step 1. After inserting the table into your document, you will have to ensure that ❶ the field you want to group-by has been inserted into the table row. Once done, select the field for grouping. In our example, we use the “Subject”-column of the Product table.

Select the field for grouping.
Figure 1: Selecting the grouping field

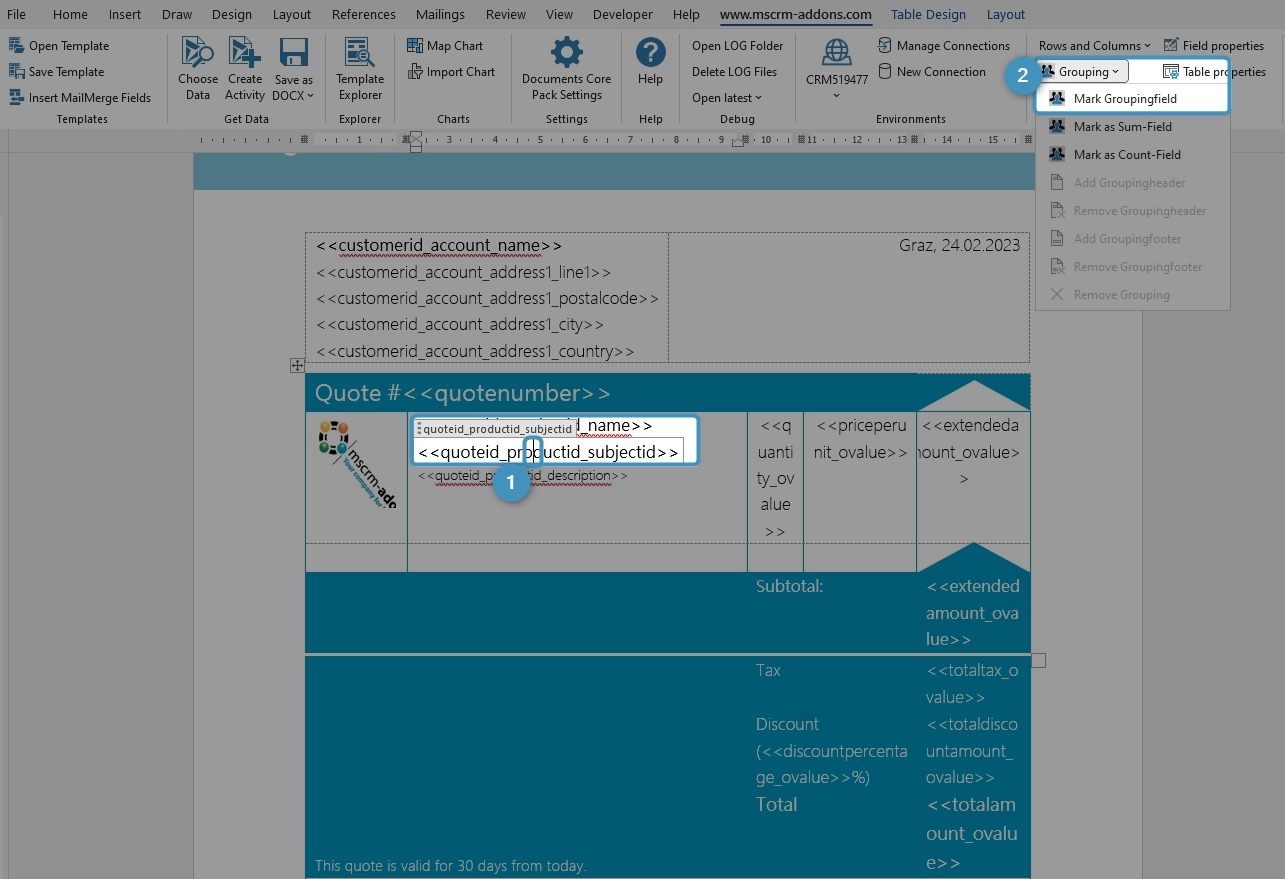
Step 2. Now put the ❶ cursor in the field you want to group and navigate to the Grouping drop-down and select ❷ Mark Grouping field.

Select in the Grouping drop-down the Mark Grouping field.
Figure 2: Put the cursor in the field, that should be marked as Gouping-field

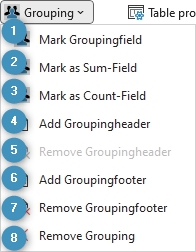
More Grouping options:

❶ Mark Groupingfield: This function specifies the selected field as the grouping parameter. The header and Footer to specify details are inserted automatically.
❷ Mark as Sum-Field: This function specifies the selected field as the sum field. This allows e.g. create totals of a group in a table -footer.(See this article for details)
❸ Mark as Count-Field: This function counts, for example, the number of products in a table.
❹ Add Groupingheader: This function adds an additional header.
❺ Remove Groupingheader: This function removes a header you added before.
❻ Add Groupingfooter: This function adds an additional footer.
❼ Remove Groupingfooter: This function removes a footer you added before.
❽ Remove Grouping: This function allows you to remove the entire grouping for a selected table.

The Grouping options.
Figure 3: All Grouping options

Step 3. Once clicked, a ❶ Header and a ❷ Footer row are automatically created. You can change the layout and formatting for your groups.
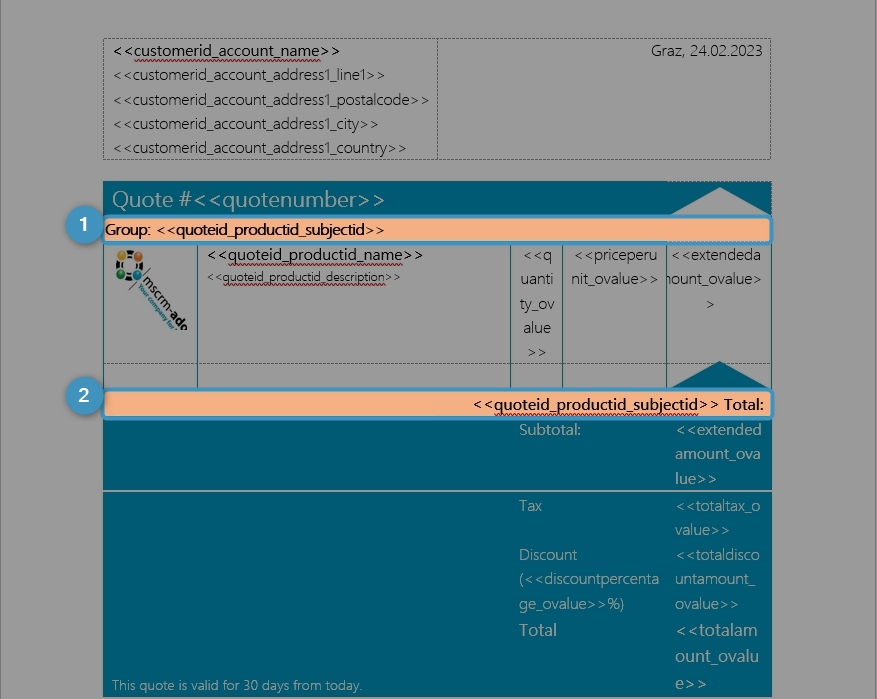
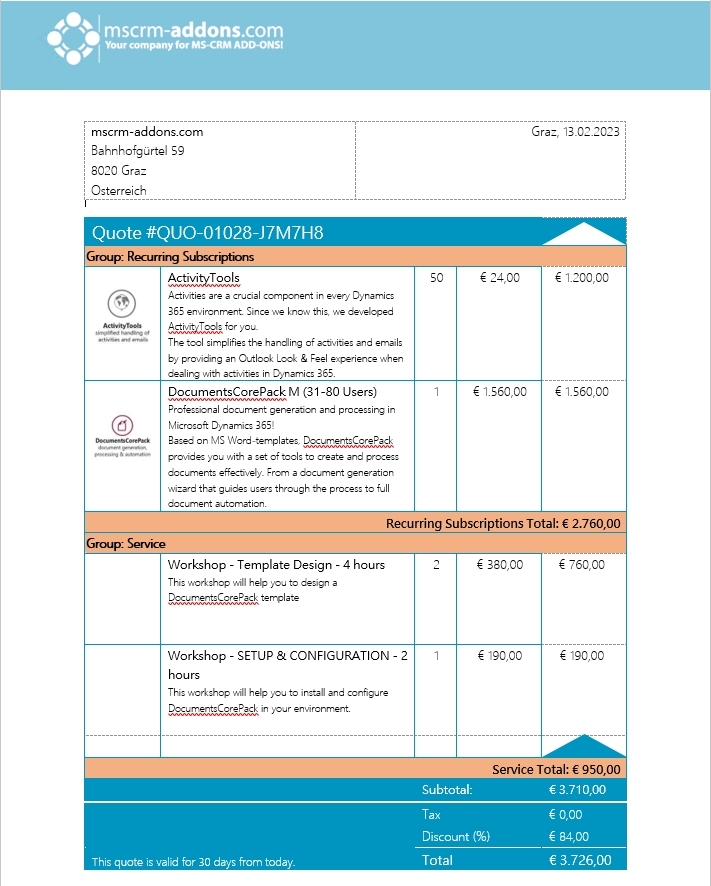
Header and Footer are created after marking as Groupingfield.
Figure 4: Header and Footer are created after marking as Groupingfield

Step 4. The result.

A sample Grouping result.
Figure 5: Grouping Result

That’s it! We appreciate your feedback! Please share your thoughts by sending an email to support@mscrm-addons.com.

Was this helpful?

2 Yes  3 No
Related Articles
  • How to update the metadata in the DocumentsCorePack Template Designer
  • Working with Product Properties in DocumentsCorePack
  • How to work with the Relationship Manager
  • Using virtual tables in DocumentsCorePack
  • DocumentsCorePack Template Designer Settings
  • How to solve: Failed to connect to an IPC Port
Latest Articles
  • How to share the Connection of the DocumentsCorePack Connector
  • How to update the metadata in the DocumentsCorePack Template Designer
  • Working with Product Properties in DocumentsCorePack
  • How to work with the Relationship Manager
  • Using virtual tables in DocumentsCorePack
Popular Articles
  • Where do I find the Unique Organization name in Microsoft Dynamics 365?
  • DocumentsCorePack Template Designer – Getting Started
  • mscrm-addons.com Application Access for Dynamics 365 (App Access) – DocumentsCorePack
  • DocumentsCorePack Online Service Configuration
  • Step-by-Step: How to configure a One-Click-Action
Top Rated Articles
  • IMPORTANT information for Dynamics 365 online customers using DocumentsCorePack and/or AttachmentExtractor
  • How to activate the DocumentsCorePack connector for PowerApps & Microsoft Flow
  • Step-by-Step: How to configure a One-Click-Action
  • Online Services: Required Application Permissions
  • Where do I find the Unique Organization name in Microsoft Dynamics 365?
Categories
  • *News and General Infos* 51
  • Webinars 35
  • Template Designer(DCP 179
  • DocumentsCorePack(DCP 192
  • TelephoneIntegration (TI 65
  • AttachmentExtractor (AE 62
  • PowerSearch (PS 48
  • ActivityTools (AT 59
  • SmartBar (SB 53
  • GroupCalendar (GC 46
Our Vision

“We see it as our purpose to provide products that simplify and speed up our customers’ Microsoft Dynamics 365 experience.”

Knowledgebase
LogIn
mscrm-addons.com
  • Products
  • Online Shop
  • Downloads
  • My Account
About Us
  • About Us
  • Case Studies
  • Newsletter
  • Partner Program
  • Contact
Support
  • Support
  • Terms & Conditions
  • Documentation
  • Webinars
  • Legal Documents
  • Impressum
  • © 2022 www.mscrm-addons.com. All Rights Reserved.