• Release History
  • Documentation
  • Back to www.mscrm-addons.com
  • Release History
  • Documentation
  • Back to www.mscrm-addons.com
home/Knowledge Base/Template Designer(DCP)/How to set a signing order for Adobe Sign

How to set a signing order for Adobe Sign

441 views 1 Updated on December 23, 2022

An electronic signature is data associated with electronic information that can be used to identify and verify the integrity of the signer or signature creator. Electronic information is usually electronic documents. From a technical point of view, the electronic signature fulfills the same purpose as a handwritten signature on paper documents.

To avoid all signer recipients receiving the e-mail at the same time, it is possible to change the signing order. Follow the step-by-step tutorial to do so.

Step 1: Open a Word document and navigate in the menu bar to www.mscrm-addons.com and click on Insert MailMerge Fields.

Select "Insert MailMerge Fields" in the menu bar of www.mscrm-addons.com in Word.

Step 2: The DocumentsCorePack TemplateDesigner opens. Press the [Advanced Template Settings] button.

Press the [Advanced Template Settings] button of the DCP Template Designer.

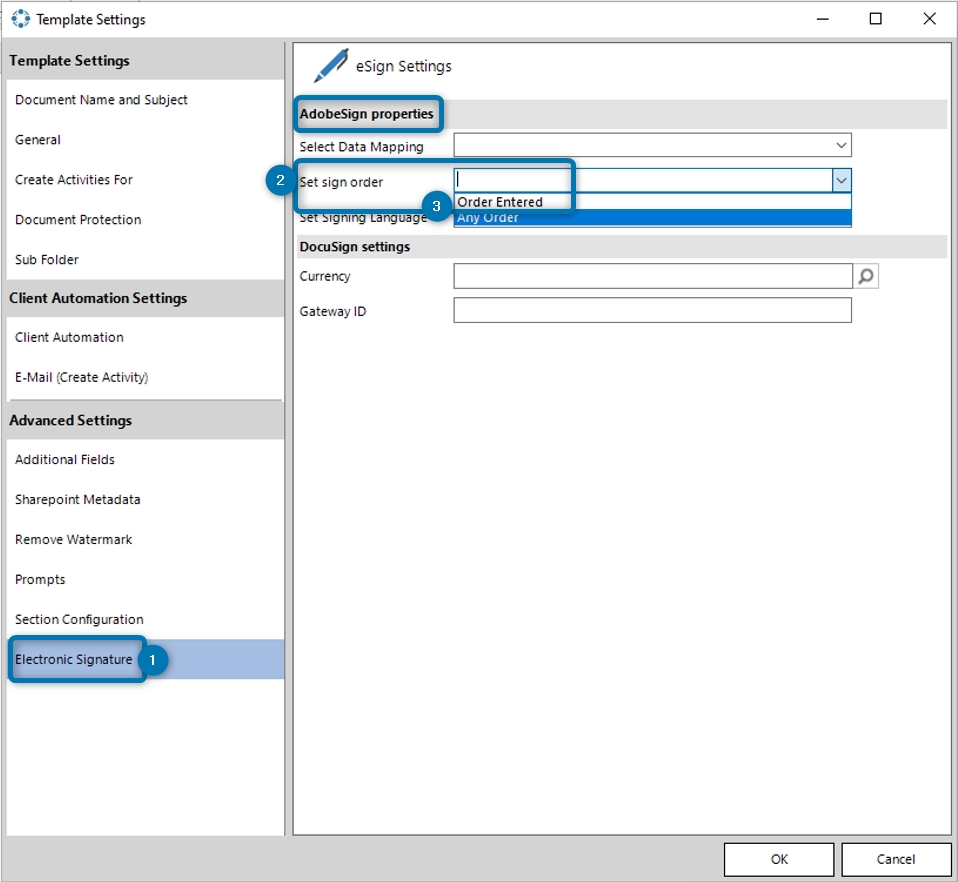
Step 3: The Template Settings window pops up. Navigate to the group ❶ Electronic Signature, find the option ❷ Set sign order and select ❸ Order Entered. Then the e-mails will be sent to the next person after signing.

Please note: The group Electronic Signature is only visible when Adobe Sign, DocuSign or AssureSign is installed.

Set the Signing order for the Electronic Signature.

Step 3: Save the template. Then start the signing process and send it to Adobe.

That´s it! We appreciate your feedback! Please share your thoughts by sending an email to support@mscrm-addons.com!

Was this helpful?

1 Yes  No
Related Articles
  • Ensuring correct time zone display for DateTime fields
  • How to compare a date-fields with the current date 
  • Create a template for XML or plain text
  • E-Invoicing with DocumentsCorePack
  • How to add content from SharePoint to a document
  • Using MS Word field codes in DocumentsCorePack templates
Leave A Comment Cancel reply

You must be logged in to post a comment.

Latest Articles
  • DocumentsCorePack: Best practices for Dynamics 365 on-premises to online migration projects
  • Multilingual Support in DocumentsCorePack
  • Recap: ColorCloud 2025
  • Configure DocumentsCorePack within custom pages
  • AI-Powered Document Generation with Copilot in Sales
Popular Articles
  • DocumentsCorePack Template Designer – Getting Started
  • Step-by-Step: How to configure a One-Click-Action
  • Application Access for Dynamics 365
  • How to find your environment’s unique name in Microsoft Dynamics 365
  • How licenses are counted
Top Rated Articles
  • “Undefined”-labels in Chrome and Edge 114 and higher
  • Important information for Dynamics 365 online customers using DocumentsCorePack and/or AttachmentExtractor
  • How to activate the DocumentsCorePack Connector for PowerApps & Microsoft Flow
  • How licenses are counted
  • How to insert Condition Fields in DocumentsCorePack Templates designer
Categories
  • *News and General Infos* 62
  • Webinars 44
  • Template Designer(DCP 196
  • DocumentsCorePack(DCP 250
  • TelephoneIntegration (TI 65
  • AttachmentExtractor (AE 72
  • PowerSearch (PS 50
  • ActivityTools (AT 61
  • SmartBar (SB 54
  • GroupCalendar (GC 47
Our Vision

“We see it as our purpose to provide products that simplify and speed up our customers’ Microsoft Dynamics 365 experience.”

Knowledgebase
LogIn
mscrm-addons.com
  • Products
  • Online Shop
  • Downloads
  • My Account
About Us
  • About Us
  • Case Studies
  • Newsletter
  • Partner Program
  • Contact
Support
  • Support
  • Terms & Conditions
  • Documentation
  • Webinars
  • Legal Documents
  • Impressum
  • © 2022 www.mscrm-addons.com. All Rights Reserved.