• Release History
  • Documentation
  • Back to www.mscrm-addons.com
  • Release History
  • Documentation
  • Back to www.mscrm-addons.com
home/Knowledge Base/Template Designer(DCP)/How to use the “Insert as picture field” functionality for a saved path to a File Share or SharePoint

How to use the “Insert as picture field” functionality for a saved path to a File Share or SharePoint

1048 views 0 Updated on March 31, 2023

This article outlines how to insert a picture in your DocumentsCorePack TemplateDesigner, for a saved path to a fileshare or to SharePoint.

How to prepare MS Dynamics 365 for the “Insert as picture field” functionality

Before you insert a picture field, you must first save a picture or a path to a file share/SharePoint in your Dynamics 365 system.

Save a picture or a path to a file share/SharePoint in your Dynamics 365 system.
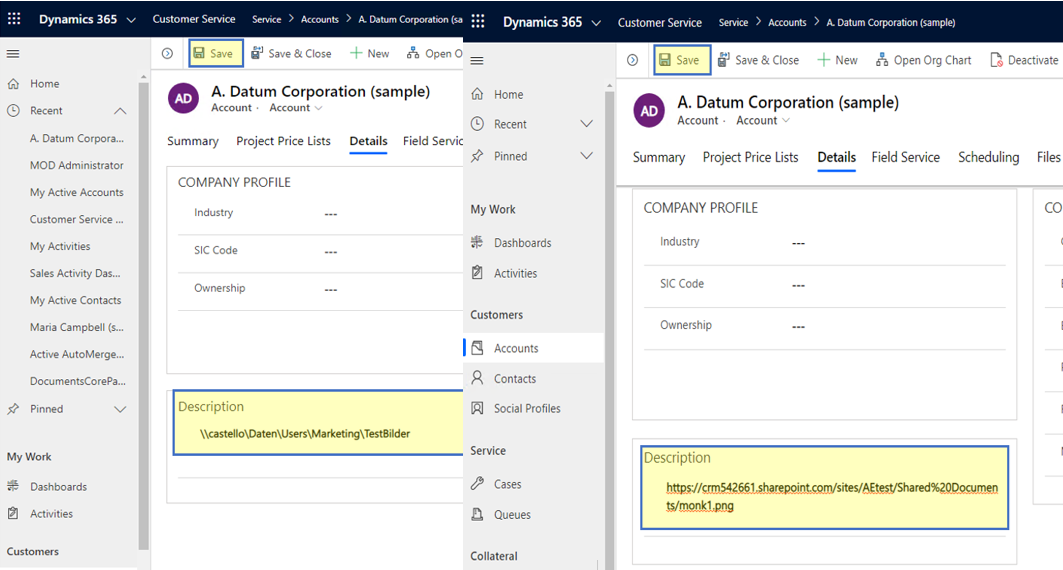
Figure 1: Saved pathes to a fileshare or sharepoint

Please Note: Make sure that the link to your SharePoint account is working. Check that it points to the image you want to show in your document. If your template becomes corrupted after you have added an image to the header, have a look at this article.

Now open the DocumentsCorePack Template Designer in your Dynamics 365 and:

❶ Navigate to the standard tab and look for the location in which you have previously saved the File Share path like in this example we used:
❷ Account. The tree-view should be visible from the moment you open the Standard tab. If you do not find your field immediately, use the scroll bar to look for the corresponding fields or search for it in the search field. When you find your field, click on it, like in this example it is:
❸ Description.
❹ If you want to insert the Description as a Picture Field, open the Insert Field drop-down selection and select Insert Description as Picture field.

Select "Insert Description as Picture field."
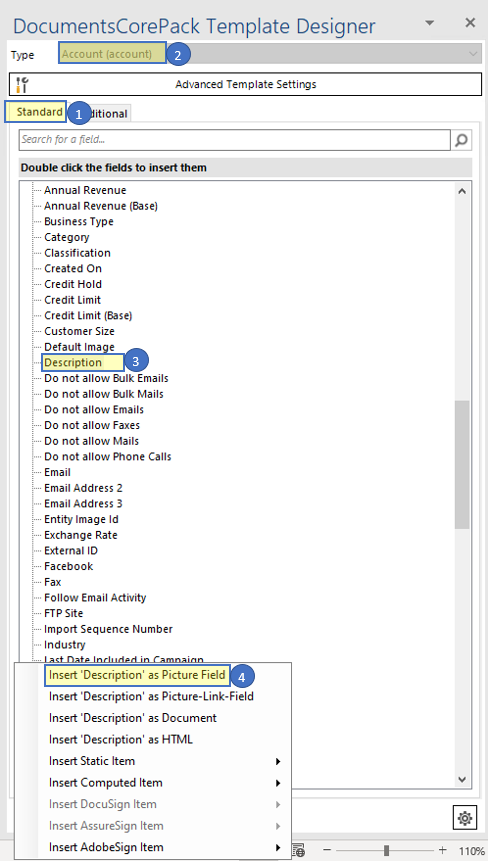
Figure 2: Insert Description as Picture Field

A placeholder will then appear in your document.

A sample placeholder.
Figure 3: Placeholder

Please note: With the DocumentsCorePack for Dynamics 365, it is also possible to define a link and make the picture clickable in the result. Details on how to set this up can be found here.​

If you merge this template, DocumentsCorePack will resolve the URL to your picture and insert it into the document.

URL resolved by DocumentsCorePack.
Figure 4: Resolved URL to picture

Please note: If you are using a SharePoint URL and authentication is required to integrate them into your document, you can enable this by using the Authenticate against SharePoint (formerly “External Image”).

The authentication works as long as the executing (service) user has access to SharePoint.

Additional options by using field properties.

Figure 5: Additional options by using field properties

Back to “How to use a picture with DocumentsCorePack“.

That’s it! We appreciate your feedback! Please share your thoughts by sending an email to support@mscrm-addons.com.

Was this helpful?

Yes  2 No
Related Articles
  • How to update the metadata in the DocumentsCorePack Template Designer
  • Working with Product Properties in DocumentsCorePack
  • How to work with the Relationship Manager
  • Using virtual tables in DocumentsCorePack
  • DocumentsCorePack Template Designer Settings
  • How to solve: Failed to connect to an IPC Port
Leave A Comment Cancel reply

You must be logged in to post a comment.

Latest Articles
  • How to share the Connection of the DocumentsCorePack Connector
  • How to update the metadata in the DocumentsCorePack Template Designer
  • Working with Product Properties in DocumentsCorePack
  • How to work with the Relationship Manager
  • Using virtual tables in DocumentsCorePack
Popular Articles
  • Where do I find the Unique Organization name in Microsoft Dynamics 365?
  • DocumentsCorePack Template Designer – Getting Started
  • mscrm-addons.com Application Access for Dynamics 365 (App Access) – DocumentsCorePack
  • DocumentsCorePack Online Service Configuration
  • Step-by-Step: How to configure a One-Click-Action
Top Rated Articles
  • IMPORTANT information for Dynamics 365 online customers using DocumentsCorePack and/or AttachmentExtractor
  • How to activate the DocumentsCorePack connector for PowerApps & Microsoft Flow
  • Step-by-Step: How to configure a One-Click-Action
  • Online Services: Required Application Permissions
  • Where do I find the Unique Organization name in Microsoft Dynamics 365?
Categories
  • *News and General Infos* 51
  • Webinars 35
  • Template Designer(DCP 179
  • DocumentsCorePack(DCP 192
  • TelephoneIntegration (TI 65
  • AttachmentExtractor (AE 62
  • PowerSearch (PS 48
  • ActivityTools (AT 59
  • SmartBar (SB 53
  • GroupCalendar (GC 46
Our Vision

“We see it as our purpose to provide products that simplify and speed up our customers’ Microsoft Dynamics 365 experience.”

Knowledgebase
LogIn
mscrm-addons.com
  • Products
  • Online Shop
  • Downloads
  • My Account
About Us
  • About Us
  • Case Studies
  • Newsletter
  • Partner Program
  • Contact
Support
  • Support
  • Terms & Conditions
  • Documentation
  • Webinars
  • Legal Documents
  • Impressum
  • © 2022 www.mscrm-addons.com. All Rights Reserved.