• Archive
  • Back to www.mscrm-addons.com
  • Archive
  • Back to www.mscrm-addons.com
home/Knowledge Base/Template Designer(DCP)

Note title and description (Dynamics 365)

55 views 0

Written by Administrator
September 6, 2017

This blog article outlines how to apply special settings, in detail note title and description, to your DocumentsCorePack Template. You have to access the Template Settings Dialog, which is described step by step in this article.

1) First, navigate to ❶ www.mscrm-addons.com and click on the ❷ [Insert MailMerge Fields]-button. In the so opened tree on the right side, you have to click the ❸ [Advanced Template Settings]-button to open the Template Settings Dialog.

DCP Advanced Template Settings
Figure 1: DCP Advanced Template Settings

​

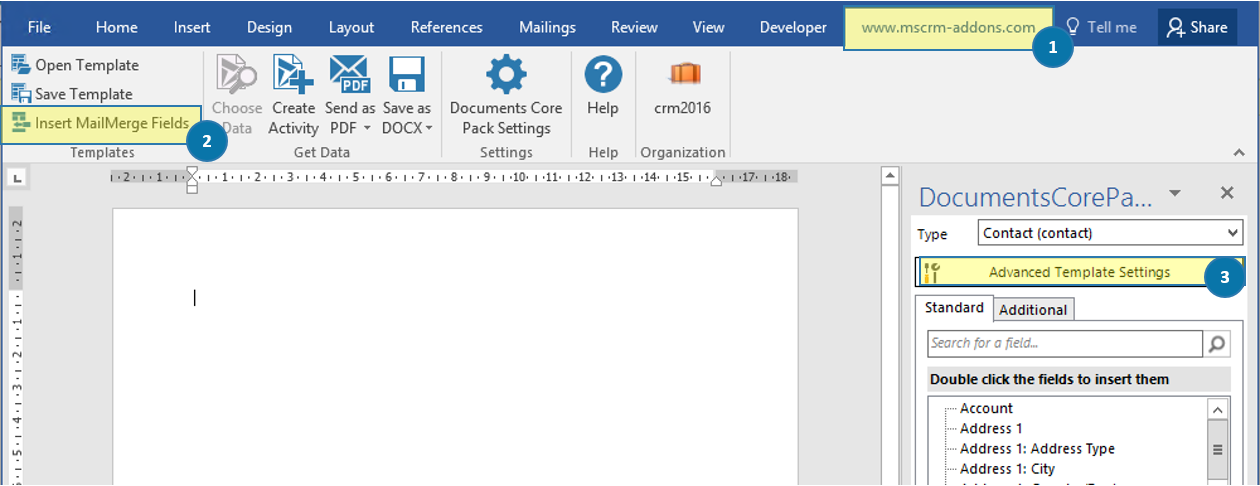
2) The Template Settings Dialog allows you to define your Template Settings individual and in detail. Navigate to ❶ General and go to the bottom of this window, to define your Note Title and Note Description. By clicking the ❷ Edit symbol of each option, you can select the fields that should be used in your Pattern. Several DocumentsCorePack properties support the same syntax. To learn more about the DCP syntax, please have a look at this article here.

DCP Template Settings Dialog
Figure 2: DCP Template Settings Dialog

​

A complete list of all the available properties can be found here.

This is how the created Note look in CRM:


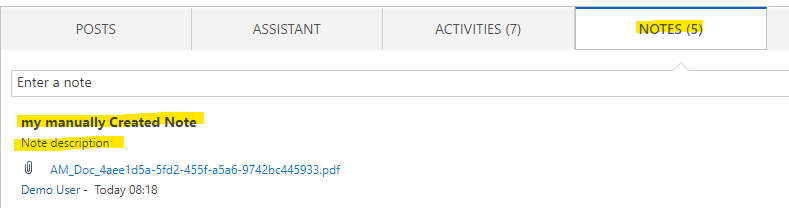
Figure 3: Note and Description


​

That’s it! We appreciate your feedback! Please share your thoughts by sending an email to support@mscrm-addons.com.

reworkdone PA – added Screenshot from result

result is not visible

Was this helpful?

Yes  No
Related Articles
  • General Settings – DocumentsCorePack Server Based
  • How to use the Insert-as-Picture-Link-Field-button in Dynamics-365
  • How to use the Insert-as-Picture-Link-Field-button in Dynamics-365
  • Documents generated in Flows cannot be opened
  • How licenses are counted
  • How to setup editable sections in your template (Dynamics 365)
Latest Articles
  • The Local License Manager
  • TemplateImportExport Console Application – DCPIE.exe
  • How to trigger a Microsoft Flow from dialog
  • General Settings – DocumentsCorePack Server Based
  • How to use the Insert-as-Picture-Link-Field-button in Dynamics-365
Popular Articles
  • How to activate the DocumentsCorePack connector for PowerApps & Microsoft Flow
  • How licenses are counted
  • Where do I find the Unique Organization name in Microsoft Dynamics 365?
  • How to work with the new DocumentsCorePack custom connector for PowerAutomate (Microsoft Flow)
  • DocumentsCorePack Charts Feature (Dynamics 365)
Top Rated Articles
  • How to activate the DocumentsCorePack connector for PowerApps & Microsoft Flow
  • Can you save data capacity by moving email content?
  • Recap of the first virtual eXtreme365 & Community Summit event
  • Step-by-Step: How to configure a One-Click-Action
  • How to set up an email content service
Categories
  • *News and General Infos* 44
  • Template Designer(DCP 151
  • DocumentsCorePack(DCP 146
  • TelephoneIntegration (TI 62
  • AttachmentExtractor (AE 47
  • PowerSearch (PS 42
  • ActivityTools (AT 54
  • SmartBar (SB 49
  • GroupCalendar (GC 43
Our Vision

“We see it as our purpose to provide products that simplify and speed up our customers’ Microsoft Dynamics 365 experience.”

Knowledgebase
LogIn
mscrm-addons.com
  • Products
  • Online Shop
  • Downloads
  • My Account
About Us
  • About Us
  • Case Studies
  • Newsletter
  • Partner Program
  • Contact
Support
  • Support
  • Terms & Conditions
  • Documentation
  • Webinars
  • Legal Documents
  • Impressum
  • © 2020 www.mscrm-addons.com. All Rights Reserved.