The AutoMergeWorkingItem (or AMWI for short) is the record responsible for generating and processing documents via DocumentsCorePack. Regardless of if you’re generating a document through the Dialog, a Flow, or with custom code, an AMWI is created holding all information needed to generate the document you need.
In this article, we will summarize the role the AMWI plays in DocumentsCorePack.
Overview
To generate a document via DocumentsCorePack (e.g. through a source like the Dialog), an AMWI record is created first. The user’s input is taken from the Dialog and passed into the AMWI. Once the user’s information has been saved to the AMWI, a document is generated and processed based upon that data.
The AMWI’s fields
The information stored in the fields within the AMWI dictates the kind of document that should be generated and what should happen to the document upon creation. Typically, these fields are filled out automatically when using e.g. the Dialog or generating a document via Power Automate.
(Note: When using custom code, it is important to know which fields should be filled out to prevent errors. This will be described in more detail later.)
Every AMWI must have the Name, Owner, and AutoMergeAction fields filled out. These three fields are mandatory for every AMWI. Other fields must only be filled out depending on the option selected under AutoMergeAction.

A brief description of each AutoMergeAction is as follows:
- CreateDocument
- Generates a document based upon a template and a record
- Concatenate
- Concatenates two designated documents
- AttachToLetter
- Attaches a generated document to a Letter record
- AttachToEmail
- Attaches a generated document to an email
- AttachToAppointment
- Attaches a generated document to an Appointment record
- AttachToEntity
- Attaches a generated document to a designated entity
- SendEmail
- Sends a designated email
- CreateSharePointFolder
- Saves a generated document to a created SharePoint folder
- PrintDocument
- Sends a generated document to a printer to be printed
- DeleteTempDocument
- Deletes the temporarily stored document from Dynamics 365
- SignDocument
- Sends a generated document to be signed (via DocuSign, AssureSign, or AdobeSign)
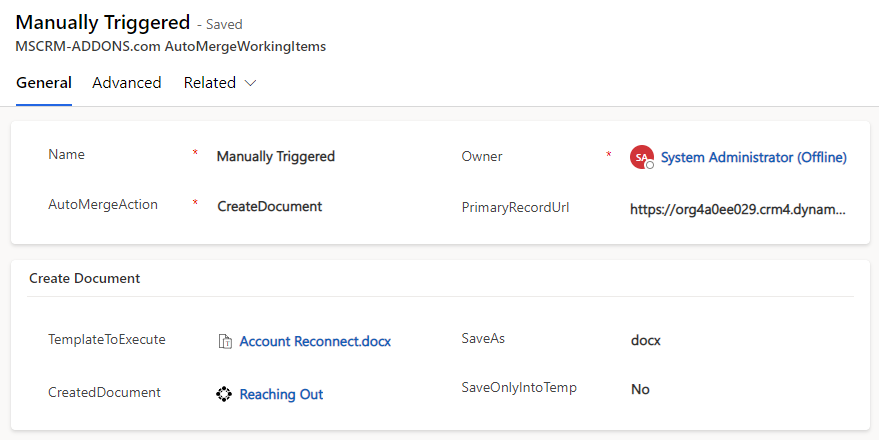
Each option is tied to a different set of fields within the AMWI. For example, in the below screenshot, this AMWI was created after a user had used the Dialog to create a document based on a template from the Account entity. Since the CreateDocument AutoMergeAction was selected during this process, the fields under the Create Document section have also been filled out. This includes the TemplateToExecute field, which is a lookup that holds the selected template, and the SaveAs field, which is a picklist that holds the selected filetype. Both of these fields are needed for generating a document.
Notably, the PrimaryRecordUrl field is also filled out, as that is the field that holds the URL of the record that data will be pulled from. Thus, this field is also mandatory for creating a document.
This URL, if not filled in automatically, can be retrieved from the record itself. An example URL is as follows:
https://orgXXXXXXXXX.crm4.dynamics.com/userdefined/edit.aspx?etc=1&id=03C9F02E-67A3-ED11-AAD1-6045BD8A7277&amdocpreview=true
Once all mandatory fields are filled in, a document can be generated properly. It should be noted that the document generation service will work on any active AMWI, even for manually created AMWIs. As long as the correct fields are filled and the AMWI is saved, a document will be created.
Combining document generation and processing
It is also possible to use a single AMWI for both document creation and processing. For example, while the CreateDocument AutoMergeAction is selected, you can additionally choose to set an email to attach a document to, or define a printer in the Print Document section. By creating an AMWI in this way, it prevents the need for creating a second AMWI.
Locating a generated document
Once the AMWI has been executed, the record’s status will be shown as “Inactive.” If a document has been generated, the CreatedDocument field will contain the generated document.
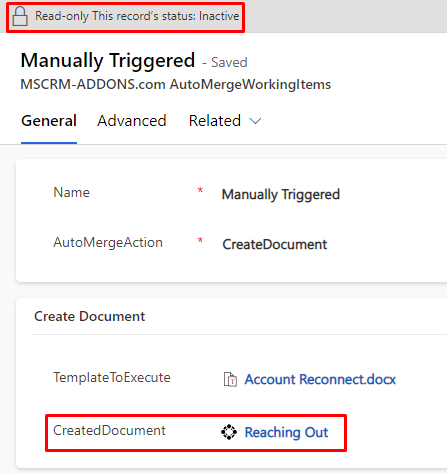
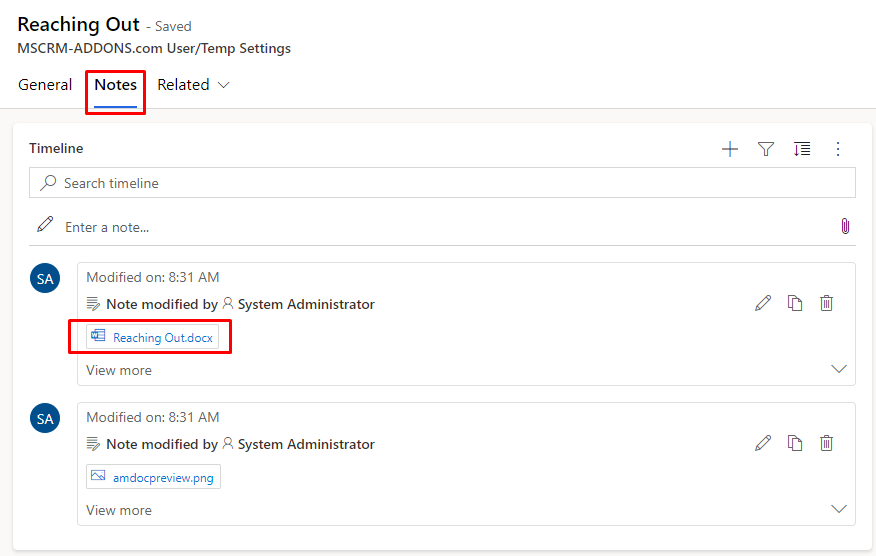
Clicking on the link in the CreatedDocument field will bring you to a separate record that contains the document itself. It can be found under the Notes tab.
However, if a document has not been generated, the CreatedDocument field will be left empty. If this is the case, you can scroll to the ReturnValue at the bottom of the record to see if an error occurred.

Creating documents from custom code
To generate a document using custom code, an AWMI must be created and the required attributes must be filled in. In this case, the required fields would be the Name, Owner, AutoMergeAction, PrimaryRecordUrl, TemplateToExecute, and SaveAs fields. A sample of some custom C# code is shown below:
Entity entity = new Entity("ptm_automergeworkingitems ");

entity["ptm_name"] = "Name";
entity["ptm_automergeaction"] = new OptionSetValue(956670000);
entity["ownerid"] = new EntityReference("systemuser", new Guid("<systemuser_id>"));
entity["ptm_primaryrecordurl"] = "https://<ORGNAME>.crm.dynamics.com/main.aspx?etc=<OBJECTTYPECODE>&id={<ENTITYRECORDID>}&pagetype=entityrecord";
entity["ptm_templatetoexecute"] = new EntityReference("ptm_template", new Guid("<template_id>"));
entity["ptm_saveas"] = new OptionSetValue(956670008);

Guid entityId = crmSvc.Create(entity);
Custom Code Details:
- Please note that the value for ptm_primaryrecordurl should be replaced with the proper GUID of the record you want to create the document for. For example, if your template is built for the Contact entity, then the PrimaryRecordUrl should be the GUID of a Contact record.
- For ptm_automergeaction, the OptionSetValue is the value for a particular listed item. In this case, the value listed above represents the CreateDocument option. Other options are listed below:
- CreateDocument (956670000)
- Concatenate (956670007)
- AttachToLetter (956670001)
- AttachToEmail (956670002)
- AttachToAppointment (956670010)
- AttachToEntity (956670006)
- SendEmail (956670003)
- CreateSharePointFolder (956670008)
- PrintDocument (956670005)
- DeleteTempDocument (956670004)
- SignDocument (956670009)
- Similarly, for ptm_saveas, the OptionSetValue here represents the filetype. The value listed above represents the PDF option. For docx, the value would be “956670006”
Other options are listed below:- text (956670000)
- png (956670001)
- jpeg (956670002)
- html (956670003)
- epub (956670004)
- doc (956670005)
- docx (956670006)
- bmp (956670007)
- pdf (956670008)
- xps (956670009)
- For other schema values and their respective option sets, please refer to the “MSCRM_OptionSets” document shown in the “Attached Files” section below.
That’s it! We appreciate your feedback! Please share your thoughts by sending an email to support@mscrm-addons.com.