The DCP Diagnostics Tool provides helpful information and utilities to manage your own installation of DocumentsCorePack. There are three tabs to this program:
❶ The Diagnose tab
❷ The System Information tab
❸ And the Tools tab
You can find this tool in the Documents Core Pack Template Designer for Dynamics 365 folder. Please navigate to the installation path of DocumentsCorePack Template Designer, for example:
C:\Program Files (x86)\PTM EDV-Systeme GmbH\Documents Core Pack Client for Dynamics 365
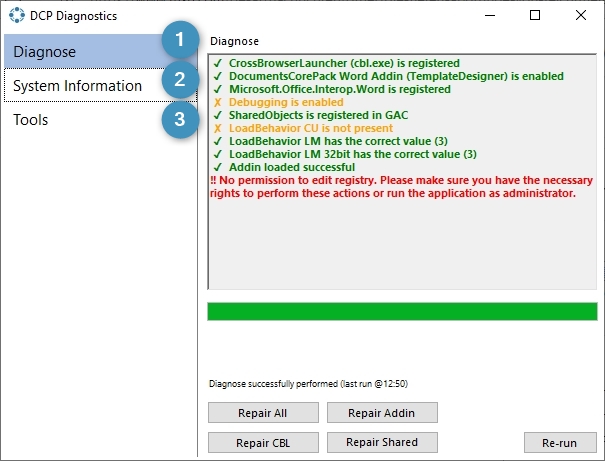
The Diagnose Tab
The Diagnose Tab is selected by default upon launching the program. Here, the window will display a list of diagnostics about DCP. This can be helpful if you need to know which functions are enabled or disabled, or if a functionality isn’t working properly.
If an error is displayed in the window, you can use one of the ‘Repair’ options down below to attempt to fix it. Additionally, you can click the ‘Re-run’ button to refresh the diagnostics window.
System Information Tab
A list of information regarding your device is displayed. This shows you details such as your OS, your version of DCP, and the version of various Internet browsers.

Tools Tab
The Tools tab contains several functions useful for managing certain aspects of the DocumentsCorePack. It contains four different groups:
❶ Metadata
❷ Debugging
❸ GAC Install
❹ and Misc.
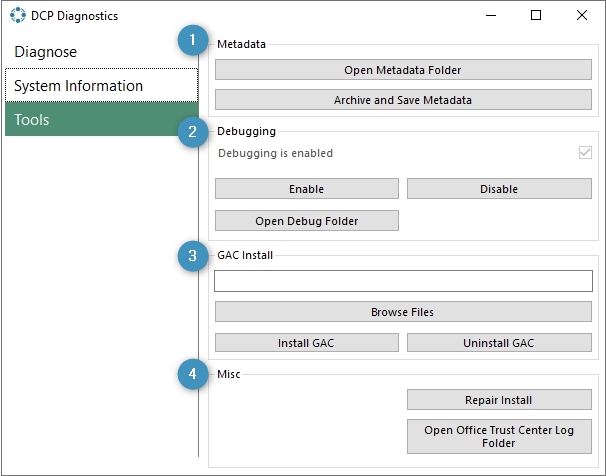
❶ Metadata
Metadata contains two options:
- Open Metadata Folder – Clicking the Open Metadata Folder will bring you to the folder that contains the metadata the DocumentsCorePack needs to operate properly.
- Archive and Save Metadata – Archive and Save Metadata will prompt you to select a folder. Clicking on OK will save the current metadata in the folder that you selected.
❷ Debugging
In this group, you can enable or disable debugging. Clicking the Open Debug Folder button will bring you to the folder that contains debugging log files.
Please Note: This option should only be used if you cannot access the MSCRM ribbon in Word. Otherwise, you should activate debugging through the Documents Core Pack Settings button.
❸ GAC Install
You can choose and install a dll (dynamic link library) into the Global Assembly Cache (or GAC) here. The Uninstall button will remove the dll of your selection from the GAC. Regardless of the option you choose, the path to the dll file will be displayed within the textbox.
❹ Misc.
The Repair Install button will attempt to repair the DCP installer. This is different from the ‘Repair All’ button in the diagnose tab, as this will only attempt to repair the installer itself.
That’s it! We appreciate your feedback! Please share your thoughts by sending an email to support@mscrm-addons.com.