This article describes the best practices and provides examples for bulk-document generation via DocumentsCorePack (DCP) in Power Automate (Microsoft Flow).
NOTE: We recommend load-balancing if you need to generate a batch of documents. This will lead to significant performance improvements, as can be seen in this article: “Performance benchmark, limitations & scalability“.
Sometimes, it is required to generate a high number of documents in a short period of time. In these cases, we can use Flows to do just that.
When building a Flow to generate bulk documents, there are two points to be aware of:
- Create document jobs fast: In order for our services to start generating documents, the Flow has to create the document jobs as fast as possible in an asynchronous manner. Thus, the queue of documents to generate gets filled and the service(s) will be able to start generating the documents in bulk.
- If possible, combine document generation and processing settings into a single document job: DCP allows the combination of generation and processing steps into one action. Thus, you can prevent having to set up additional actions in your Flow to process the document.
E.g. A single request can have both:- Definition of the document to be generated.
- Definition on how the document should be processed upon generation (e.g. Save to SharePoint, Attach to email, ect.).
Keeping those points in mind, we will continue on and start setting up the Flow.
What is our goal?
Our goal is to generate and process documents for each of our account records. To do this, we will need to load our records and loop through our records twice: once for generating the document requests, and once for retrieving the generated documents for processing.
1st Loop: Generate document requests
After loading the records, you need to generate the documents (e.g. via the DataVerse – List rows action) and generate your document requests via an Apply-to-Each loop.
Please note: You must loop through all records that you want to generate a document for. In this article, we are looping through 1000 account records.
Within your loop, you have two possibilities to create DocumentJobs.
1. Use the DocumentsCorePack Connector
The DCP connector has a Create DocumentJob (async) (V3) action to create the queue item:
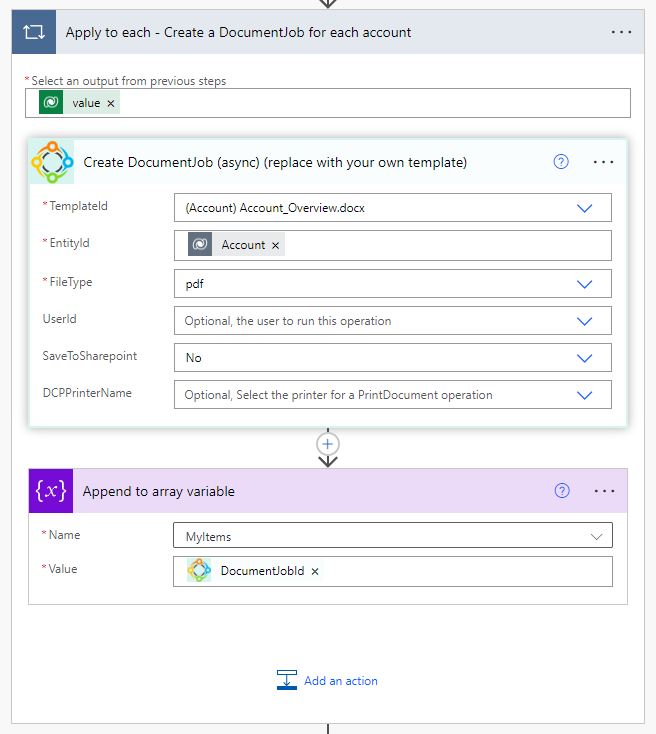
This action allows you to directly specify whether a document should be stored in SharePoint or be printed by accessing the respective fields under Show advanced options. If one of these fields is required, select it here to avoid additional requests later on.
If you plan to do the document processing inside your Flow, you must save the DocumentJobId in an array (see information on the 2nd loop further on).
2. Use the DataVerse Connector:
You can also use the Dataverse connector to create the queue items (by adding rows for mscrm-addons.com AutoMergeworkingitems). In general, it works the same. We need a loop to generate the queue items, but now we select the OOTB Dataverse Connector Add a row action instead.
Please Note: The setup is a bit more complex, but this is the fastest way to create queue items (DocumentJobs).
Here, you can see how the Flow should look:
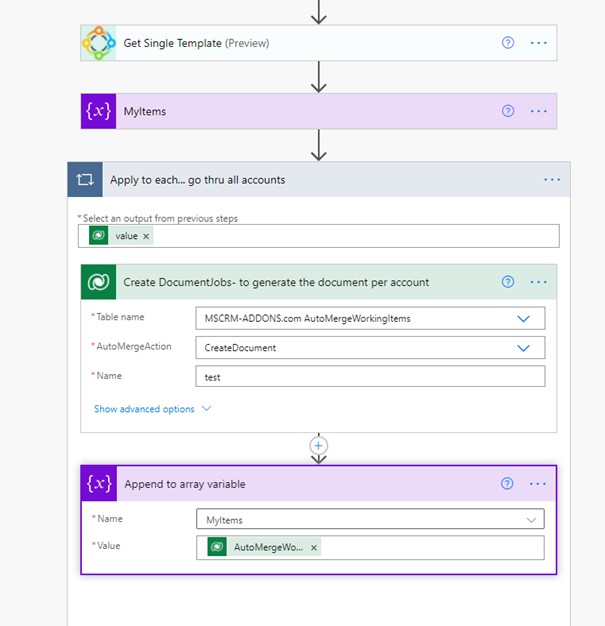
There is an additional step to read the Template ID. We need this Template ID in the Dataverse – Add a row step to specify the template to be used.
The rest of the loop is the same as above. Again, you need to store the AutoMergeWorkingItems Unique identifier, which is the DocumentJobID, to an array.
Additionally, you need to fill out the following fields in the Dataverse Action:
- Template ID:

- Account ID

- File Type:

You can define additional document processing settings directly on this Item (e.g. Attach to and send an Email, Save to SharePoint, etc.). Again, the goal is to keep the number of requests to a minimum, so always try to process the document in the same Action.
What is the difference between the DocumentsCorePack Connector and the Dataverse Connector?
DocumentsCorePack Connector:
- User-friendly & intuitive setup.
- No need for a Get Template step, because the template can be directly specified in the Create document (sync) (V3) step.
- Document generation speed is restricted based on the service protection API limit.
Dataverse Connector:
- It is the fastest way to create the items, since the Add a row action will not count towards the service protection API limit as outlined in this article.
Recommendation: If you must email your documents or if you deal with very high volumes of records (10000+ records), the Dataverse connector is the better choice. For smaller batches, both options are fine with a negligible difference in performance.
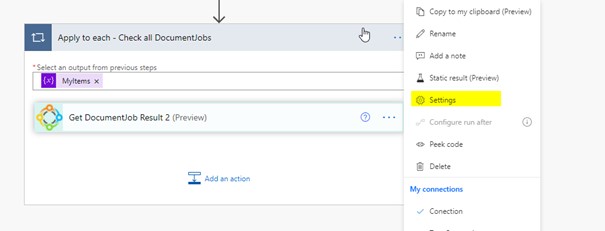
2nd Loop: Get generated documents for processing
In order to process the finished documents in your Flow, a second loop is required through the DocumentJobIds saved in our array.
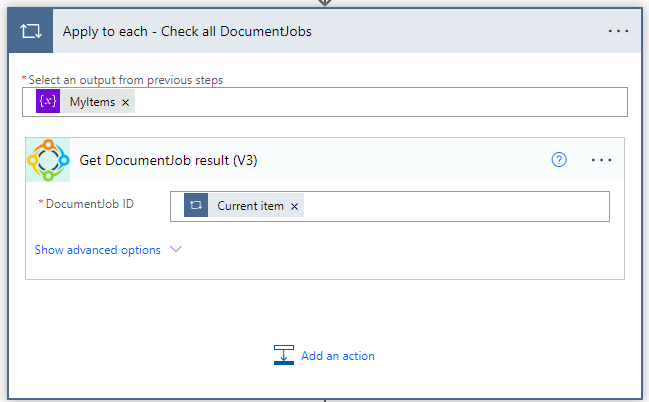
The Get DocumentJob result (V3) action provides the following information for every ID of our array:
- File Name
- File size
- Document content
- Mime-Type
- Success State
- Return value
Thus, after retrieving this information, you can add further steps to process the document as required by your business. You can use the full Power Automate suite to do so. The possibilities are endless. Some examples are:
- Create an email and send the document as an attachment.
- Save the document to OneDrive, DropBox, or Azure Blob.
- Print the document.
Please note: If you want to speed up this loop, you can turn on the Concurrency Control to execute the loop parallel. If you do that, we recommend changing the retry policy as described below.
Troubleshooting
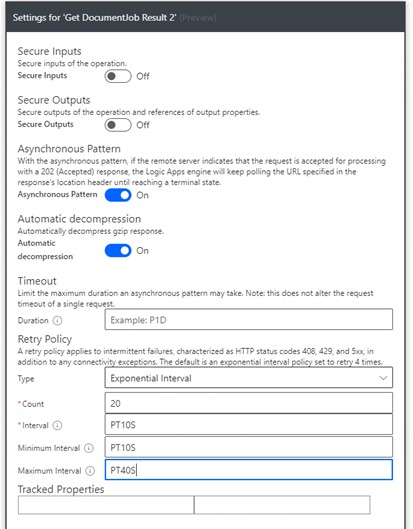
429 Error on a DocumentsCorePack step:
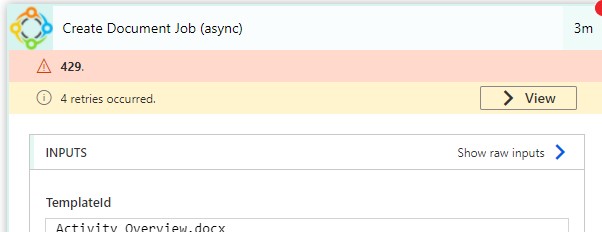
If this error occurs, you are hitting an action limit from Microsoft Flow.
Please go to the settings of the step:
We recommend that you change the Retry Policy of this step to the following:
Example Flows
Attached at the bottom of this article are a few example flows we have provided. Try them out to get familiar with how the features discussed in this article works.
Back to “The DocumentsCorePack connector for PowerApps and PowerAutomate (Microsoft Flow)“.
That’s it! We appreciate your feedback! Please share your thoughts by sending an email to support@mscrm-addons.com