• Release History
  • Documentation
  • Back to www.mscrm-addons.com
  • Release History
  • Documentation
  • Back to www.mscrm-addons.com
home/Knowledge Base/Template Designer(DCP)/When to use the „Do not use DataProvider“-setting in DocumentsCorePack

When to use the „Do not use DataProvider“-setting in DocumentsCorePack

487 views 0 Updated on February 23, 2023

“Do not use Dataprovider” is an additional setting in your DocumentsCorePack TemplateDesigner, where you can define if you want to use the DataProvider as an external program, or if Word should connect to Dynamics 365 directly.

This option is useful  

  • If you want to use our Template Designer in the Microsoft Word App (not the desktop version of Word which  is the full featured version)

Prerequisites: DocumentsCorePack TemplateDesigner 10.27!
Here are instructions on how to check your version. 

How to activate the „Do not use Dataprovider“–setting 

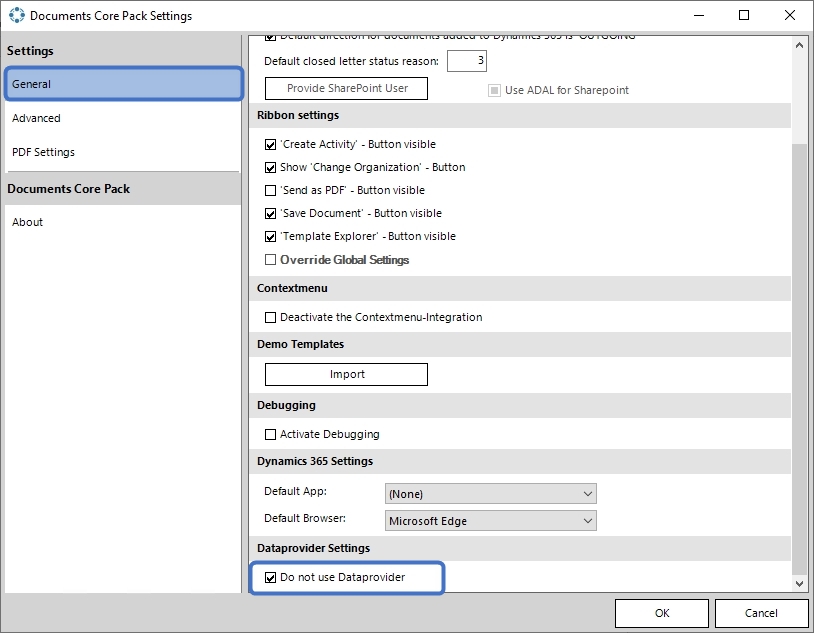
Open the DocumentsCorePack TemplateDesigner and click on the “Documents Core Pack Settings” on the www.mscrm-addons.com ribbon. 

Word ribbon - DCP settings
Figure 1: Word ribbon – DCP settings

Navigate to the “General”-tab and scroll down to the bottom to tick the new feature of DocumentsCorePack TemplateDesigner “Do not use Dataprovider”.

DCP General settings 
Figure 2: DCP General settings 

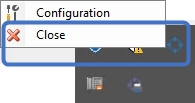
Please note: To make this change work you have to restart Microsoft Word and stop the Dataprovider. Therefore navigate to the Dataprovider symbol in the right bottom corner, make a right-click and select “Close”.

Close Dataprovider
Figure 3: Close Dataprovider

If you now open the DocumentsCorePack TemplateDesigner, the DataProvider no longer starts, but Word connects directly to your Dynamics 365. 

Direct connection to Dynamics 365 
Figure 4: Direct connection to Dynamics 365 

That’s it! We appreciate your feedback! Please share your thoughts by sending an email to support@mscrm-addons.com! 

Was this helpful?

Yes  No
Related Articles
  • Ensuring correct time zone display for DateTime fields
  • How to compare a date-fields with the current date 
  • Create a template for XML or plain text
  • E-Invoicing with DocumentsCorePack
  • How to add content from SharePoint to a document
  • Using MS Word field codes in DocumentsCorePack templates
Leave A Comment Cancel reply

You must be logged in to post a comment.

Latest Articles
  • DocumentsCorePack: Best practices for Dynamics 365 on-premises to online migration projects
  • Multilingual Support in DocumentsCorePack
  • Recap: ColorCloud 2025
  • Configure DocumentsCorePack within custom pages
  • AI-Powered Document Generation with Copilot in Sales
Popular Articles
  • DocumentsCorePack Template Designer – Getting Started
  • Step-by-Step: How to configure a One-Click-Action
  • Application Access for Dynamics 365
  • How to find your environment’s unique name in Microsoft Dynamics 365
  • How licenses are counted
Top Rated Articles
  • “Undefined”-labels in Chrome and Edge 114 and higher
  • Important information for Dynamics 365 online customers using DocumentsCorePack and/or AttachmentExtractor
  • How to activate the DocumentsCorePack Connector for PowerApps & Microsoft Flow
  • How licenses are counted
  • How to insert Condition Fields in DocumentsCorePack Templates designer
Categories
  • *News and General Infos* 62
  • Webinars 44
  • Template Designer(DCP 196
  • DocumentsCorePack(DCP 250
  • TelephoneIntegration (TI 65
  • AttachmentExtractor (AE 72
  • PowerSearch (PS 50
  • ActivityTools (AT 61
  • SmartBar (SB 54
  • GroupCalendar (GC 47
Our Vision

“We see it as our purpose to provide products that simplify and speed up our customers’ Microsoft Dynamics 365 experience.”

Knowledgebase
LogIn
mscrm-addons.com
  • Products
  • Online Shop
  • Downloads
  • My Account
About Us
  • About Us
  • Case Studies
  • Newsletter
  • Partner Program
  • Contact
Support
  • Support
  • Terms & Conditions
  • Documentation
  • Webinars
  • Legal Documents
  • Impressum
  • © 2022 www.mscrm-addons.com. All Rights Reserved.