This step-by-step tutorial outlines how to create a document and attach it to an email in a single workflow-step.
Requirements: DocumentsCorePack ServerBased, MS Dynamics CRM 2015/2016 or MS Dynamics 365
Step 1: Create a new workflow
To create a new workflow navigate in your Dynamics 365 to Settings ❶ and then Processes ❷ and click on the [New]-button ❸.
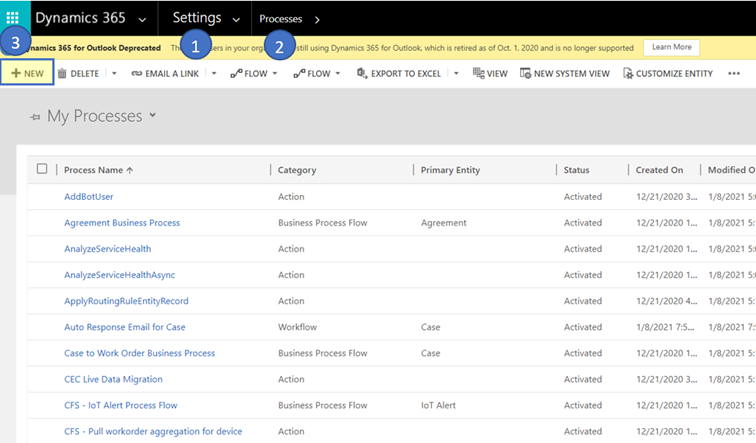
Figure 1: Add a new process
Please type in a Process name ❶ (here: Test Workflow), set Workflow as Category ❷, select the entity you would like to create the workflow for ❸ (here: Account), and click on the [OK]-button ❹ in order to finish the creation of your new workflow.
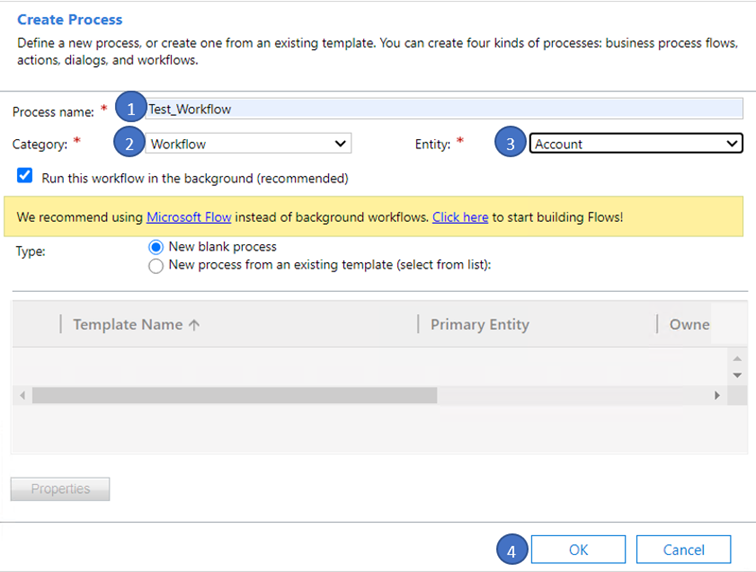
Figure 2: Create a new workflow
Step 2: Add your workflow details
If we want to receive a good result for our workflow, we first have to create an email. To do so, please click on the [Add Step]-dropdown-button ❶ and select “Create Record”. Type in a name for your step ❷ (here: Create Email) and use the “Create“-dropdown menu ❸ to set the “Create“-section to Email. Next, click on [Set Properties]-button ❹.

Figure 3: Create an E-mail
An email activity opens. In this window, a sender, a subject and an email text ❺ has to be defined. The form assistant supports you when it comes to the setting of the Recipient-field ❶. The Regarding-field ❻ is often already pre-filled. If not, simply follow the same instructions as for the Recipient-field for the Regarding-field.
Please set the cursor into the “Recipient”-field ❶ in order to set the recipient. On the right side you can find a “Look for“-dropdown menu ❷ where you can select the entity “Account“. Click on the [Add]-button ❸ and then on the [OK]–button ❹. Now the Recipient-field is filled out correctly.

Figure 4: Configure the email activity
Optionally, you may scroll down and configure some more details of the eMail step.
Once you have finished the configuration, please click on the [Save and Close]-button in the left top corner.
Next, we want to create a new “MSCRM-ADDONS.com AutoMerge Working item”, which makes sure that the document is generated and attached to the email properly.
Please add a new step by clicking again on the [Add Step]-button and select “Create Record”. Then, type in a step description and use the “Create“-dropdown menu to set the “Create”-section to “MSCRM-ADDONS.com” “AutoMergeWorkingItems”. Next, click on the [Set Properties]-button.
A window opens where we set the properties for the next step. Please name the “AutoMergeWorkingItem” ❶ (here: Create and Attach) and set an “AutoMergeAction” ❷ using the dropdown menu (here: CreateDocument).

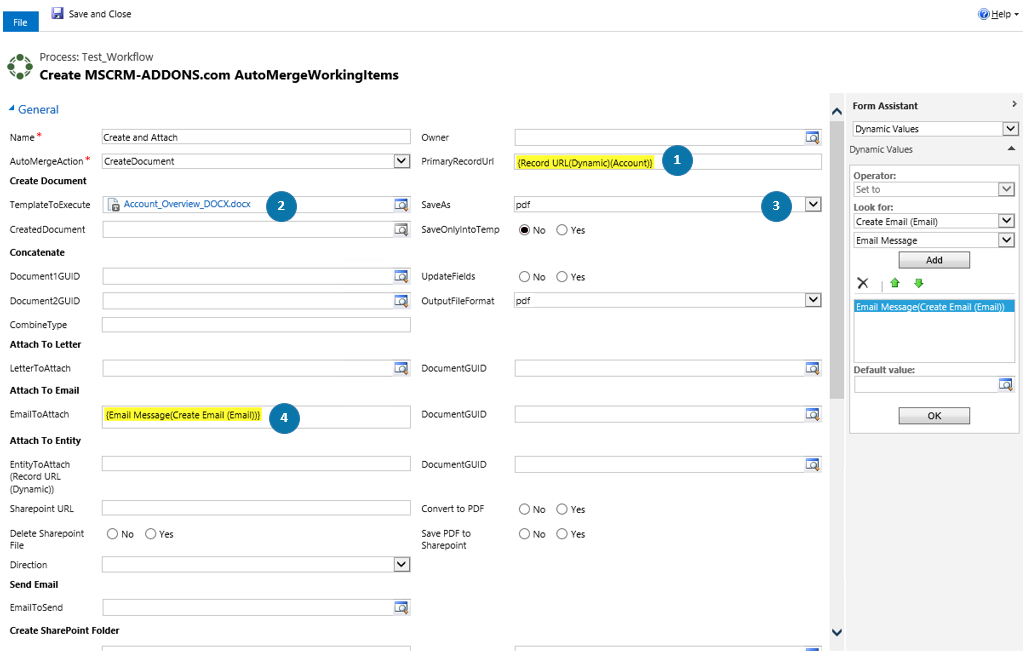
Figure 5: Name the AutoMergeWorkingItem
Next, it is important to make sure that the workflow contains all the important settings that are necessary for a smoothly running process.
Apart from the name and the AutoMerge Action, it is important to fill in the following fields:
❶ the PrimaryRecordsUrl-field
❷ the TemplateToExecute-field
❸ the SaveAs-field and
❹ the EmailToAttach – field

Figure 6: MSCRM-ADDONS.com AutoMergeWorkingItems
Please find further information on how to insert the single fields below.
1) How do I set a PrimaryRecordsUrl-field?
Set the cursor in the “PrimaryRecordUrl”-field ❶ and go to the “Look for”-area ❷ within the form assistant on the right side. Next, select “Record URL(Dynamics)” ❷ from the second dropdown-menu, click on the [Add]-button ❸ and then on the [OK]-button ❹.

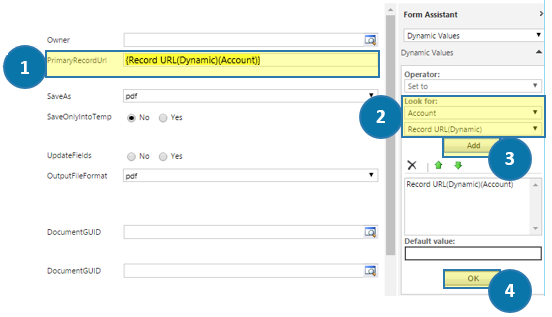
Figure 7: Insert the PrimaryRecordsUrl
Please note: Set the “SaveOnlyIntoTemp“-option on “No“, if you want to save data on SharePoint. Set this option on “Yes“, if you want to save data as temp files only. Additionally, please set the “OutputFileFormat” on “.pdf“.
2) How do I select a template to execute?
To determine the template that should be executed during the workflow, simply set your cursor in the “TemplateToExecute“-field and look for the template you would like to add.
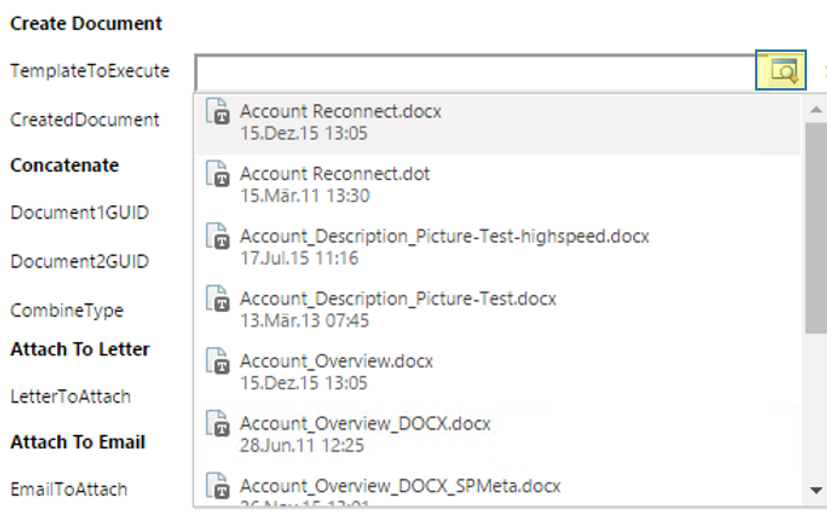
Figure 8: Select a template
3) How do I set a file format?
The “Save As”-field enables you to select a certain file format. In order to define it, simply use the drop down menu of the field.
Hint: Please select a Documenttype (pdf or docx) to create an attachment to the mail. And select html to use the generated document as email body instead.
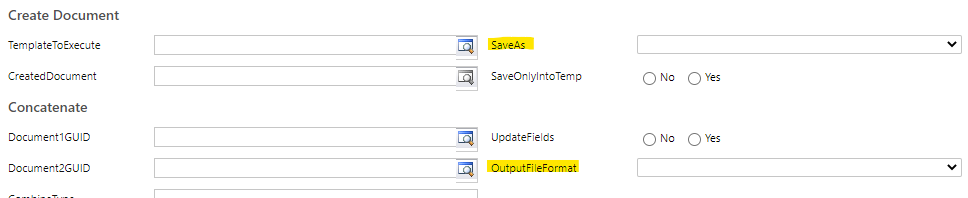
Figure 9: Save as-field, OutPutFileFormat-field
4) How do I define which eMail should be attached?
Next, set the cursor into the “EmailToAttach“-field ❶ and select “Create Email (Email)” in the form assistant ❷ on the right side.
Please note: It is of utmost importance also to select an eMail here. Next, click on the [Add]-button ❸. Once you have finished the configuration, please click on the [Save and Close]-button ❹ in order to save your settings. Additionally, it is possible to send the document via eMail if you insert the created eMail (see 1, 2 & 3) also into this field ❺.
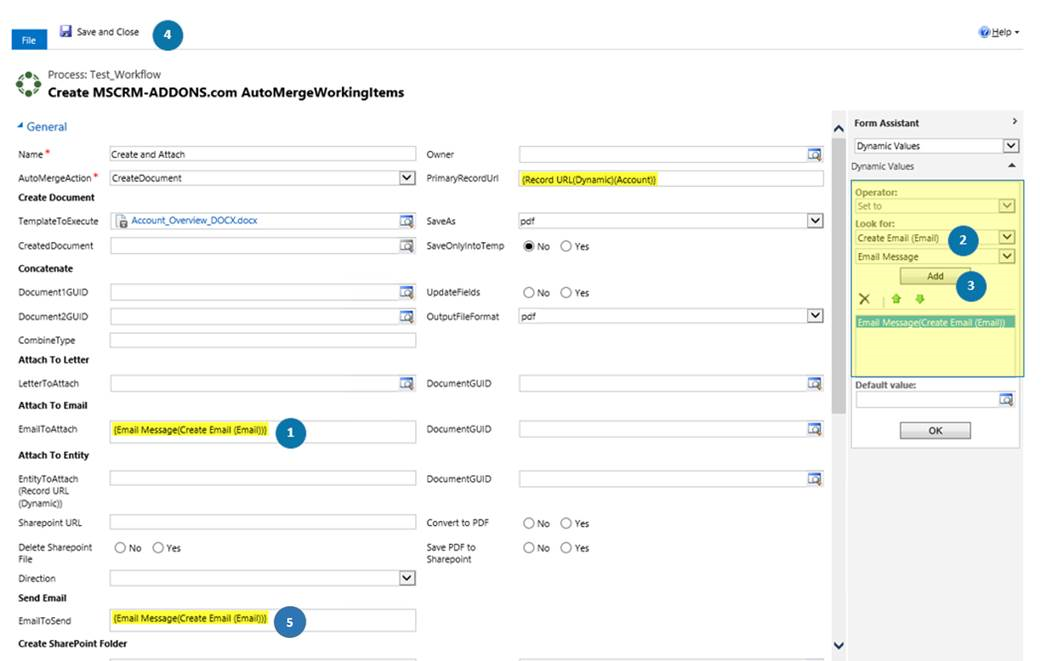
Figure 10: Attach Email
Now your workflow settings are finished and the workflow is ready to be used. Please do not forget to save the workflow before you proceed!

Figure 11: Workflow – ready to use
Step 3: Activate your new workflow
Please select your newly created workflow in the My Processes-section and click on the [Activate]-button in the command bar.
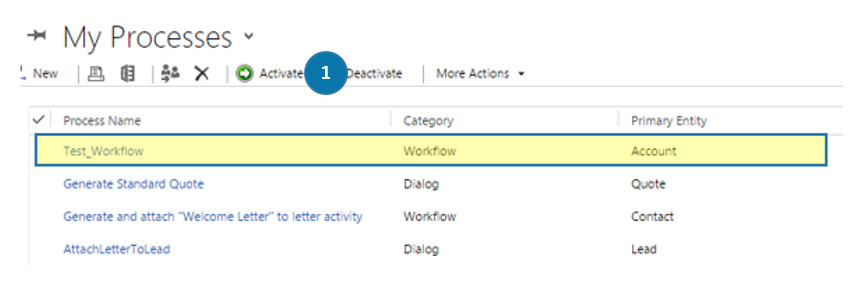
Figure 12: Activate workflow
In the following question dialog, click on the [Activate]-button in order to proceed.

Figure 13: Activate the process
That’s it! We appreciate your feedback! Please share your thoughts by sending an email to support@mscrm-addons.com.