mscrm-addons.com logomscrm-addons.com logo
  • Release History
  • Knowledge Base
  • Documentation
  • Contact Support
  • Release History
  • Knowledge Base
  • Documentation
  • Contact Support
home/Knowledge Base/DocumentsCorePack(DCP)/How to prepare a document for DeepSign

How to prepare a document for DeepSign

478 views 0 Updated on March 31, 2026

DeepSign is another e-signature tool that empowers users to electronically sign documents. It is primarily used in Switzerland, Germany, and Austria. This article describes how to create a DocumentsCorePack (DCP) template with a DeepSign signature.

Requirements:  

  • Template Designer version 11.4 
  • Installation of the DeepSign for Dynamics 365 solution 

Add e-signature elements via the Insert Field button 

To add DeepSign e-signature functionality to a DCP template, navigate to the mscrm-addons tab in Word. From here, select Insert MailMerge Fields to open the Template Designer. 

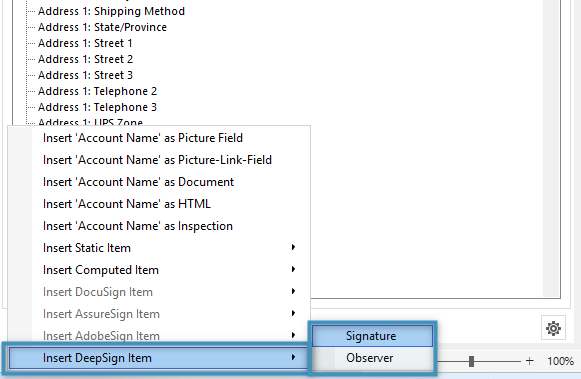
In your Word document, click where you want to insert an e-signature. Then navigate back to the Template Designer and expand the Insert Field dropdown to view all options. Hover over Insert DeepSign item and select Signature, if sending to a signee, and Observer if not.  

Inserting a DeepSign signature via the 'Insert Field' menu
Figure 1: Inserting a DeepSign signature via the ‘Insert Field’ menu

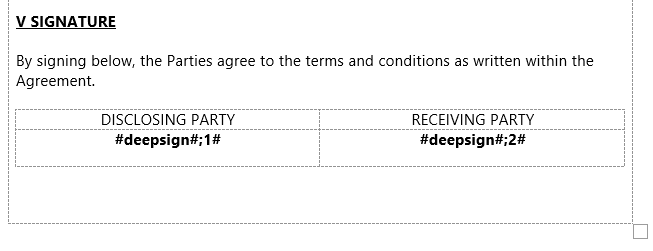
An inserted signature field will be placed in the document as shown below. 

A DeepSign signature field
Figure 2: A DeepSign signature field

If multiple signers are required, insert multiple fields.  Each added field will represent another signer. 

 Two DeepSign fields
Figure 3: Two DeepSign fields

Note: As of Template Designer – Desktop Client 12.8 and Office Add-In 1.11, DeepSign fields must be no greater than font size 4. If the fields are of a greater size, the document will be unable to be emailed during the document generation process. A fix for this issue is being worked on.

Create via placeholder text 

The placeholder text for DeepSign is as follows: #deepsign#e-mail;signOrder# 

However, in order for it to be used with the DCP dialog, you must leave out the email, as this will be later selected from the dialog. So, in the actual template in Word, the placeholder text should be as follows: #deepsign#;signOrder#. For your first signer, it would look like this: #deepsign#;1#. If there are additional signers, add the same placeholder text with the respective sign order numbers (ex: 1, 2, 3, etc.).

Advanced Criteria 

If you have additional criteria that you would like to define, you can use other DeepSign placeholder text formats to do so. This also allows you to avoid using the latest client version by manually inserting the placeholders. View this article for more information.  

That’s it! We appreciate your feedback! Please share your thoughts by sending an email to support@mscrm-addons.com. 

Tags:deepsigne-signesigne-signingesigning

Was this helpful?

Yes  No
Related Articles
  • What are the safest and fastest ways to automate document creation in Dynamics 365?
  • Why do document errors and inconsistencies increase as teams scale in Dynamics 365?
  • “Recipients not found” warning when using One-Click-Action
  • What makes a Dynamics 365 add-on easy for partners to recommend in every deal 
  • Enhancing data security for DCP and AE using a virtual network
  • Security issues when installing DocumentsCorePack (Defender)
Latest Articles
  • What are the safest and fastest ways to automate document creation in Dynamics 365?
  • Recap: Canadian Power Platform Summit 2026
  • What makes a partner tool defensible during budget pushback?
  • What are safe ways to reduce Dynamics 365 storage without deleting records? 
  • Why do document errors and inconsistencies increase as teams scale in Dynamics 365?
Popular Articles
  • DocumentsCorePack Template Designer – Getting Started
  • Step-by-Step: How to configure a One-Click-Action
  • Application Access for Dynamics 365
  • How licenses are counted
  • How to find your environment’s unique name in Microsoft Dynamics 365
Top Rated Articles
  • “Undefined”-labels in Chrome and Edge 114 and higher
  • How to insert Condition Fields in DocumentsCorePack Templates designer
  • Important information for Dynamics 365 online customers using DocumentsCorePack and/or AttachmentExtractor
  • How to activate the DocumentsCorePack Connector for PowerApps & Microsoft Flow
  • How licenses are counted
Categories
  • *News and General Infos* 73
  • Webinars 47
  • Template Designer(DCP 197
  • DocumentsCorePack(DCP 269
  • TelephoneIntegration (TI 65
  • AttachmentExtractor (AE 79
  • PowerSearch (PS 50
  • ActivityTools (AT 61
  • SmartBar (SB 54
  • GroupCalendar (GC 47
Our Vision

“We see it as our purpose to provide products that simplify and speed up our customers’ Microsoft Dynamics 365 experience.”

Knowledgebase
LogIn
mscrm-addons.com
  • Products
  • Online Shop
  • Downloads
  • My Account
About Us
  • About Us
  • Case Studies
  • Newsletter
  • Partner Program
  • Contact
Support
  • Support
  • Terms & Conditions
  • Documentation
  • Webinars
  • Legal Documents
  • Impressum
  • Cookies
  • © 2025 www.mscrm-addons.com. All Rights Reserved.