mscrm-addons.com logomscrm-addons.com logo
  • Release History
  • Knowledge Base
  • Documentation
  • Contact Support
  • Release History
  • Knowledge Base
  • Documentation
  • Contact Support
home/Knowledge Base/AttachmentExtractor (AE)/How to enable debugging for AttachmentExtractor

How to enable debugging for AttachmentExtractor

426 views 0 Updated on July 27, 2022

+++++++++++++++++++++++++++++++++++++++++++++++++++++

Please note: this article applies to

CRM 2011, CRM 2013, CRM 2015/2016 and
Microsoft Dynamics 365

It does NOT apply to Dynamics 365 Online with an Online Service

+++++++++++++++++++++++++++++++++++++++++++++++++++++

This article provides you with a step-by-step instruction on how to enable debugging
for AttachmentExtractor in CRM 2011, 2013, 2015/2016 and MS Dynamics 365.

Step by Step instruction

There are two debugging processes for AttachmentExtractor: The configuration and the service process.

While AttachmentExtractor-configuration debugging is always running (saving a log-subfolder of the application’s installation folder), the service part has to be activated.

Step 1:

To enable the debugging process for a specific service, you need to launch the ServiceManagement for AttachmentExtractor from the Start-Pane.

To do so, enter the term ServiceManagement in the Search field and press Enter.

image

Figure 1: Service Management for AttachmentExtractor

The AttachmentExtractor Management-window opens.

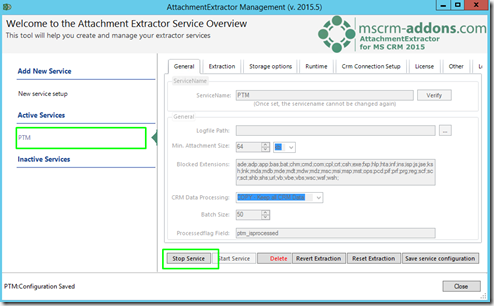
Please note: If the service for which you want to enable debugging is already running, you need to stop the service before you can change the configuration.

To do so, open the Active Services management-tab and click on the [Stop Service]-button.

Screenshot_11

Figure 2: Active Services management-tab > Stop Service

Step 2:

If there is no active service running, you can start the debugging process immediately. The AttachmentExtractor offers seperate debugging options
for each configured service.

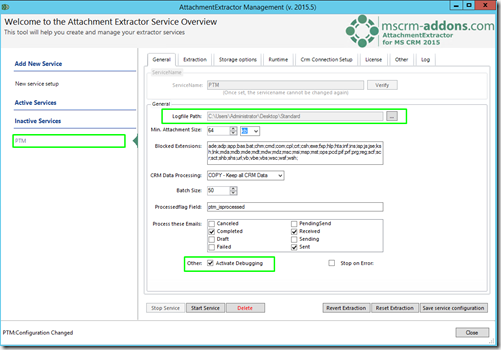
To enable debugging for a specific service, you need to specifiy a logfile-path in the general section of the general tab
and enable debugging by checking the Activate Debugging checkbox.

Screenshot_13

Figure 3: Specify a logfile-path

Please note: In MS Dynamics 365, you will find the Activate-Debugging checkbox directly under the Logfile-path-drop down menu.

Step 3:

Once this is done, access the the log files.
To do so, please navigate to the installation path of AttachmentExtractor and send us the files in the log-folder with an error description to support@mscrm-addons.com

Example:

C:\Program Files (x86)\PTM EDV-Systeme GmbH\AttachmentExtractor for Microsoft Dynamics CRM 2013\log (for e.g. MS Dyn CRM 2013)
C:\Program Files (x86)\PTM EDV-Systeme GmbH\AttachmentExtractor for Microsoft Dynamics CRM 2015\log (for e.g. MS Dyn CRM 2015)

That’s it! We appreciate your feedback! Please share your thoughts by sending an email to support@mscrm-addons.com.

Was this helpful?

Yes  No
Related Articles
  • The Hidden Cost of CRM Storage — And How to Eliminate It 
  • What Happens After You Deploy AttachmentExtractor: Storage & Cost Savings in Dynamics 365
  • How to Eliminate Excess Storage Costs in Microsoft Dynamics 365 Without Losing Access to Emails and Attachments
  • Buried in Storage Fees? Here’s How to Cut Dynamics 365 Costs Fast
  • AttachmentExtractor: Best practices for  Dynamics 365 on-premises to online migration projects 
  • Impact of AttachmentExtractor on AI capabilities in Microsoft Dynamics 365 
Latest Articles
  • AttachmentExtractor: Bandwidth & Performance – FAQ 
  • Recap: Power Platform Community Conference 2025
  • Recap: Community Summit 2025
  • Locating Raw Inputs and Outputs in Power Automate
  • Step by Step: How to execute an OCA in a Power Automate flow 
Popular Articles
  • DocumentsCorePack Template Designer – Getting Started
  • Step-by-Step: How to configure a One-Click-Action
  • Application Access for Dynamics 365
  • How licenses are counted
  • How to find your environment’s unique name in Microsoft Dynamics 365
Top Rated Articles
  • “Undefined”-labels in Chrome and Edge 114 and higher
  • How to insert Condition Fields in DocumentsCorePack Templates designer
  • Important information for Dynamics 365 online customers using DocumentsCorePack and/or AttachmentExtractor
  • How to activate the DocumentsCorePack Connector for PowerApps & Microsoft Flow
  • How licenses are counted
Categories
  • *News and General Infos* 68
  • Webinars 46
  • Template Designer(DCP 197
  • DocumentsCorePack(DCP 263
  • TelephoneIntegration (TI 65
  • AttachmentExtractor (AE 76
  • PowerSearch (PS 50
  • ActivityTools (AT 61
  • SmartBar (SB 54
  • GroupCalendar (GC 47
Our Vision

“We see it as our purpose to provide products that simplify and speed up our customers’ Microsoft Dynamics 365 experience.”

Knowledgebase
LogIn
mscrm-addons.com
  • Products
  • Online Shop
  • Downloads
  • My Account
About Us
  • About Us
  • Case Studies
  • Newsletter
  • Partner Program
  • Contact
Support
  • Support
  • Terms & Conditions
  • Documentation
  • Webinars
  • Legal Documents
  • Impressum
  • © 2025 www.mscrm-addons.com. All Rights Reserved.