mscrm-addons.com logomscrm-addons.com logo
  • Release History
  • Knowledge Base
  • Documentation
  • Contact Support
  • Release History
  • Knowledge Base
  • Documentation
  • Contact Support
home/Knowledge Base/TelephoneIntegration (TI)/“Server2Server” authentication for the DocumentsCorePack Template Designer and Telephone Integration

“Server2Server” authentication for the DocumentsCorePack Template Designer and Telephone Integration

1880 views 1 Updated on October 23, 2023

Due to the deprecation of the so-called WS-trust authentication security protocol, when connecting to Microsoft Dataverse (Dynamics 365) after June 2021, it is required to enable “server 2 server” authentication for the DocumentsCorePack Template Designer and Telephone Integration for all customers.

This article provides a step-by-step guide on how to enable “server 2 server” authentication for the following components:

  • DocumentsCorePack Template Designer
  • TelephoneIntegration Client

1. Open the Connection Dialog

DocumentsCorePack Template Designer: Right-click on the Data-Provider icon in your Taskbar – > Configuration. Once opened, click on Change Logon.

Access the DocumentsCorePack Template Designer connection settings
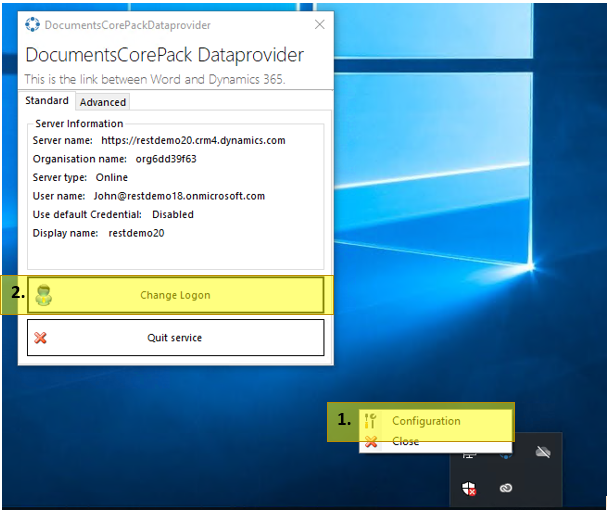
Figure 1: Access the DocumentsCorePack Template Designer connection settings

Telephone Integration: If you do get the following error message, simply click on Open Settings:

Error message and access to connection settings for the TelephoneIntegration client
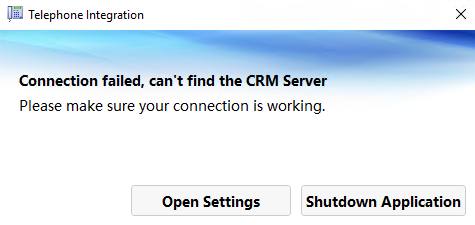
Figure 2: Error message and access to connection settings for the TelephoneIntegration client

Alternatively you can right click on the TelephoneIntegrtion Icon in your taskbar > Setup. Within the settings, switch to the CRM tab and click on Setup Connection.

Accessing connection settings for the TelephoneIntegration Client.
Figure 3: Accessing connection settings for the TelephoneIntegration Client.


2. Enable “Server 2 Server” authentication

Within the connection dialog, perform the following steps:

Enabling "Server2Server" authentication for your Dynamics 365 / PowerApps connection
Figure 4: Enabling “Server2Server” authentication for your Dynamics 365 / PowerApps connection

1. Activate the Prefer Server2Server authentication setting
2. Hit Retrieve all or Retrieve organizations 

This will open the Microsoft OAuth window to authenticate your user where you can enter the credentials you want to use to connect to your Dynamics 365 or Powerapp.

3. Select the organization you want to connect to.
4. Confirm your changes with a click on OK.

IMPORTANT: Older versions still have the use local discovery setting enabled and checked. Please ensure that this setting is disabled!
Please note: Depending on your version, this setting might be on the Additional Settings tab.

That’s it! We appreciate your feedback! Please share your thoughts by sending an email to support@mscrm-addons.com. 

Was this helpful?

1 Yes  3 No
Related Articles
  • How do teams automate document and PDF generation directly inside Dynamics 365?
  • Enable logging for the AutoMergeAzure Plugin for Dynamics 365 Online
  • Why Microsoft partners standardize on a single Dynamics 365 storage solution
  • Can DocumentsCorePack automate documents directly inside Dynamics 365 at scale?
  • Recap: Directions North America 2026
  • Recap: ColorCloud 2026
Leave A Comment Cancel reply

You must be logged in to post a comment.

Latest Articles
  • How do teams automate document and PDF generation directly inside Dynamics 365?
  • Enable logging for the AutoMergeAzure Plugin for Dynamics 365 Online
  • Why Microsoft partners standardize on a single Dynamics 365 storage solution
  • Can DocumentsCorePack automate documents directly inside Dynamics 365 at scale?
  • Recap: Directions North America 2026
Popular Articles
  • DocumentsCorePack Template Designer – Getting Started
  • Step-by-Step: How to configure a One-Click-Action
  • Application Access for Dynamics 365
  • How licenses are counted
  • How to find your environment’s unique name in Microsoft Dynamics 365
Top Rated Articles
  • “Undefined”-labels in Chrome and Edge 114 and higher
  • How to insert Condition Fields in DocumentsCorePack Templates designer
  • Important information for Dynamics 365 online customers using DocumentsCorePack and/or AttachmentExtractor
  • How to activate the DocumentsCorePack Connector for PowerApps & Microsoft Flow
  • How licenses are counted
Categories
  • *News and General Infos* 76
  • Webinars 48
  • Template Designer(DCP 197
  • DocumentsCorePack(DCP 272
  • TelephoneIntegration (TI 65
  • AttachmentExtractor (AE 80
  • PowerSearch (PS 50
  • ActivityTools (AT 61
  • SmartBar (SB 54
  • GroupCalendar (GC 47
Our Vision

“We see it as our purpose to provide products that simplify and speed up our customers’ Microsoft Dynamics 365 experience.”

Knowledgebase
LogIn
mscrm-addons.com
  • Products
  • Online Shop
  • Downloads
  • My Account
About Us
  • About Us
  • Case Studies
  • Newsletter
  • Partner Program
  • Contact
Support
  • Support
  • Terms & Conditions
  • Documentation
  • Webinars
  • Legal Documents
  • Impressum
  • Cookies
  • © 2025 www.mscrm-addons.com. All Rights Reserved.