Sometimes it is necessary to generate a large number of documents in a short timeframe. In these cases, we can use flows to accomplish this efficiently. This article outlines best practices and provides examples for generating documents in bulk using DocumentsCorePack (DCP) in Power Automate.
Note: We recommend load-balancing for batch document generation. This will lead to significant performance improvements, as demonstrated here: “Performance benchmark, limitations & scalability“.
Our goal
Our goal is to generate and process documents for each of our account records. To accomplish this, we need to load all account records and loop through them twice: once for generating the document requests, and once for retrieving the generated documents for processing.
When creating this bulk document generation flow, there are two points to keep in mind:
- Create document jobs fast: To enable our services to begin generating documents efficiently, the flow must create document jobs quickly and in an asynchronous manner. This rapidly populates the document generation queue, allowing the service(s) to process and generate documents in bulk.
- Combine document generation and processing settings into a single document job when possible: DCP makes it possible to combine document generation and processing into a single action. This eliminates the need to configure additional steps in your flow to process the document afterward.
For example, one request can include both:
- The definition of the document to be generated
- The instructions for how the document should be processed once generated (e.g., save to SharePoint, attach to an email, etc.).
First loop: Generating document requests
After retrieving all records (via, for example, Dataverse’s List rows action), you will need to generate the document jobs within an Apply-to-Each loop.
Note: You must loop through every record for which you want to generate a document. In this example, the process loops through 1000 account records.
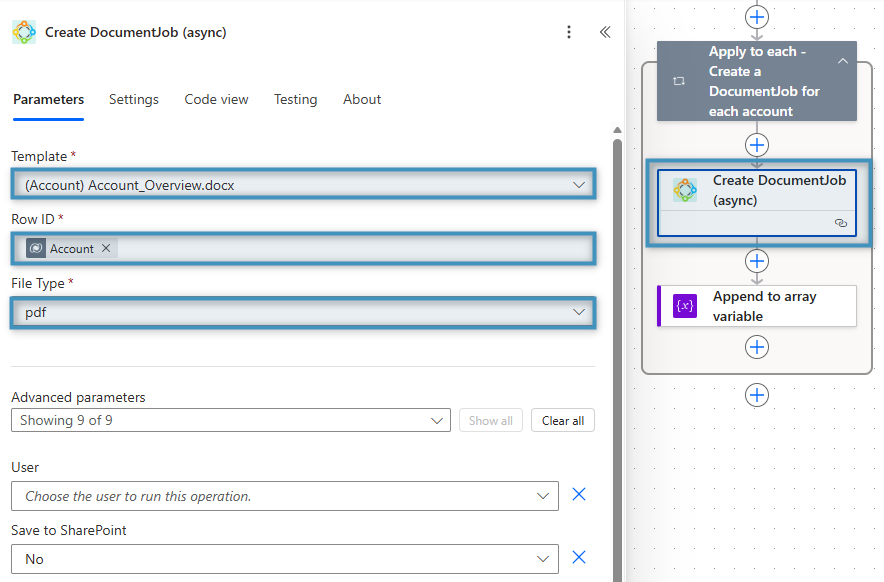
Within your loop, use the DocumentsCorePack Connector to create DocumentJobs. The DCP connector has the Create DocumentJob (async) action, which you can use to create queue items:
This action allows you to directly specify whether the document should be stored in SharePoint or printed by configuring the corresponding fields under Advanced parameters. If either of these settings is required, select it here to avoid additional requests later in the flow.
If you plan to do the document processing inside your flow, be sure to save the DocumentJobId in an array (as explained below).
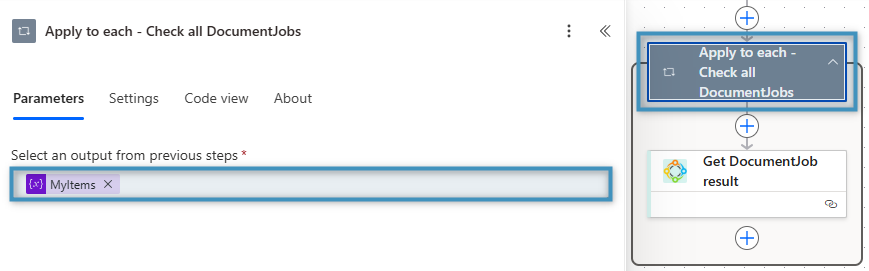
Second loop: Get generated documents for processing
In order to process the finished documents in your flow, a second loop is required for the DocumentJobIds saved in our array. First, select your variable in the Apply to each control.
Then, add the Get DocumentJob result action and insert the Current item parameter from the previous loop into the DocumentJob ID field.
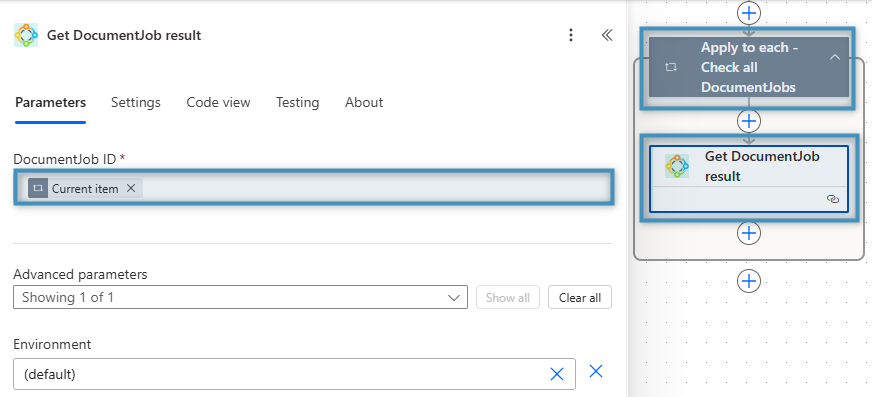
The Get DocumentJob result action provides the following information for every ID of our array:
- File Name
- File size
- Document content
- Mime-Type
- Success State
- Return Value
After retrieving this information, you can add additional steps to process the document according to your business needs. Power Automate provides a wide range of capabilities for this. You could, for example:
- Create an email and send the document as an attachment
- Save the document to OneDrive, DropBox, or Azure Blob
- Print the document
Note: To speed up this loop, you can enable the Concurrency Control to run the loop in parallel. If you do, we recommend adjusting the retry policy as described below.
Troubleshooting
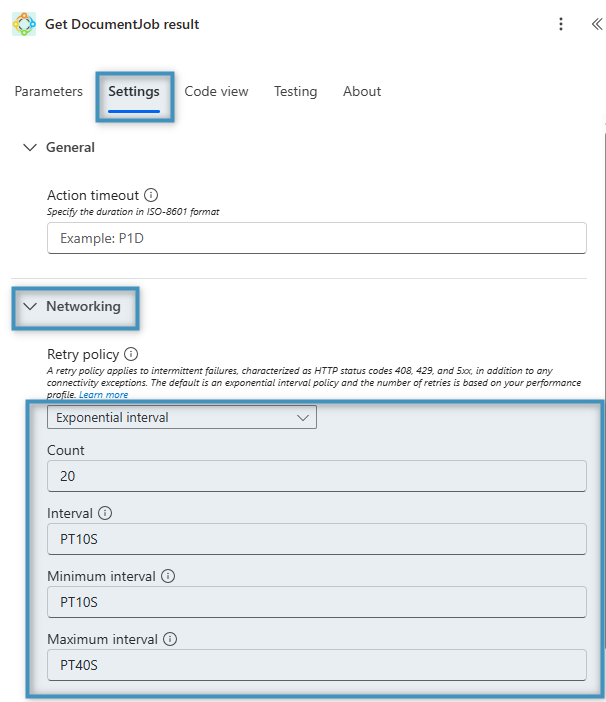
If a 429 error occurs, it means you have reached an action limit in Microsoft flow. To fix this, go to the Settings of the step:

We recommend changing the Retry Policy for this step to the following:
Example flows
At the bottom of this article, you will find a few example flows. Feel free to try them out to get familiar with how the features discussed in this article work.