mscrm-addons.com logo displayed here.mscrm-addons.com logo displayed here.
  • Release History
  • Documentation
  • Back to www.mscrm-addons.com
  • Release History
  • Documentation
  • Back to www.mscrm-addons.com
home/Knowledge Base/DocumentsCorePack(DCP)/How to generate and attach a document as a note and save it to SharePoint via Power Automate

How to generate and attach a document as a note and save it to SharePoint via Power Automate

5196 views 0 Updated on January 31, 2025

This article provides a step-by-step guide on how to generate a document, attach it as a note, and save it to SharePoint using Power Automate.

In the following example, we will create an automated cloud flow that generates a welcome letter, attaches it to a contact after the contact has been created, and saves it to SharePoint using Power Automate.

Prerequisites: To use the DocumentsCorePack Connector, you will need to get an API key from the service configuration. Learn more about how this works here.

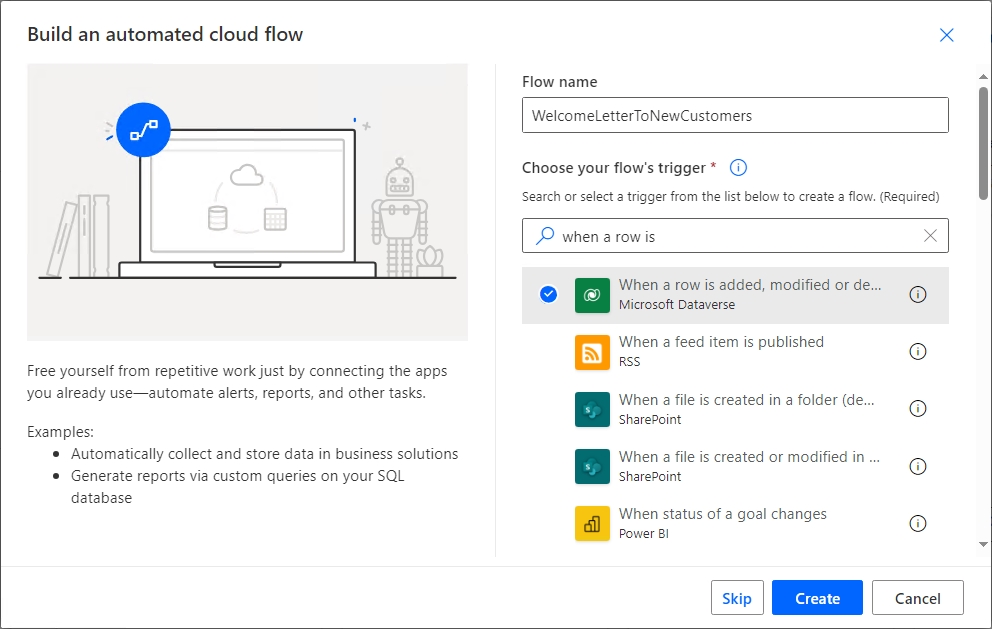
Step 1: Creating the flow

Begin by creating a new flow and selecting a trigger. In our case, we will build an automated cloud flow. We will select When a row is added, modified, or deleted as the trigger.

Creating a flow
Figure 1: Creating a flow

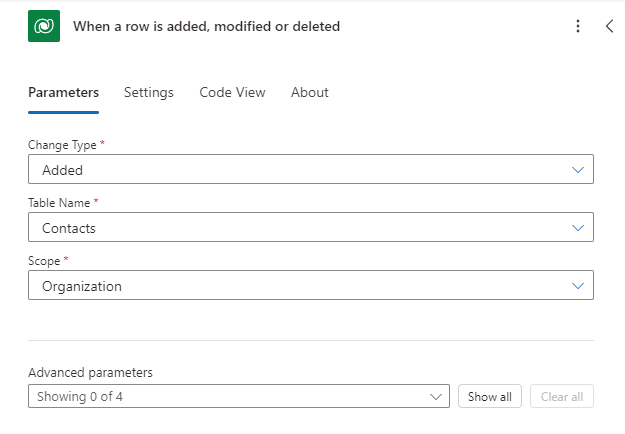
Step 2: Setting our starting parameters

Fill in the parameters accordingly. We will set Change Type to Added and set the Table Name to Contacts.

Setting the parameters
Figure 2: Setting the parameters

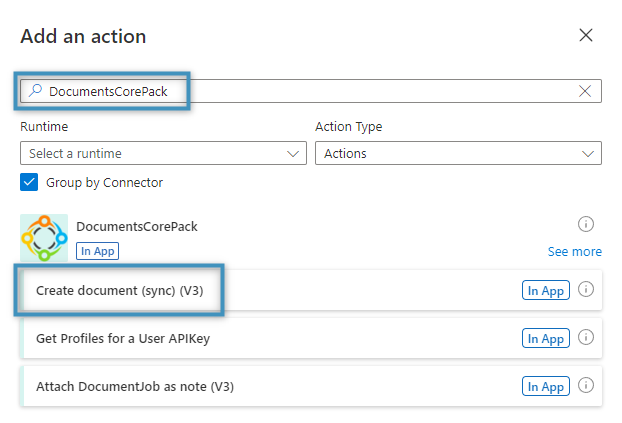
Step 3: Adding our action

Next, we will add a new action to our flow. Search for the DocumentsCorePack Connector and select Create document (sync) (V3) from the list of actions.

Searching for the connector and selecting an action
Figure 3: Searching for the connector and selecting an action

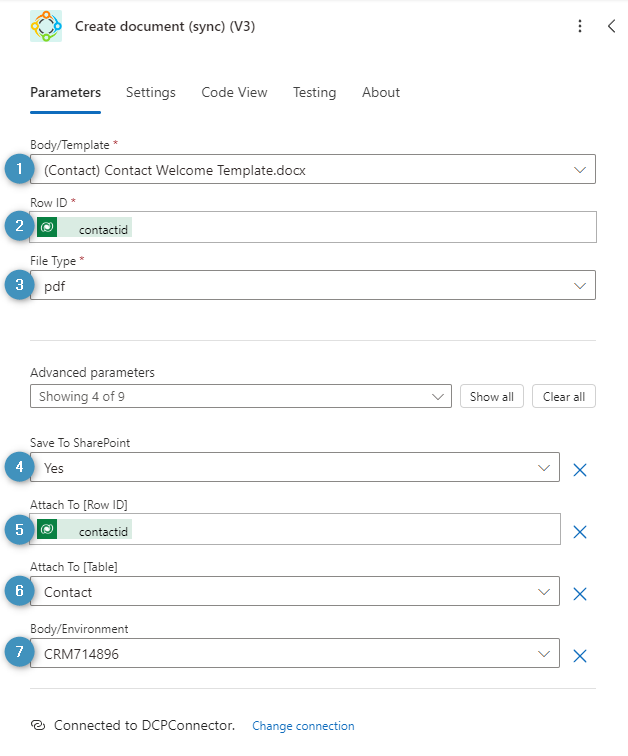
Step 4: Configuring our action

After selecting the action, the following window will pop up. Please fill out the following fields:

❶ Body/Template: Choose a template
❷ Row ID: Select the unique identifier of the record to run this template for
❸ FileType: Select a file type
❹ Save To SharePoint: Choose whether or not to save the generated document to SharePoint. The document will be stored in the document location of the record the document is created for.
❺ Attach to [Row ID]: The unique identifier of the record to attach this document to.
❻ Attach to [Table]: The table the generated document should be attached to
❼ Body/Environment: The environment this action should be used in

Please note: Make sure that the base entity of your template matches the entity of your selected trigger.

Fill out our action as shown below.

How to generate and attach a document as a note and save it to SharePoint via Power Automate
Figure 4: The Create document (sync) (V3) action

Optional Step: An alternative approach

Instead of using the Create document step to attach the generated document to the record, it is also possible to add an extra step to the flow and attach it there.

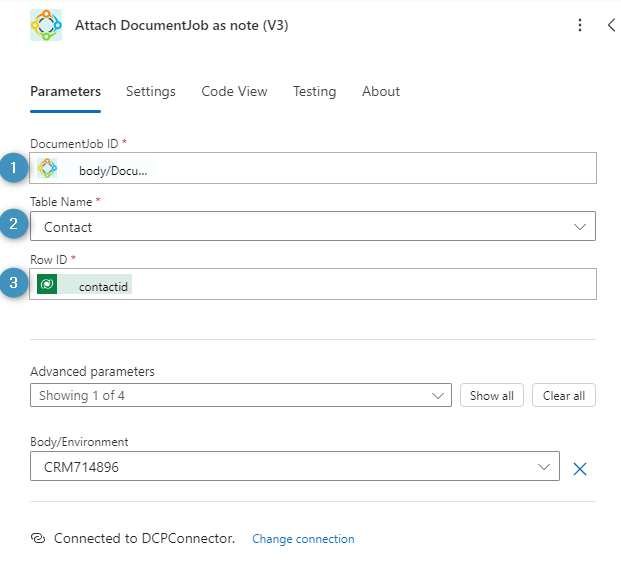
Add the Attach DocumentJob as a note (V3) action after the Create document action. You can configured the following parameters:

❶ DocumentJob ID: The DocumentJob ID of the generated document
❷ Table name: Choose a table to attach the note to
❸ Row ID: ID of the record to attach the note to

Please note: You can also add a note description or a note subject to help organize your notes.

Fill in this action as follows:

How to generate and attach a document as a note and save it to SharePoint via Power Automate
Figure 5: The Attach DocumentJob as note (V3) action

Set up your flow, then save it.

Step 5: Testing the Flow

You can directly start your flow within Dynamics 365 by pressing the Test button.

How to generate and attach a document as a note and save it to SharePoint via Power Automate
Figure 5: Testing the flow

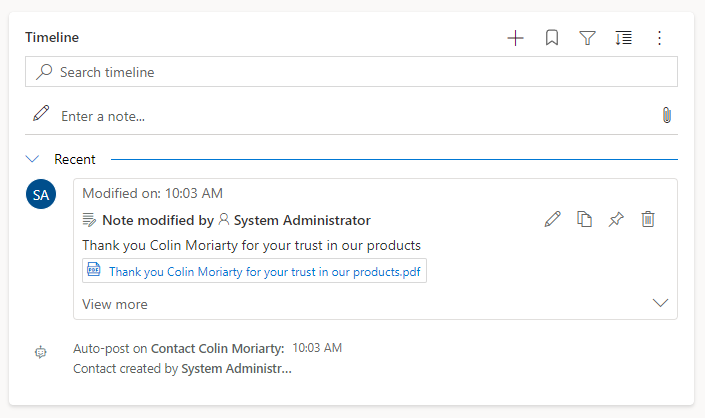
After your flow runs successfully, it attaches the created document to the new contact as a PDF.

How to generate and attach a document as a note and save it to SharePoint via Power Automate
Figure 6: The generated document attached to the record’s timeline

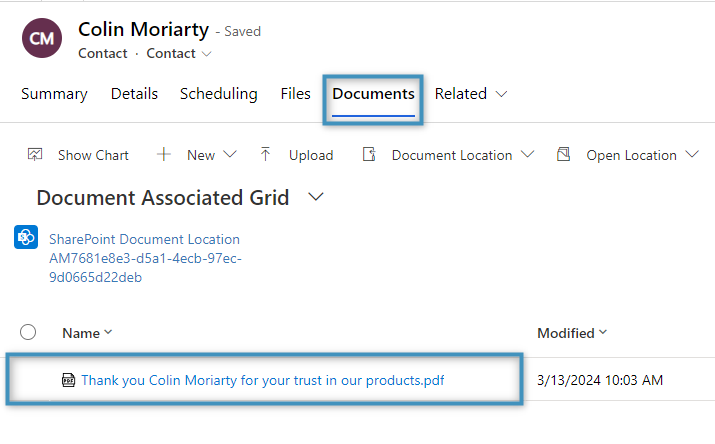
If you configure the Create document action to save the document to SharePoint, you will find the document under the Documents tab of the record.

How to generate and attach a document as a note and save it to SharePoint via Power Automate
Figure 7: The generated document saved to SharePoint

Back to “The DocumentsCorePack connector for PowerApps and PowerAutomate (Microsoft Flow)“.

That’s it! We appreciate your feedback! Please share your thoughts by sending an email to support@mscrm-addons.com.

Was this helpful?

Yes  No
Related Articles
  • Deploying DocumentsCorePack: Setup, Automation, and Real Business Impact in Dynamics365
  • Introducing the DocumentsCorePack Template Designer Office Add-In (Beta)
  • 3 Ways DocumentsCorePack Transforms Proposal, Quote, and Contract Creation
  • DeepSign for DocumentsCorePack 
  • Generate and send a document for e-signing using DeepSign
  • How to prepare a document for DeepSign
Leave A Comment Cancel reply

You must be logged in to post a comment.

Latest Articles
  • What Happens After You Deploy AttachmentExtractor: Storage & Cost Savings in Dynamics 365
  • Deploying DocumentsCorePack: Setup, Automation, and Real Business Impact in Dynamics365
  • Introducing the DocumentsCorePack Template Designer Office Add-In (Beta)
  • How to Eliminate Excess Storage Costs in Microsoft Dynamics 365 Without Losing Access to Emails and Attachments
  • 3 Ways DocumentsCorePack Transforms Proposal, Quote, and Contract Creation
Popular Articles
  • DocumentsCorePack Template Designer – Getting Started
  • Step-by-Step: How to configure a One-Click-Action
  • Application Access for Dynamics 365
  • How to find your environment’s unique name in Microsoft Dynamics 365
  • How licenses are counted
Top Rated Articles
  • “Undefined”-labels in Chrome and Edge 114 and higher
  • Important information for Dynamics 365 online customers using DocumentsCorePack and/or AttachmentExtractor
  • How to activate the DocumentsCorePack Connector for PowerApps & Microsoft Flow
  • How to insert Condition Fields in DocumentsCorePack Templates designer
  • How licenses are counted
Categories
  • *News and General Infos* 64
  • Webinars 45
  • Template Designer(DCP 196
  • DocumentsCorePack(DCP 258
  • TelephoneIntegration (TI 65
  • AttachmentExtractor (AE 75
  • PowerSearch (PS 50
  • ActivityTools (AT 61
  • SmartBar (SB 54
  • GroupCalendar (GC 47
Our Vision

“We see it as our purpose to provide products that simplify and speed up our customers’ Microsoft Dynamics 365 experience.”

Knowledgebase
LogIn
mscrm-addons.com
  • Products
  • Online Shop
  • Downloads
  • My Account
About Us
  • About Us
  • Case Studies
  • Newsletter
  • Partner Program
  • Contact
Support
  • Support
  • Terms & Conditions
  • Documentation
  • Webinars
  • Legal Documents
  • Impressum
  • © 2022 www.mscrm-addons.com. All Rights Reserved.