In many business scenarios, such as case management, it is crucial to include relevant content, like incident images stored in a SharePoint folder linked to a case record, into reports or other documents.
This article explains how DocumentsCorePack enables the integration of content from specific SharePoint locations directly into your documents, by establishing a relationship with the SharePoint document table and configuring a query to retrieve and insert items using the Insert Picture Field or Insert Document option.
Note: This table has limitations and does not behave like other tables and queries. For example, fetches without a filter to a regarding object will not return any data.
Important: Adding content from SharePoint to a document does not work out of the box when using an AppAccess connection as of March 2025. This refers to the Dynamics 365 connection, not the SharePoint connection. Additional setup steps are required.
https://learn.microsoft.com/en-us/power-platform/admin/configure-azure-app-with-sharepoint-access
Step-by-Step Example
For this example, I will use Case as the regarding object to add all .png files from the SharePoint location of the Case-record to the document via the Insert Picture Field button.
To start, access the www.mscrm-addons.com tab in Word and select Insert MailMerge Fields. The Template Designer will open. Change the Type to Case (incident) and then access the Relationship Designer by selecting the Additional tab and then Add Relationship/Entity.
Next, check the Use Query Expression V2 checkbox. Then change the existing relation to Separate Entities and select SharePoint Document from the dropdown menu. Check Absolute URL and Document ID for the Attributes. Under the Advanced Settings set the Type to inner. Then select Add to add another relationship.

Next, resolve the filter to the regarding object by changing the existing relation to Relationships and selecting the regarding object, which in this example is Case. Under the Advanced Settings set the Type to inner.

Then you need to place filters on the file elements to return the items you want to add to your document using the Insert Picture Field or Insert Document button, such as a query only for .png files or .docx files.
Start by manually placing the qid placeholder. This will be replaced later with the actual guide of the record that the document creation action is triggered from, which is the id of the Case record in this example. To do this, select Add under Filter, select AND for the Type and then Add again, select the regarding object (ex: Case), choose in for the operator, and type qid for the value. Then press OK twice to apply the filter.
Note: Some filter operators do not work with this use-case. The operators eq, neq, ne, null, and not-null work as expected and can be used. However, the operators ends-with, like, and begins-with do not work. Do not use those operators or it will return an error.

Save the relationship with the regarding object by selecting OK at the bottom-right of the window. This will return you to the original window for the SharePoint Document.
Apply additional filters here to specify the file types to be loaded. In this example, we want to load only .png files.

Press OK at the bottom right of the window once you have finished adding all additional filters. Select Absolute URL from the list of available fields. Then select the Insert Picture Field button, since we are only loading .png files for this example.

You may be prompted with the following dialog, where you can decide how the table should appear. For this example, we will choose to insert a new Table with a row per related record without a header or footer and with one column.
Please note: If you choose to insert the field from the first related record without a table, only the first image on the record will be pulled into the document, not all of them.

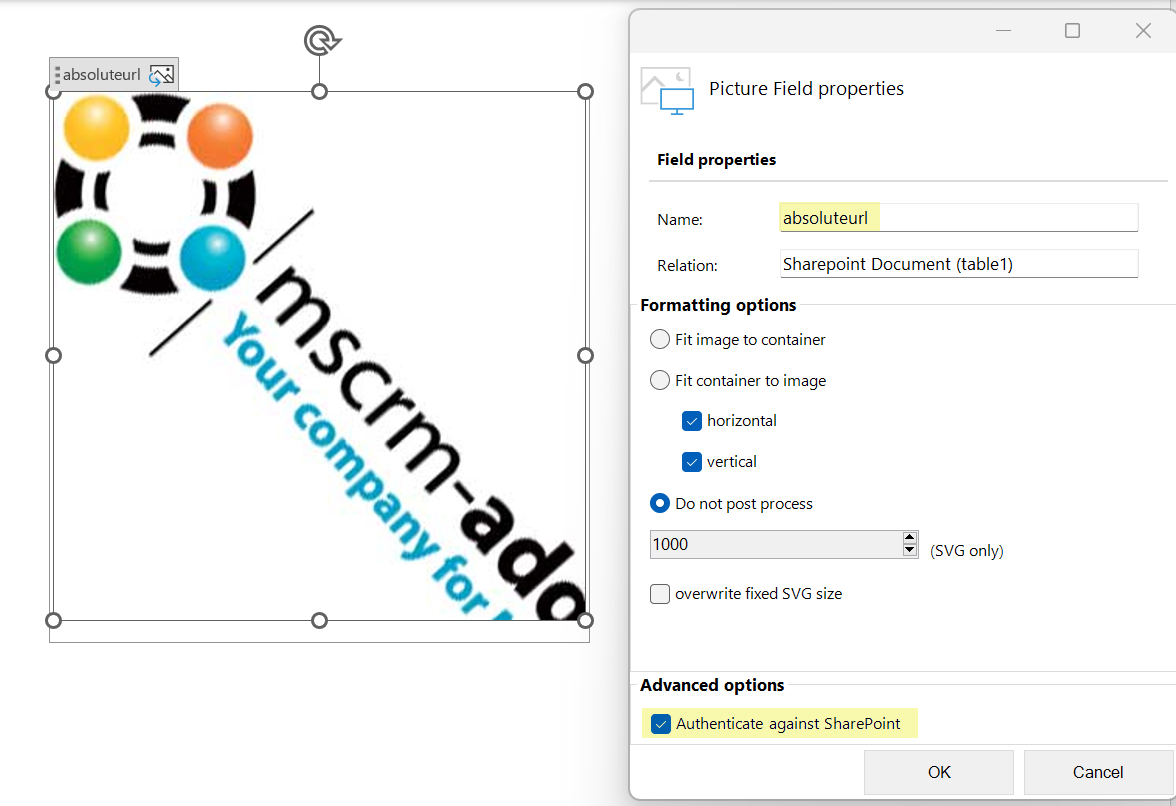
After selecting OK, the field absoluteurl will appear in your document, which holds the URL to the file.
Important: After inserting the field, you must access the Field Properties from the www.mscrm-addons.com tab and check the Authenticate against Sharepoint checkbox.
You can test that the field is working correctly by navigating back to the www.mscrm-addons.com tab and selecting Choose Data and then selecting a Case record. Below, you can see the sample case record used and the end result.


And that covers how to add content from SharePoint to a document!
Try it Yourself!
For further guidance, view the attached sample template below that has all of the above steps completed, and try using it yourself.
That’s it! We appreciate your feedback! Please share your thoughts by sending an email to support@mscrm-addons.com.