• Release History
  • Documentation
  • Back to www.mscrm-addons.com
  • Release History
  • Documentation
  • Back to www.mscrm-addons.com
home/Knowledge Base/AttachmentExtractor (AE)/Limiting access to SharePoint for custom app access using Sites.Selected

Limiting access to SharePoint for custom app access using Sites.Selected

3767 views 2 Updated on May 7, 2025

Limiting access to SharePoint for custom app access using Sites.Selected can be used, When choosing custom AppAccess, you can limit the scope of access to Sharepoint by using the Sites.Selected privilege. The Sites.Selected does not grant any privileges on its own, but allows you to manually define the access for the app.

The step-by-step guide on limiting access to SharePoint for custom app access using Sites.Selected.

Note: Without privileges, an app with Sites.Selected cannot logon to Sharepoint.

Granting privileges via PowerShell

Limiting the scope of access to SharePoint using Sites.Selected
Figure 1: An example screenshot of PowerShell

To grant privileges, you will first need to enter the following line of code in order to allow PowerShell to communicate with SharePoint:
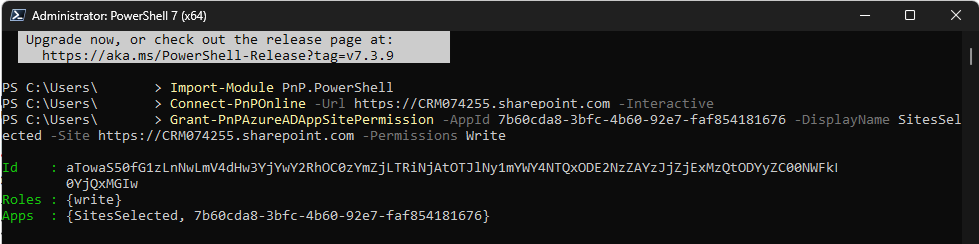
Import-Module PnP.PowerShell

Then, you will need to enter the next line of code to connect PowerShell to your SharePoint, replacing <YourSharepoint> with your SharePoint URL.

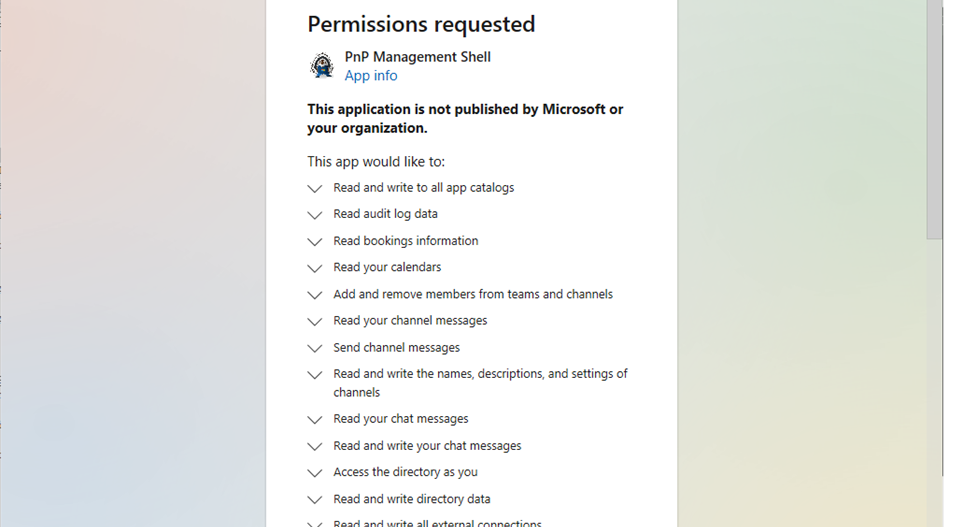
Connect-PnPOnline -Url <YourSharepoint> -Interactive

Once entered, you will need to grant PowerShell permission via a connection dialog. This will allow PowerShell to manage Sharepoint.

Limiting the scope of access to SharePoint using Sites.Selected
Figure 2: A portion of the permissions dialog

After PowerShell has been permitted to connect, you can grant permissions for your app through the following line of code (replacing any tags with brackets with your own values):

Grant-PnPAzureADAppSitePermission -AppId <AppId> -DisplayName <AppDisplayName> -Site <YourSharepoint> -Permissions <Permission>

The possible permissions that can be granted by replacing the <Permission> tag are as follows:

  • Read
  • Write – Save to Sharepoint, but cannot create OnBehalfOfColumn to reflect the user initiating the save
  • Manage – Save to Sharepoint and create OnBehalfOfColumn to reflect the user initiating the save
  • FullControl

Alternative: Using Microsoft Graph PowerShell SDK

In some environments, the PnP.PowerShell module may not work reliably. As an alternative, you can use the Microsoft Graph PowerShell SDK to grant Sites.Selected access programmatically by following these steps:

Install-Module Microsoft.Graph -Scope CurrentUser
Connect-MgGraph -Scopes "Sites.FullControl.All"

$Site = Get-MgSite "yourtenant.sharepoint.com:/sites/testsite1:/"

$Application = @{
    id = "<AppId>"
    displayName = "<AppDisplayName>"
}

$Status = New-MgSitePermission -SiteId $Site.Id `
    -Roles "write" `
    -GrantedToIdentities @{"application" = $Application}

Note:

  • The “:” need to enclose he full site definition when using “Get-MgSite“
  • The grantable permissions are outlined above

Revoke privilege

To revoke privileges, you can use the following code:

Revoke-PnPAzureADAppSitePermission -PermissionId <Id>

Note: Revoke does not prompt any error if the specified Id does not exist. Always verify if the privileges are as desired by checking the granted privileges.

Check granted privileges

To check privileges, you can use the following code:

Get-PnPAzureADAppSitePermission -AppIdentity <AppId>

​That’s it! We appreciate your feedback! Please share your thoughts by sending an email to support@mscrm-addons.com.

Tags:SharepointSecurityApplicationAccessSitesSelected

Was this helpful?

2 Yes  3 No
Related Articles
  • Introducing the DocumentsCorePack Template Designer Office Add-In (Beta)
  • How to Eliminate Excess Storage Costs in Microsoft Dynamics 365 Without Losing Access to Emails and Attachments
  • 3 Ways DocumentsCorePack Transforms Proposal, Quote, and Contract Creation
  • DeepSign for DocumentsCorePack 
  • Generate and send a document for e-signing using DeepSign
  • How to prepare a document for DeepSign
Latest Articles
  • Introducing the DocumentsCorePack Template Designer Office Add-In (Beta)
  • How to Eliminate Excess Storage Costs in Microsoft Dynamics 365 Without Losing Access to Emails and Attachments
  • 3 Ways DocumentsCorePack Transforms Proposal, Quote, and Contract Creation
  • DeepSign for DocumentsCorePack 
  • Generate and send a document for e-signing using DeepSign
Popular Articles
  • DocumentsCorePack Template Designer – Getting Started
  • Step-by-Step: How to configure a One-Click-Action
  • Application Access for Dynamics 365
  • How to find your environment’s unique name in Microsoft Dynamics 365
  • How licenses are counted
Top Rated Articles
  • “Undefined”-labels in Chrome and Edge 114 and higher
  • Important information for Dynamics 365 online customers using DocumentsCorePack and/or AttachmentExtractor
  • How to activate the DocumentsCorePack Connector for PowerApps & Microsoft Flow
  • How licenses are counted
  • How to insert Condition Fields in DocumentsCorePack Templates designer
Categories
  • *News and General Infos* 64
  • Webinars 45
  • Template Designer(DCP 197
  • DocumentsCorePack(DCP 258
  • TelephoneIntegration (TI 65
  • AttachmentExtractor (AE 74
  • PowerSearch (PS 50
  • ActivityTools (AT 61
  • SmartBar (SB 54
  • GroupCalendar (GC 47
Our Vision

“We see it as our purpose to provide products that simplify and speed up our customers’ Microsoft Dynamics 365 experience.”

Knowledgebase
LogIn
mscrm-addons.com
  • Products
  • Online Shop
  • Downloads
  • My Account
About Us
  • About Us
  • Case Studies
  • Newsletter
  • Partner Program
  • Contact
Support
  • Support
  • Terms & Conditions
  • Documentation
  • Webinars
  • Legal Documents
  • Impressum
  • © 2022 www.mscrm-addons.com. All Rights Reserved.