mscrm-addons.com logomscrm-addons.com logo
  • Release History
  • Knowledge Base
  • Documentation
  • Contact Support
  • Release History
  • Knowledge Base
  • Documentation
  • Contact Support
home/Knowledge Base/DocumentsCorePack(DCP)/How To: Set up the DocumentsCorePack custom connector for PowerAutomate (Microsoft Flow)

How To: Set up the DocumentsCorePack custom connector for PowerAutomate (Microsoft Flow)

881 views 1 Updated on February 13, 2023

In this article, we will show you how to create a DocumentsCorePack custom connector for PowerAutomate enabling users to utilize the document generation and processing capabilities within their Flows and Canvas Apps.

IMPORTANT: The way which is described here is already outdated and only useful if you want to manually want to import the REST-API of DocumentsCorePack.
We highly recommend to use the new certified DocumentsCorePack connector. Please go to following article to learn how you can use the certified connector.

Prerequisites:

  • Your DocumentsCorePack service must be hosted on mscrm-addons.com (Open Service Configuration)
  • Your DocumentsCorePack service must use Server2Server authentication

Step-by-Step video:

https://youtu.be/9xJ2vX8y5XE

​Step-by-Step guide:

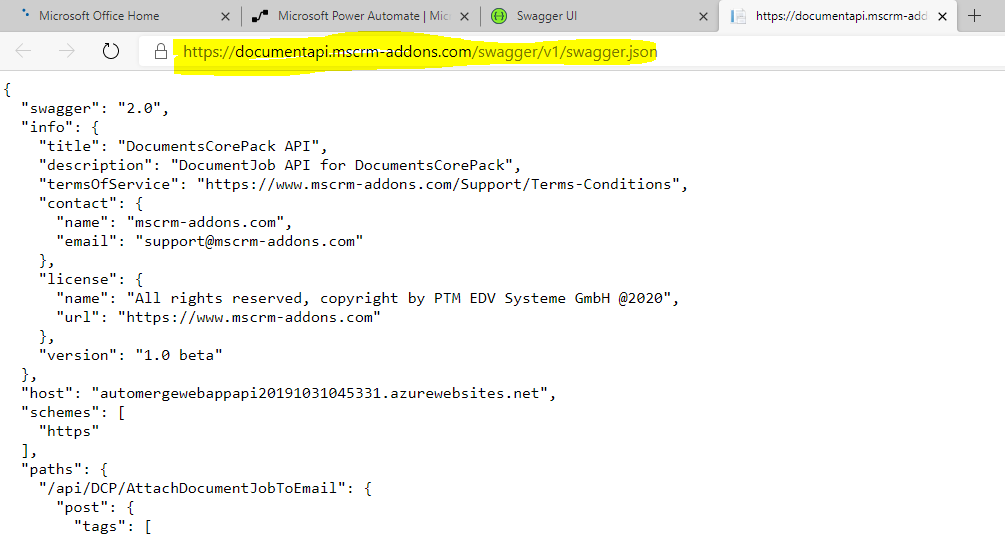
  1. Visit https://documentapi.mscrm-addons.com/swagger/v1/swagger.json and save the swagger.json file locally.
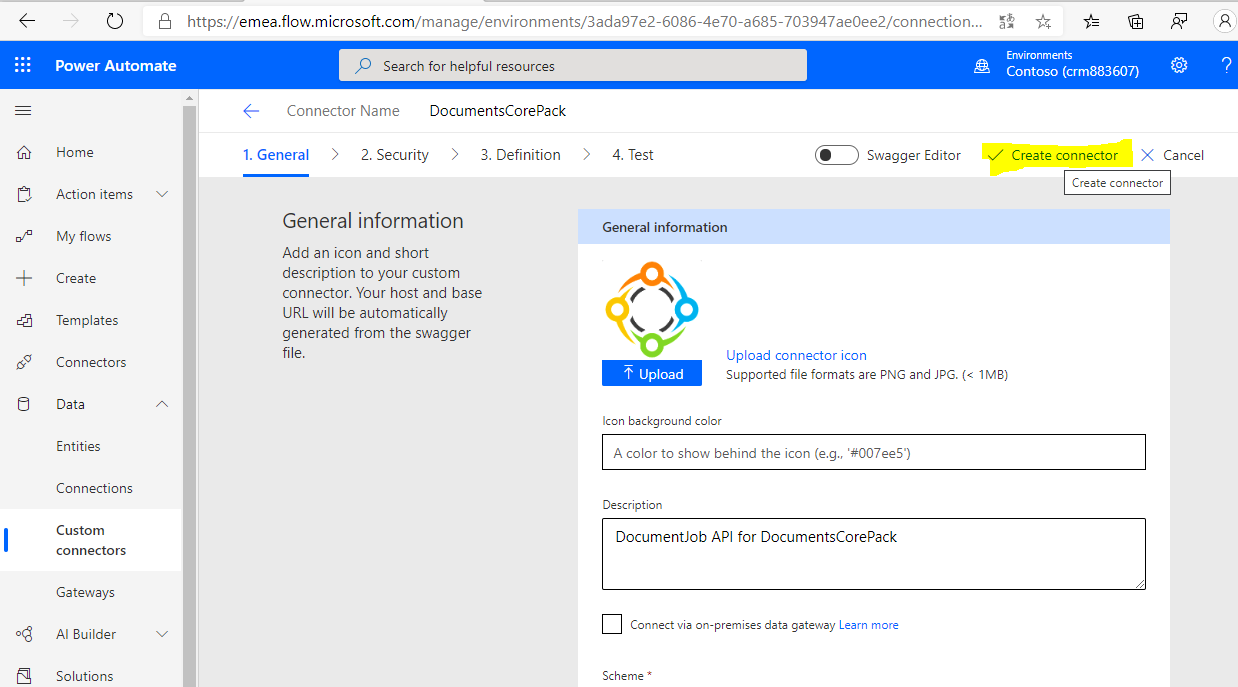
  2. Go to https://flow.microsoft.com  or https://make.powerapps.com, choose the environment you want to add the connector too and and click on [Data->CustomConnector->OpenAPI-File import]
  3.  Select the file saved in step #1 and follow the instructions. You can optionally change the icon/color and name of the connector as desired. Once done, click on [Create Connector]
  4. Visit the service configuration on https://www.mscrm-addons.com/Products/DocumentsCorePack/ServiceConfiguration, select the service and click on [get API key]
  5. When asked, enter the API key to define the connection for your DocumentsCorePack Connector.

You are now all set.

Note: You can easily test the connection. Therefore you click on the edit button on the custom connector and go to step 4 [Test]. After selecting or creating a new connection you can use the [Test operation] for the [Ping] method. If successfull you will see a “Message”: “[Date] [Time]succesfully connected to [orgname] as [username]” DocumentsService is alive” message in the response area.

That’s it. You are now ready to use the connector.

Helpful Links:

  • Step-by-Step video on using the DocumentsCorePack connector to generate and process documents in a flow: https://www.youtube.com/watch?v=tUG10goIbzE
  • Free trial of DocumentsCorePack: Get DocumentsCorePack from AppSource

Was this helpful?

1 Yes  1 No
Related Articles
  • Deploying DocumentsCorePack: Setup, Automation, and Real Business Impact in Dynamics365
  • Introducing the DocumentsCorePack Template Designer Office Add-In (Beta)
  • 3 Ways DocumentsCorePack Transforms Proposal, Quote, and Contract Creation
  • DeepSign for DocumentsCorePack 
  • Generate and send a document for e-signing using DeepSign
  • How to prepare a document for DeepSign
Latest Articles
  • What Happens After You Deploy AttachmentExtractor: Storage & Cost Savings in Dynamics 365
  • Deploying DocumentsCorePack: Setup, Automation, and Real Business Impact in Dynamics365
  • Introducing the DocumentsCorePack Template Designer Office Add-In (Beta)
  • How to Eliminate Excess Storage Costs in Microsoft Dynamics 365 Without Losing Access to Emails and Attachments
  • 3 Ways DocumentsCorePack Transforms Proposal, Quote, and Contract Creation
Popular Articles
  • DocumentsCorePack Template Designer – Getting Started
  • Step-by-Step: How to configure a One-Click-Action
  • Application Access for Dynamics 365
  • How to find your environment’s unique name in Microsoft Dynamics 365
  • How licenses are counted
Top Rated Articles
  • “Undefined”-labels in Chrome and Edge 114 and higher
  • Important information for Dynamics 365 online customers using DocumentsCorePack and/or AttachmentExtractor
  • How to activate the DocumentsCorePack Connector for PowerApps & Microsoft Flow
  • How to insert Condition Fields in DocumentsCorePack Templates designer
  • How licenses are counted
Categories
  • *News and General Infos* 64
  • Webinars 45
  • Template Designer(DCP 196
  • DocumentsCorePack(DCP 258
  • TelephoneIntegration (TI 65
  • AttachmentExtractor (AE 75
  • PowerSearch (PS 50
  • ActivityTools (AT 61
  • SmartBar (SB 54
  • GroupCalendar (GC 47
Our Vision

“We see it as our purpose to provide products that simplify and speed up our customers’ Microsoft Dynamics 365 experience.”

Knowledgebase
LogIn
mscrm-addons.com
  • Products
  • Online Shop
  • Downloads
  • My Account
About Us
  • About Us
  • Case Studies
  • Newsletter
  • Partner Program
  • Contact
Support
  • Support
  • Terms & Conditions
  • Documentation
  • Webinars
  • Legal Documents
  • Impressum
  • © 2025 www.mscrm-addons.com. All Rights Reserved.