mscrm-addons.com logomscrm-addons.com logo
  • Release History
  • Knowledge Base
  • Documentation
  • Contact Support
  • Release History
  • Knowledge Base
  • Documentation
  • Contact Support
home/Knowledge Base/Template Designer(DCP)/Additional table formatting options

Additional table formatting options

1810 views 0 Updated on June 20, 2023

In this article, we will explore additional formatting options DocumentsCorePack provides for splitting a table’s header or footer. With DocumentsCorePack integrated into Dynamics 365, inserting tables in Word and merging them with data from Dynamics 365 becomes effortless. This functionality proves to be highly advantageous, mainly when presenting product information in a well-organized list format.

Step-by-step description

Step 1: In a Word template open the DocumentsCorePack Template Designer by clicking the ❶
www.mscrm-addons.com. Open the ❷ Insert MailMerge Fields.

Figure 1: Open in Word ribbon the DCP TemplateDesigner

Step 2: On the left side, select a ❶ Type and navigate to the ❷ Additional tab and e.g., with Quote Products you insert a table of products associated with this quote.

Figure 2: Start creating a table with the Template Designer

Step 3: The look-up field for Quote Product opens.

Figure 3: The look-up field for Quote Product.

Step 4: With a double-click on a field, the Insert new table window opens.

Figure 4: The display and formatting options for tables.

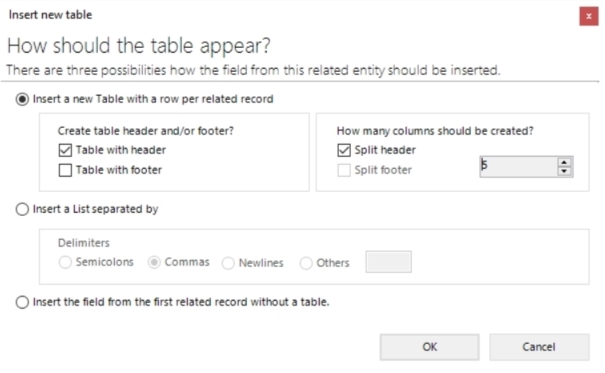
Step 5: With the new feature, you can split a table’s header and/or footer. Activate the checkbox Split header or Split footer and define how many columns should be created. The value goes from 1 up to 63.

For example, we want our table to be displayed with a header and 5 columns.

Create a table with a header and 5 columns
 Figure 5: Create a table with a header and 5 columns

Step 6: Add specific information to the table.

Figure 6: Insert additional information

That’s it! We appreciate your feedback! Please share your thoughts by sending an email to support@mscrm-addons.com.

Was this helpful?

Yes  3 No
Related Articles
  • Debugging the Template Design Office Add-In 
  • Introducing the DocumentsCorePack Template Designer Office Add-In
  • Ensuring correct time zone display for DateTime fields
  • How to compare a date-fields with the current date 
  • Create a template for XML or plain text
  • E-Invoicing with DocumentsCorePack
Latest Articles
  • Locating Raw Inputs and Outputs in Power Automate
  • Step by Step: How to execute an OCA in a Power Automate flow 
  • The Hidden Cost of CRM Storage — And How to Eliminate It 
  • Recap: Nordic Summit 2025
  • The new Template Designer Office Add-In
Popular Articles
  • DocumentsCorePack Template Designer – Getting Started
  • Step-by-Step: How to configure a One-Click-Action
  • Application Access for Dynamics 365
  • How to find your environment’s unique name in Microsoft Dynamics 365
  • How licenses are counted
Top Rated Articles
  • “Undefined”-labels in Chrome and Edge 114 and higher
  • How to insert Condition Fields in DocumentsCorePack Templates designer
  • Important information for Dynamics 365 online customers using DocumentsCorePack and/or AttachmentExtractor
  • How to activate the DocumentsCorePack Connector for PowerApps & Microsoft Flow
  • How licenses are counted
Categories
  • *News and General Infos* 65
  • Webinars 46
  • Template Designer(DCP 197
  • DocumentsCorePack(DCP 262
  • TelephoneIntegration (TI 65
  • AttachmentExtractor (AE 76
  • PowerSearch (PS 50
  • ActivityTools (AT 61
  • SmartBar (SB 54
  • GroupCalendar (GC 47
Our Vision

“We see it as our purpose to provide products that simplify and speed up our customers’ Microsoft Dynamics 365 experience.”

Knowledgebase
LogIn
mscrm-addons.com
  • Products
  • Online Shop
  • Downloads
  • My Account
About Us
  • About Us
  • Case Studies
  • Newsletter
  • Partner Program
  • Contact
Support
  • Support
  • Terms & Conditions
  • Documentation
  • Webinars
  • Legal Documents
  • Impressum
  • © 2025 www.mscrm-addons.com. All Rights Reserved.