mscrm-addons.com logomscrm-addons.com logo
  • Release History
  • Knowledge Base
  • Documentation
  • Contact Support
  • Release History
  • Knowledge Base
  • Documentation
  • Contact Support
home/Knowledge Base/DocumentsCorePack(DCP)/Process generated document in a workflow from the dialog

Process generated document in a workflow from the dialog

599 views 0 Updated on July 26, 2022

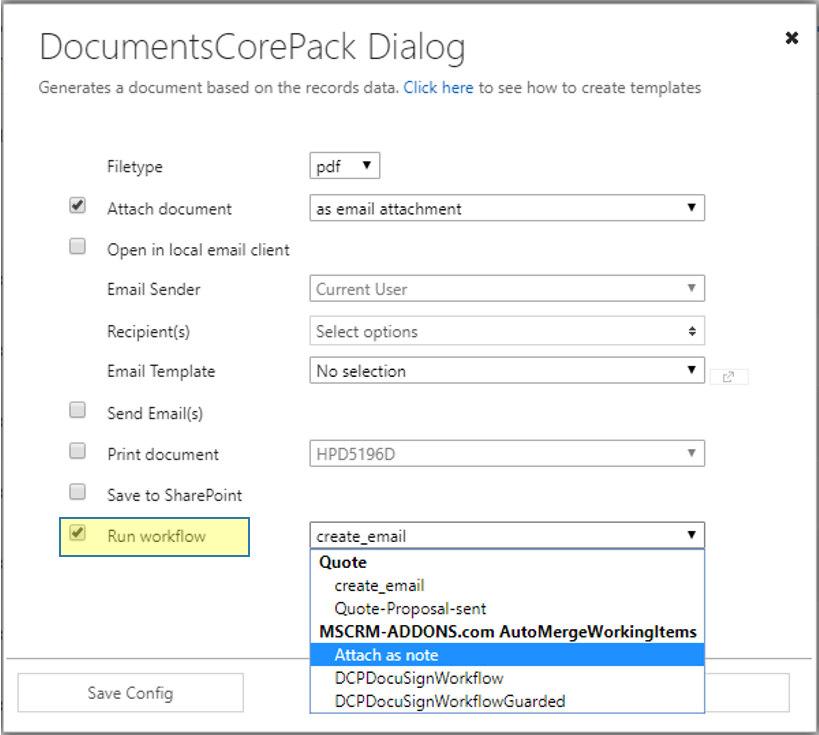
This blog article outlines how to execute an additional “Attach document”-operation by checking the Run workflow checkbox in the DocumentsCorePack Dialog (highlighted in yellow below). Therefore you have to create a workflow, which will then be displayed in the Run workflow drop-down menu. 

More information about how to create a workflow can be found here.

DocumentsCorePack Dialog - Run workflow
Figure 1: DocumentsCorePack Dialog – Run workflow


Within this tutorial, we will create such a workflow step-by-step. The result will be a document which will be ❶ attached to an e-mail and also ❷ attached as a note as you can see in the figure below.

The result

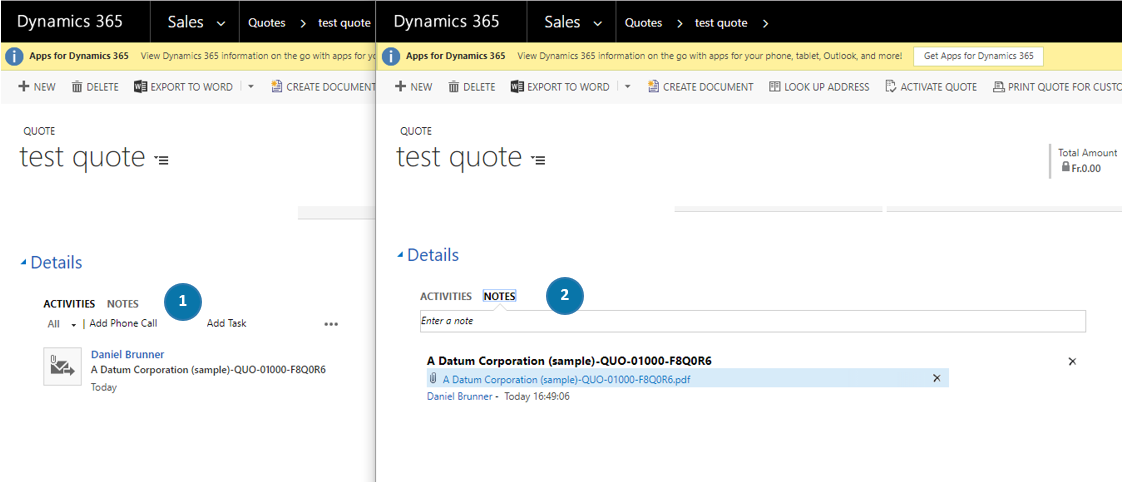
Figure 2: The result

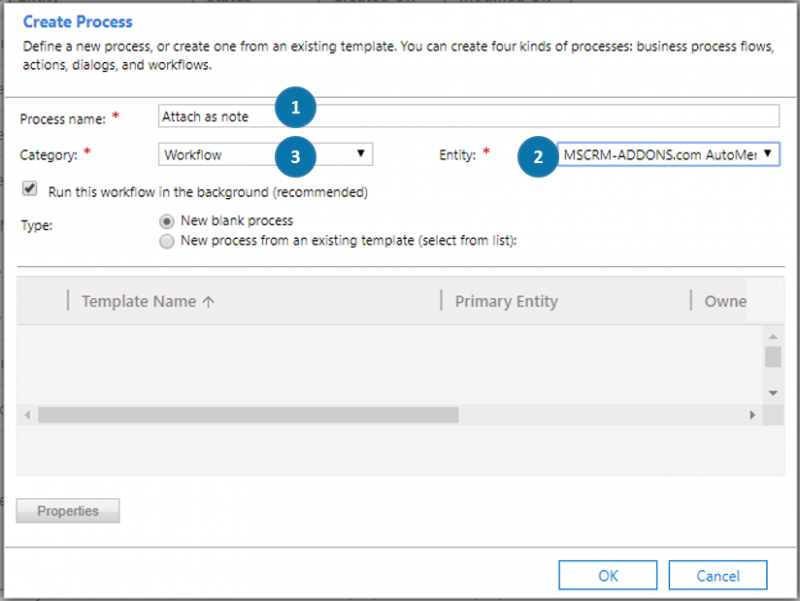
Please open your Microsoft Dynamics 365 and navigate to Settings > Processes. In the My Processes – area, click on the [New]-button in order to create a new workflow.  A dialog pops up. Type in ❶ the name of your workflow, determine ❷ an entity – MSCRM-ADDONS.com AutoMergeWorkingItems in this case and select ❸ Workflow as the process category. Afterward, hit the [OK]-button.

Figure 3: Create a new workflow

The window below pops up, where you can configure your workflow in detail. Please check the ❶ As an on-demand checkbox in the Available to Run-area and as Scope select ❷ Organization. Next, please add a new step by hitting on the [Add Step]-drop-down menu and select ❸ Create Record.

Figure 4: Create Record

As soon as the step has been added to your workflow, please enter ❶ a name that remains you of what it contains, e.g. Attach note. Then open the drop-down menu, select ❷ MSCRM-ADDONS.com AutoMergeWorkingItems and hit the ❸ [Set Properties]-button.

Figure 5: MSCRM-ADDONS.com AutoMergeWorkingItems – Set properties

The dialog below opens. It allows you to configure your workflow. Again, give it a ❶ name – Attach a note in this case and select ❷ AttachToEntity in the AutoMergeAction-field. Next, set the cursor in the ❸ PrimaryRecordUrl-field and select ❹ PrimaryRecordUrl in the drop-down menu in the Form Assistant, click on the [Add]-button and hit the [OK]-button below (highlighted in yellow). The PrimaryRecordUrl-field is filled now. Do the same for the ❺ EntityToAttach (RecordURL(Dynamic)). Then, set the cursor in the ❻ DocumentGUID-field, select CreatedDocument in the Form Assistant and proceed like before. To finish the workflow, please do not forget to click on the ❼ [Save and Close]-button.

Configure the workflow
Figure 6: Configure the workflow

After finishing the configuration, do not forget to activate your so created workflow by hitting the [Activate]-button located at the top.

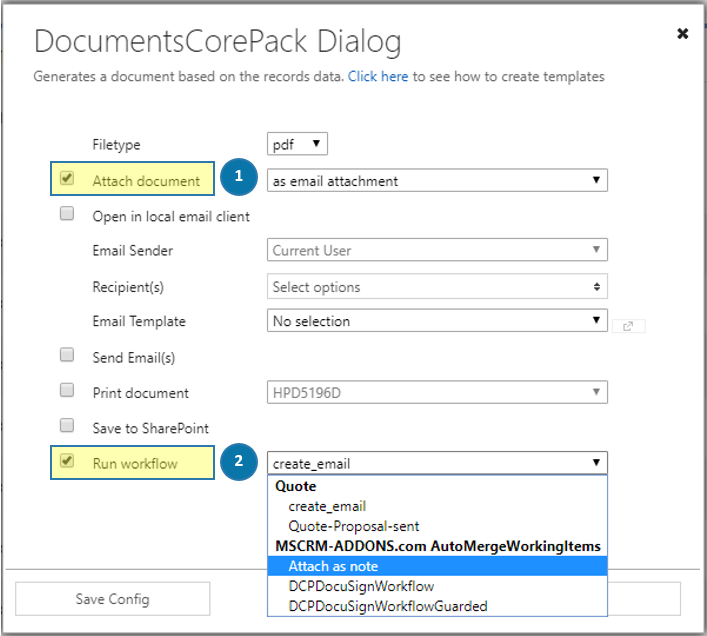
To see the result, please open the DocumentsCorePack Dialog by hitting the [Create Document]-button in your Dynamics 365. As shown in the first figure, the dialog ❶ attaches the document as an email attachment and by checking the ❷ Run workflow checkbox you can start the so created workflow and also attach it as a note.

The result
Figure 7: The result

​

That’s it! We appreciate your feedback! Please share your thoughts by sending an email to support@mscrm-addons.com.

Was this helpful?

Yes  No
Related Articles
  • Security issues when installing DocumentsCorePack (Defender)
  • Locating Raw Inputs and Outputs in Power Automate
  • Step by Step: How to execute an OCA in a Power Automate flow 
  • Stop Losing Time & Money: How Manual Document Processes Hurt Your Business
  • Debugging the Template Design Office Add-In 
  • Updating Legacy SharePoint Connections 
Latest Articles
  • mscrm-addons.com: 2025 Year in Review
  • Security issues when installing DocumentsCorePack (Defender)
  • AttachmentExtractor: Bandwidth & Performance – FAQ 
  • Recap: Power Platform Community Conference 2025
  • Recap: Community Summit 2025
Popular Articles
  • DocumentsCorePack Template Designer – Getting Started
  • Step-by-Step: How to configure a One-Click-Action
  • Application Access for Dynamics 365
  • How licenses are counted
  • How to find your environment’s unique name in Microsoft Dynamics 365
Top Rated Articles
  • “Undefined”-labels in Chrome and Edge 114 and higher
  • How to insert Condition Fields in DocumentsCorePack Templates designer
  • Important information for Dynamics 365 online customers using DocumentsCorePack and/or AttachmentExtractor
  • How to activate the DocumentsCorePack Connector for PowerApps & Microsoft Flow
  • How licenses are counted
Categories
  • *News and General Infos* 70
  • Webinars 46
  • Template Designer(DCP 197
  • DocumentsCorePack(DCP 264
  • TelephoneIntegration (TI 65
  • AttachmentExtractor (AE 76
  • PowerSearch (PS 50
  • ActivityTools (AT 61
  • SmartBar (SB 54
  • GroupCalendar (GC 47
Our Vision

“We see it as our purpose to provide products that simplify and speed up our customers’ Microsoft Dynamics 365 experience.”

Knowledgebase
LogIn
mscrm-addons.com
  • Products
  • Online Shop
  • Downloads
  • My Account
About Us
  • About Us
  • Case Studies
  • Newsletter
  • Partner Program
  • Contact
Support
  • Support
  • Terms & Conditions
  • Documentation
  • Webinars
  • Legal Documents
  • Impressum
  • © 2025 www.mscrm-addons.com. All Rights Reserved.