mscrm-addons.com logomscrm-addons.com logo
  • Release History
  • Knowledge Base
  • Documentation
  • Contact Support
  • Release History
  • Knowledge Base
  • Documentation
  • Contact Support
home/Knowledge Base/Template Designer(DCP)/Working with “Connections” in DocumentsCorePack Templates 

Working with “Connections” in DocumentsCorePack Templates 

620 views 0

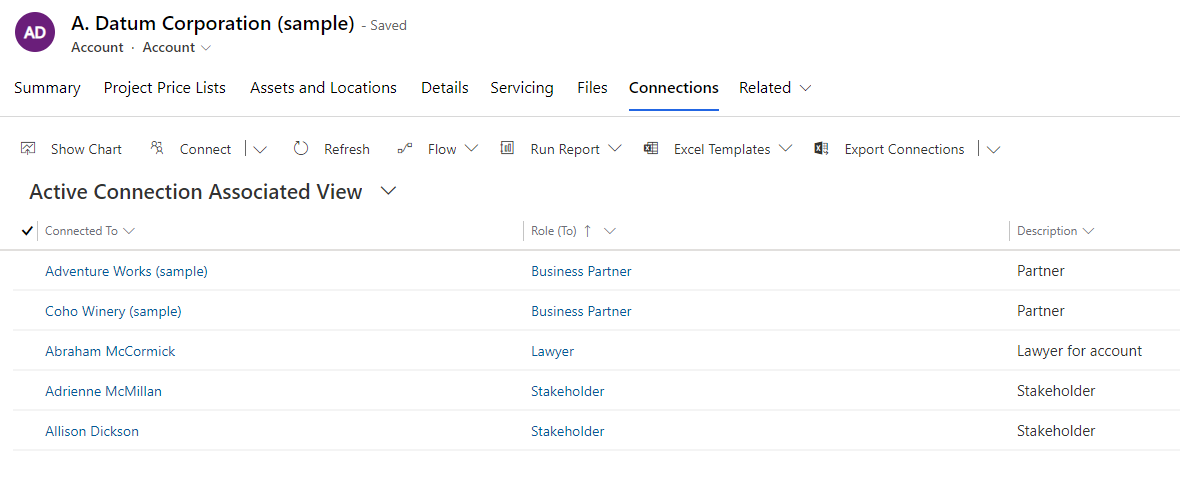
Connections enable you to easily associate users, contacts, quotes, sales orders, and many other records (table rows) with each other. The records in the association can be assigned particular roles that help define the purpose of the relationship.  The Connections table within these records acts as a sort of intermediary table which provides the relation type in between. 

In this article, we will walk through an example that demonstrates how to create a Word template that uses data related via the Connections table. 

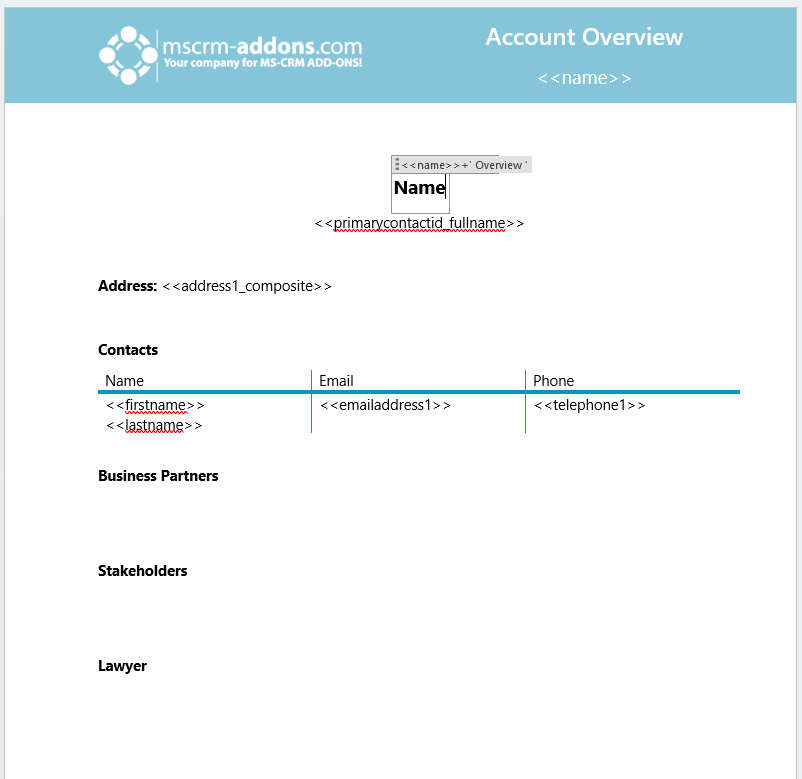
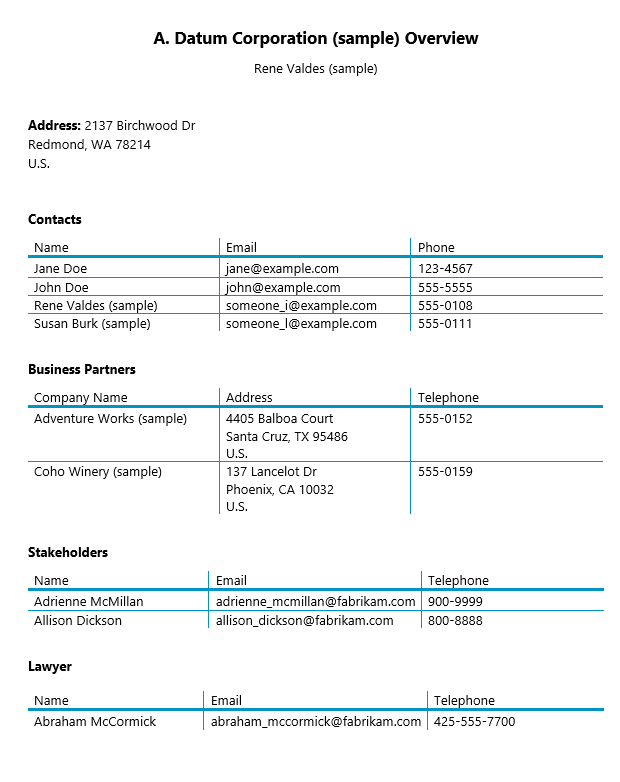
Use case: An account overview template 

We want to create a template that gives a general overview of the contacts related to our account.  On top of that, we want to include the account’s associated lawyer, business partners and stakeholders.  In this record, the business partners and individuals are associated with the account through the Connections table. 

Our Connections table in our account record
Figure 1: Our Connections table in our account record

We’ll begin by setting up our template with some general information, including the name, address, and contacts of our account.  We’ll also add sections for the account’s lawyer, business partners, and stakeholders. 

The initial template, displaying some general information.  The last three sections are empty for now.
Figure 2: The initial template, displaying some general information. The last three sections are empty for now.
To set up a table for our business partners, we’ll need to establish a relationship with our Connections table through the Relationship Designer.  To get the details we need, our relationship must consist of two levels. The ❶ first level is between our account record to the Connections table.   Then, we’ll need to ❷ add our ❸ second level, which is between our Connections table and our business partners’ records, which are also based on the account entity. 
Setting up a relationship to retrieve the data from our business partners.
Figure 3: Setting up a relationship to retrieve the data from our business partners

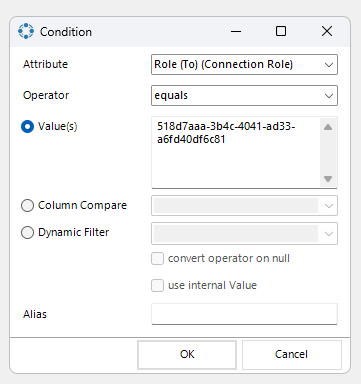
After selecting our needed fields, we will return to the first level of our relationship to add a filter in order to display only the business partners of our account.  This filter will be based on the role to our account.  Since the “Role (To)” field is a lookup, the id of the field’s record is required. 

We can add a filter by clicking the ❶ Add button under Filter.  Then, we click on ❷ Add under Conditions.  This will bring us to the ❸ condition window where we can configure it as described previously.  Once the filter has been applied, our table for our business partners is finished. 
Setting up the filter for our business partner role
Figure 4: Setting up the filter for our business partner role

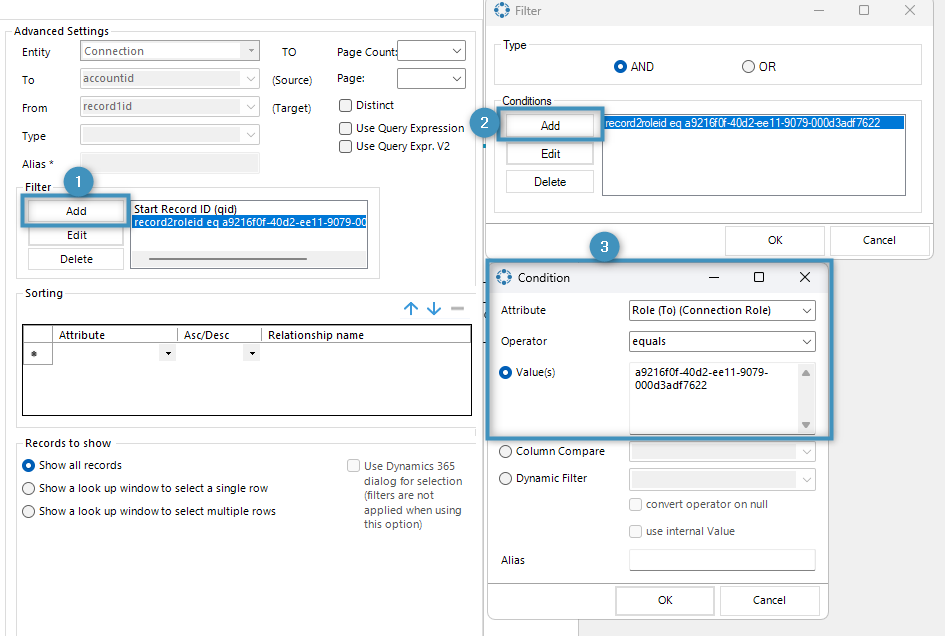
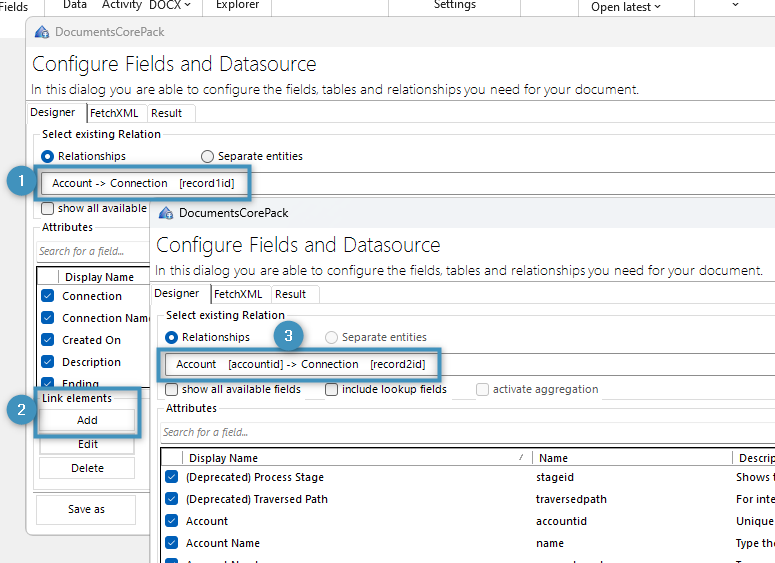
The tables for our stakeholders and our lawyer will be created similarly.  However, since they are based on the Contact entity instead of the Account entity, the relationship for both will be slightly different. 

For both tables, we will establish a relationship between ❶ Account and Connections, then ❷ add a second level where we will establish a relationship between ❸ Contact and Connections. 
Configuring a relationship to retrieve data for a contact record through the Connection entity
Figure 5: Configuring a relationship to retrieve data for a contact record through the Connection entity

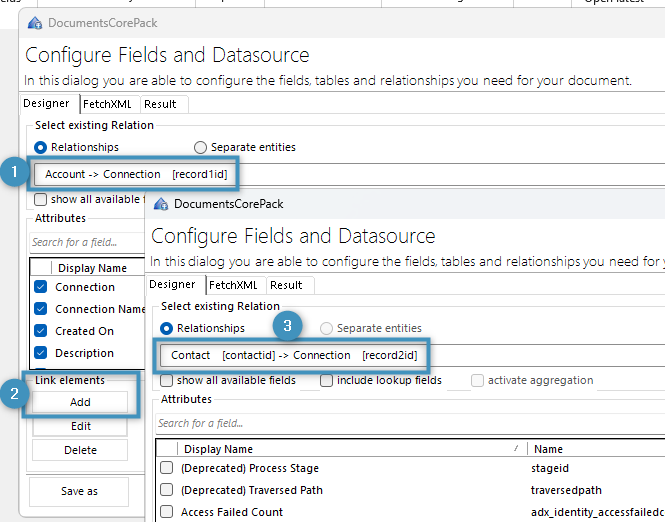
We will also need to create filters for both tables at the first level like with our business partners’ table.  Again, both filters will need the id for their respective lookup fields. 

 An example condition for one of our contact-based records
Figure 6: An example condition for one of our contact-based records

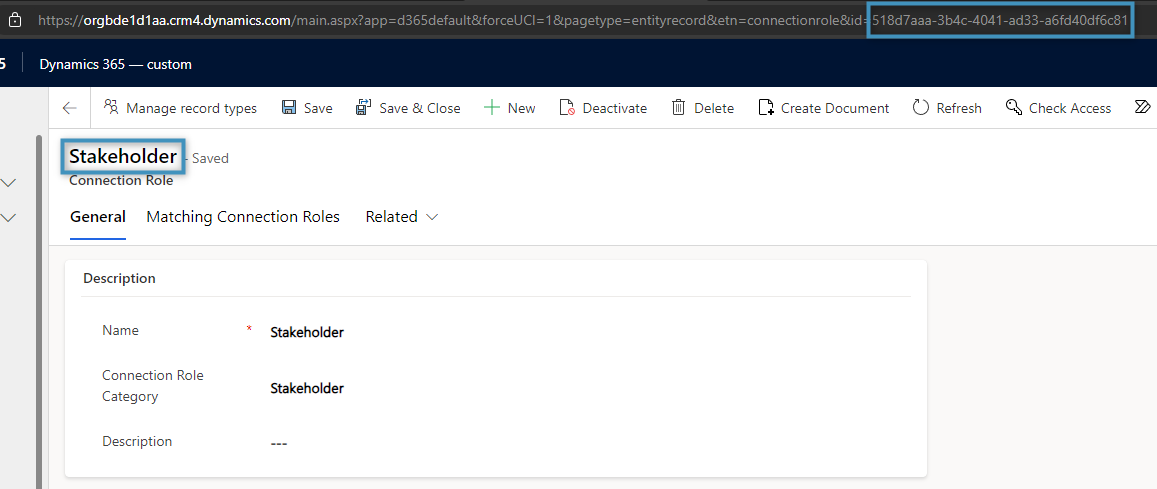
Note: The id for any of these lookup fields can be found in the URL of the record, as shown below. 

The id of our stakeholder connection role, as highlighted above
Figure 7: The id of our stakeholder connection role, as highlighted above

With our relationships created and our filters applied, we can create the tables in our template. 

Our finished template, complete with the tables for our connection-based records
Figure 8: Our finished template, complete with the tables for our connection-based records

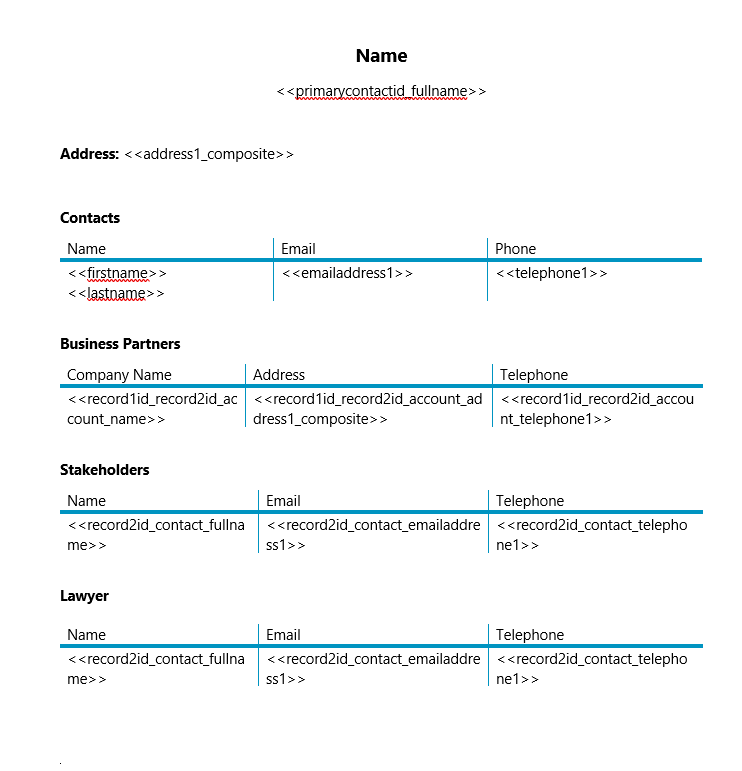
Our resulting document will be displayed as follows: 

The result document
Figure 9: The result document

That’s it! We appreciate your feedback! Please share your thoughts by sending an email to support@mscrm-addons.com. 

Was this helpful?

Yes  No
Related Articles
  • Debugging the Template Design Office Add-In 
  • Introducing the DocumentsCorePack Template Designer Office Add-In
  • Ensuring correct time zone display for DateTime fields
  • How to compare a date-fields with the current date 
  • Create a template for XML or plain text
  • E-Invoicing with DocumentsCorePack
Latest Articles
  • Locating Raw Inputs and Outputs in Power Automate
  • Step by Step: How to execute an OCA in a Power Automate flow 
  • The Hidden Cost of CRM Storage — And How to Eliminate It 
  • Recap: Nordic Summit 2025
  • The new Template Designer Office Add-In
Popular Articles
  • DocumentsCorePack Template Designer – Getting Started
  • Step-by-Step: How to configure a One-Click-Action
  • Application Access for Dynamics 365
  • How to find your environment’s unique name in Microsoft Dynamics 365
  • How licenses are counted
Top Rated Articles
  • “Undefined”-labels in Chrome and Edge 114 and higher
  • How to insert Condition Fields in DocumentsCorePack Templates designer
  • Important information for Dynamics 365 online customers using DocumentsCorePack and/or AttachmentExtractor
  • How to activate the DocumentsCorePack Connector for PowerApps & Microsoft Flow
  • How licenses are counted
Categories
  • *News and General Infos* 65
  • Webinars 46
  • Template Designer(DCP 197
  • DocumentsCorePack(DCP 262
  • TelephoneIntegration (TI 65
  • AttachmentExtractor (AE 76
  • PowerSearch (PS 50
  • ActivityTools (AT 61
  • SmartBar (SB 54
  • GroupCalendar (GC 47
Our Vision

“We see it as our purpose to provide products that simplify and speed up our customers’ Microsoft Dynamics 365 experience.”

Knowledgebase
LogIn
mscrm-addons.com
  • Products
  • Online Shop
  • Downloads
  • My Account
About Us
  • About Us
  • Case Studies
  • Newsletter
  • Partner Program
  • Contact
Support
  • Support
  • Terms & Conditions
  • Documentation
  • Webinars
  • Legal Documents
  • Impressum
  • © 2025 www.mscrm-addons.com. All Rights Reserved.