This article outlines how to configure unmanaged entities for SmartBar for MS CRM 2013!
Requirements: SmartBar for MS CRM 2013, v2013.4 and higher. All our addons come with an unlimited 14-day free trial. Please click here to download and test it!
To successfully enable SmartBar for MS CRM 2013 for unmanaged entities, please follow the instructions listed below:
1 Step: Enable SmartBar (SB) for the custom entity
This can be done by enabling the checkbox of the SmartBar Server Config. Open your SmartBar Server Config from the Start menu. Check the unmanaged entity in the Server Configuration window and save your settings.
2 Step: Open Customizations within CRM
Then open CRM and navigate to “Settings” and click on “Customizations” (see next screenshots).

Figure 1: Navigate to Customizations in your CRM
Next click on “Customize the System”

Figure 2: Click on Customize the system
3 Step: Open the entitiy’s main form:
In the next window open the “Main”-Forms of the entity in the tree view on the left. This example is for the entity “Account”.

Figure 3: The Main-form of the entity account.
This action will open following window:

Figure 4: Form Properties of the entity account.
In this new window click on the “Form Properties”-button. This will open the “Form Properties – Webpage Dialog”

Figure 5: The Form Properties – Webpage Dialog
4 Step: Add SmartBar library in the “Form Libraries”-section
This can be done by clicking on the [+Add]-button in the “Form Properties — Webpage Dialog” and selecting the “ptm_SmartBar/js/OnLoadCommandBar.js“-web resource. (See next screenshot)
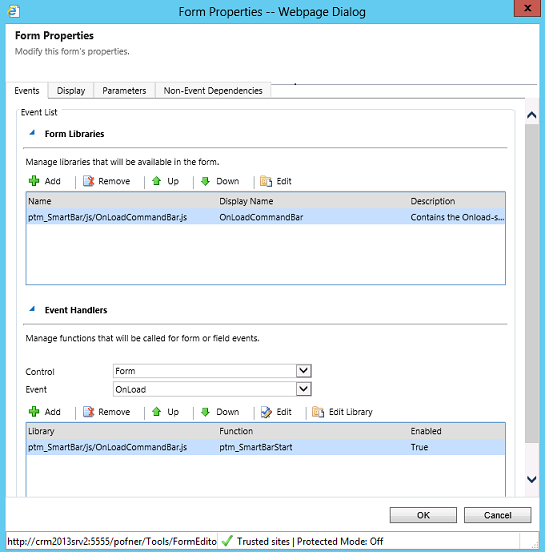
Figure 6: Add Smart Bar library
5 Step: Focus the “Event Handler”-section
Ensure that the “Control”-list box is set to “Form” and “Event” to “OnLoad”. Then click on the [Add]-button. The following window will appear:
Figure 7: Event handler-section
In this window, select the “ptm_SmartBar/js/OnLoadCommandBar.js”-library and fill in “ptm_SmartBarStart” in the textbox next to “Function”. Ensure that “Enabled” is checked. (See screenshot above).
To finish, please click on [OK] and [Save] and [Publish] the customization. (See next screenshot).

Figure 8: Save and publish your customizations
NOTE: When you chose to uninstall the product, those links have to be removed manually als well. They do not harm the CRM but will redirect to dead links if you leave them in place.
Result:
As a result the number of related entities is now displayed in the bracket. (See next screenshot)
Figure 9: The result
That’s it! We appreciate your feedback! Please share your thoughts by sending an email to support@mscrm-addons.com.