mscrm-addons.com logomscrm-addons.com logo
  • Release History
  • Knowledge Base
  • Documentation
  • Contact Support
  • Release History
  • Knowledge Base
  • Documentation
  • Contact Support
home/Knowledge Base/Template Designer(DCP)/The “Insert Calculated Field” button in DocumentsCorePack

The “Insert Calculated Field” button in DocumentsCorePack

4145 views 4 Updated on January 8, 2025

The Computed Field property is a feature that allows you to perform calculations using data from Dynamics 365. It’s a way to automatically calculate values based on other data in your system, without having to manually perform the calculations yourself.

The following article describes how to set up a computed field for your template.

Step-by-step description

Step 1: Open a Word template and navigate to the ❶ DocumentsCorePack TemplateDesigner and open the ❷ Insert MailMerge Fields.
Open the DocumentsCorePack TemplateDesigner
Figure 1: Opening the DocumentsCorePack TemplateDesigner
Step 2: Use the ❶ Calculated Field option. If you are not sure how to get to the insert fields option, please take a look at this article first.
Calculated field option is shown
Figure 2: The Calculated field option

Step 3: The Computed Field properties window opens. 

A calculation pattern can be created in the ❶ Property Designer or the ❷ Text property designer. In the Property Designer, you can enter ❸ a field either by double-clicking on the tree view or by ❹ searching for it. Clicking on the plus (+) button or right-clicking within the pattern will bring up a context menu where a ❺ number, ❻ operator, or ❼ function can be added. Fields can be dragged and dropped where appropriate. 
The various options and functions of the Computer Field properties window
Figure 3: The various options and functions of the Computer Field properties window

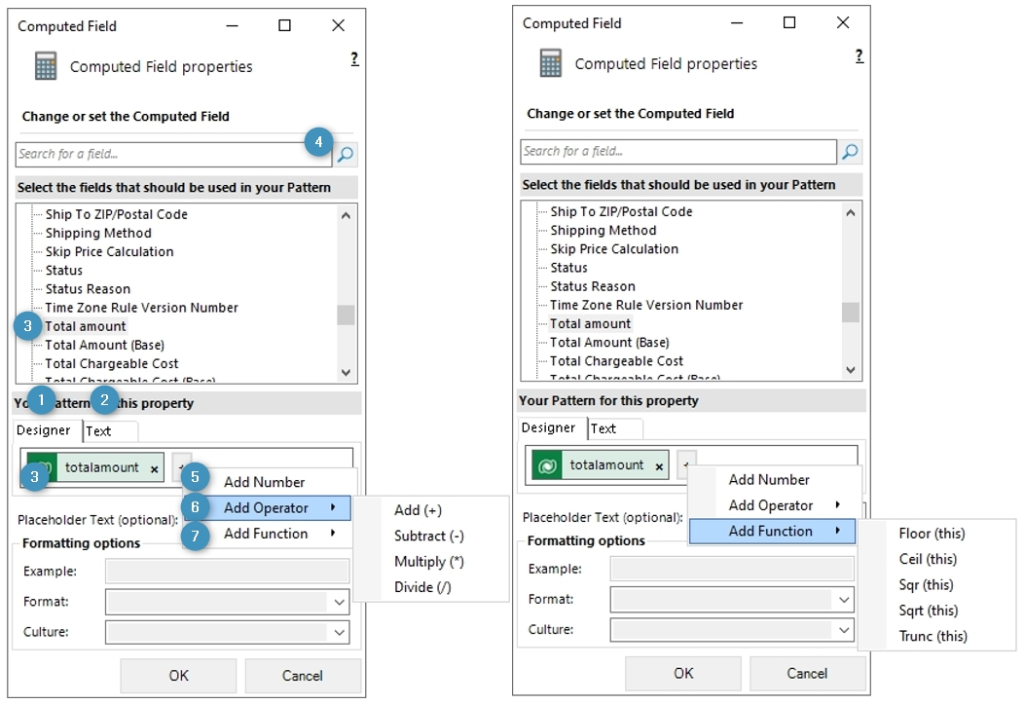
There are five available functions to add, as outlined below:

  • Floor: This function rounds down to the nearest integer value for a given number. Please keep in mind that when rounding down for a negative number, this results in a larger negative number. For example, when applied to 5.25, the function will return 5, whereas when applied to -5.25, it will return -6.  
  • Ceil: The ceiling function is the opposite of the floor function and will round up to the nearest integer value for a given number. Please keep in mind that for negative numbers, this function would result in a smaller negative number. For example, when applied to 5.25, the function will return 6, whereas when applied to -5.25, it will return -5.  
  • Sqr: The square function returns the given integer squared. For example, 4 returns 16. 
  • Sqrt: The square root function returns the square root of the given integer. Please note that the given integer cannot be a negative number. For example, 4 returns 2.  
  • Trunc: The truncate function removes all numbers after the decimal without any rounding.  For example, applying this function to the number 5.25 will return 5.

In the Text property designer, formulas can be entered manually (see below). 

Figure 4: The ‘classic’ Text property designer

Note: If the formula isn’t displayed correctly, you can enlarge the window to ensure clear visibility of your input.  

Example: In the following example, we want to find out discount percentage. The formula is using parentheses to ensure that the calculation is done correctly. 

An example formula
Figure 5: An example formula

 Result: 

Figure 6: The resulting discount percent (bottom)

Note: Please keep proper mathematical syntax in mind.  In the following example, the parenthesis have been removed, leading to the incorrect result. 

A formula that results in an incorrect result
Figure 7: A formula that results in an incorrect result

That’s it! We appreciate your feedback! Please share your thoughts by sending an email to support@mscrm-addons.com. 

Was this helpful?

4 Yes  3 No
Related Articles
  • Debugging the Template Design Office Add-In 
  • Introducing the DocumentsCorePack Template Designer Office Add-In
  • Ensuring correct time zone display for DateTime fields
  • How to compare a date-fields with the current date 
  • Create a template for XML or plain text
  • E-Invoicing with DocumentsCorePack
Latest Articles
  • The Hidden Cost of CRM Storage — And How to Eliminate It 
  • Recap: Nordic Summit 2025
  • The new Template Designer Office Add-In
  • Debugging the Template Design Office Add-In 
  • Updating Legacy SharePoint Connections 
Popular Articles
  • DocumentsCorePack Template Designer – Getting Started
  • Step-by-Step: How to configure a One-Click-Action
  • Application Access for Dynamics 365
  • How to find your environment’s unique name in Microsoft Dynamics 365
  • How licenses are counted
Top Rated Articles
  • “Undefined”-labels in Chrome and Edge 114 and higher
  • Important information for Dynamics 365 online customers using DocumentsCorePack and/or AttachmentExtractor
  • How to activate the DocumentsCorePack Connector for PowerApps & Microsoft Flow
  • How to insert Condition Fields in DocumentsCorePack Templates designer
  • How licenses are counted
Categories
  • *News and General Infos* 65
  • Webinars 46
  • Template Designer(DCP 197
  • DocumentsCorePack(DCP 260
  • TelephoneIntegration (TI 65
  • AttachmentExtractor (AE 76
  • PowerSearch (PS 50
  • ActivityTools (AT 61
  • SmartBar (SB 54
  • GroupCalendar (GC 47
Our Vision

“We see it as our purpose to provide products that simplify and speed up our customers’ Microsoft Dynamics 365 experience.”

Knowledgebase
LogIn
mscrm-addons.com
  • Products
  • Online Shop
  • Downloads
  • My Account
About Us
  • About Us
  • Case Studies
  • Newsletter
  • Partner Program
  • Contact
Support
  • Support
  • Terms & Conditions
  • Documentation
  • Webinars
  • Legal Documents
  • Impressum
  • © 2025 www.mscrm-addons.com. All Rights Reserved.