mscrm-addons.com logomscrm-addons.com logo
  • Release History
  • Knowledge Base
  • Documentation
  • Contact Support
  • Release History
  • Knowledge Base
  • Documentation
  • Contact Support
home/Knowledge Base/DocumentsCorePack(DCP)/How to generate & send a document using the DocumentsCorePack connector for MS Flow

How to generate & send a document using the DocumentsCorePack connector for MS Flow

6695 views 1 Updated on January 31, 2025

This article outlines step-by-step how to generate and send a document using the DocumentsCorePack (DCP) connector for Microsoft Flow. 

In this example, our goal is to generate and send an email to a customer.  We want to attach a document to the email that contains an overview of their related quotes.  We will do that by creating an on-demand Flow that executes a DocumentsCorePack template and sends the resulting document as an email attachment in Dynamics 365.  Additionally, we will generate another template and add it as the email’s body. 

Steps to generate & send a document using the DocumentsCorePack connector for MS Flow

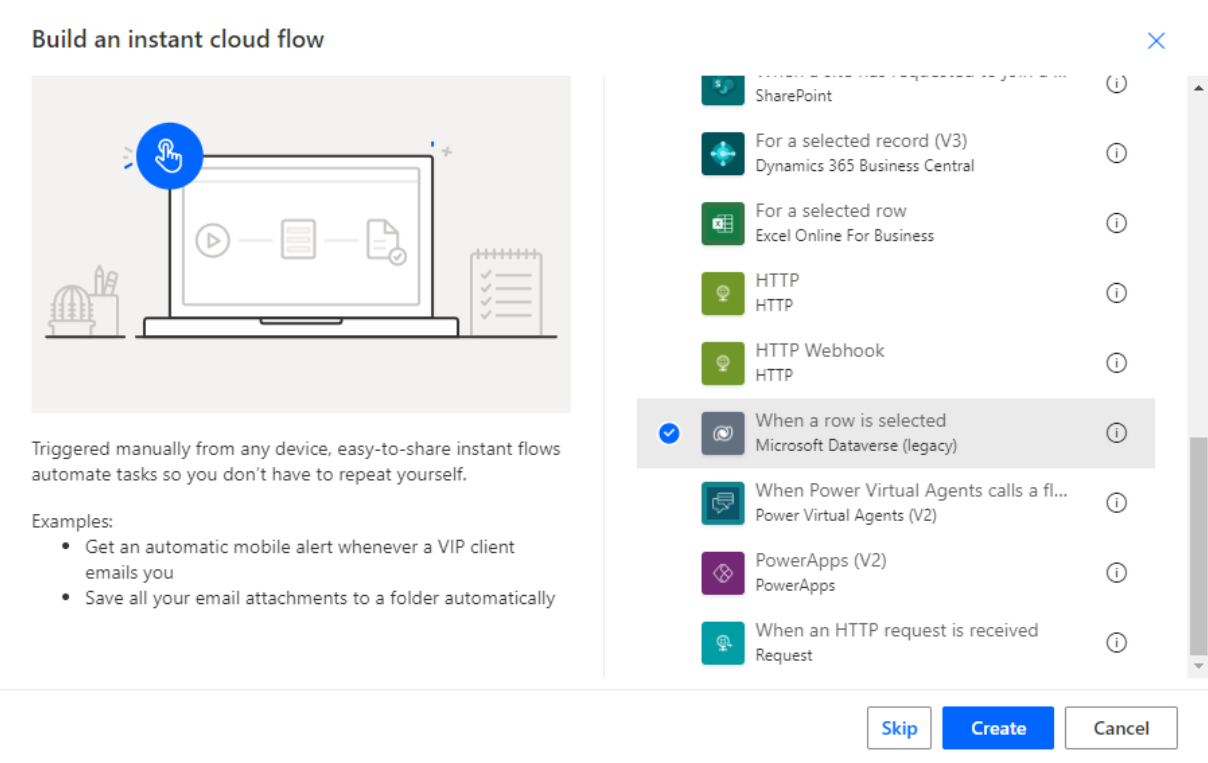
1. Start by creating a new Flow and selecting a trigger. In this example, we are building an instant cloud Flow and selecting When a row is selected as the trigger. 

Create a new flow and select a trigger. 
Figure 1: Create a new flow and select a trigger. 

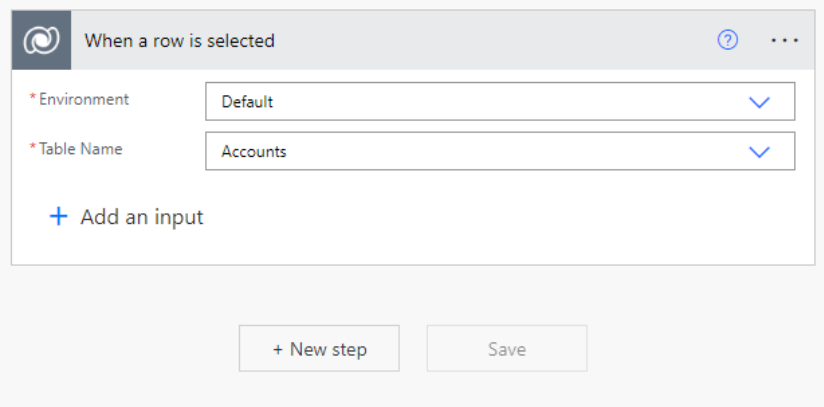
2. Select the Environment and Table Name. For the Table Name, select the base entity (table) that the Flow should be created for. For this example, we are creating it for the Account entity. 

Selecting an environment and base entity (table)
Figure 2: Selecting an environment and base entity (table)

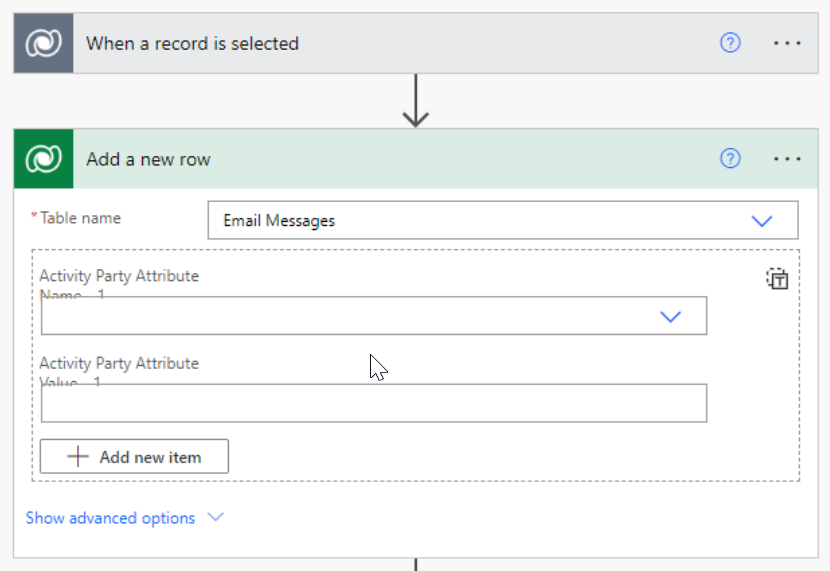
3. Click on + New step and search for the Add a new row action from the Microsoft Dataverse connector.  We want to send an email, so we select Email Messages for the Table name and click on + New step again. 

Creating a new email message
Figure 3: Creating a new email message

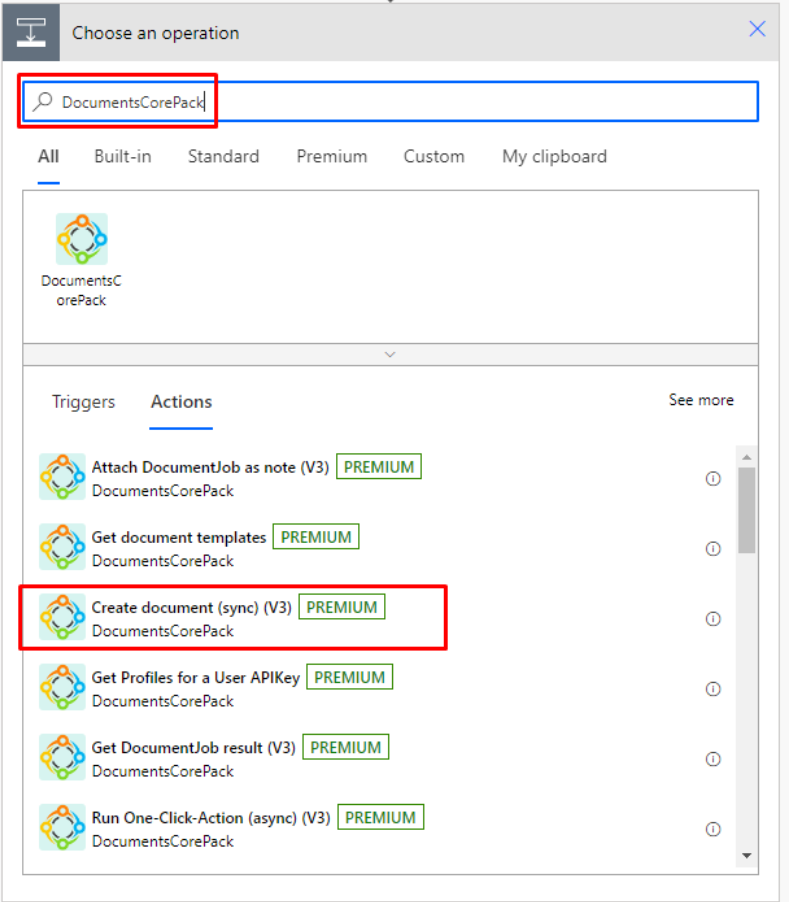
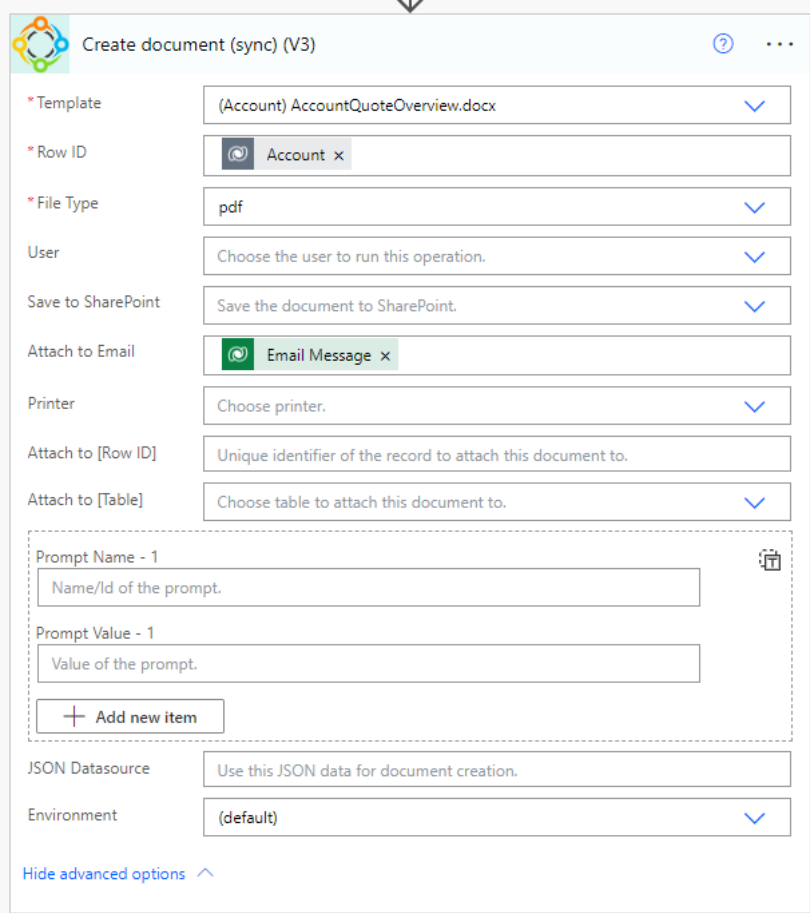
4. Search for the DocumentsCorePack connector and select Create document (sync) (V3) from the list of available actions. 

Finding the correct DCP action
Figure 4: Finding the correct DCP action

5. After selecting the action, the corresponding window will appear as shown below. The fields should be filled out as follows: 

  • Template: Select the DCP template to be used in the document generation process. In this example, we are using our AccountQuoteOverview template. 
  • Row ID: Add Account from the Dynamic content window.
  • File Type: Select PDF as the file type. This will attach the generated document as a PDF to our email. 
  • Attach to Email: Add Email Message from the Dynamic content window.

Please note:

Make sure that the base entity from the selected template matches with the entity of your selected trigger. 

Figure 5: Adding our attachment as a PDF.

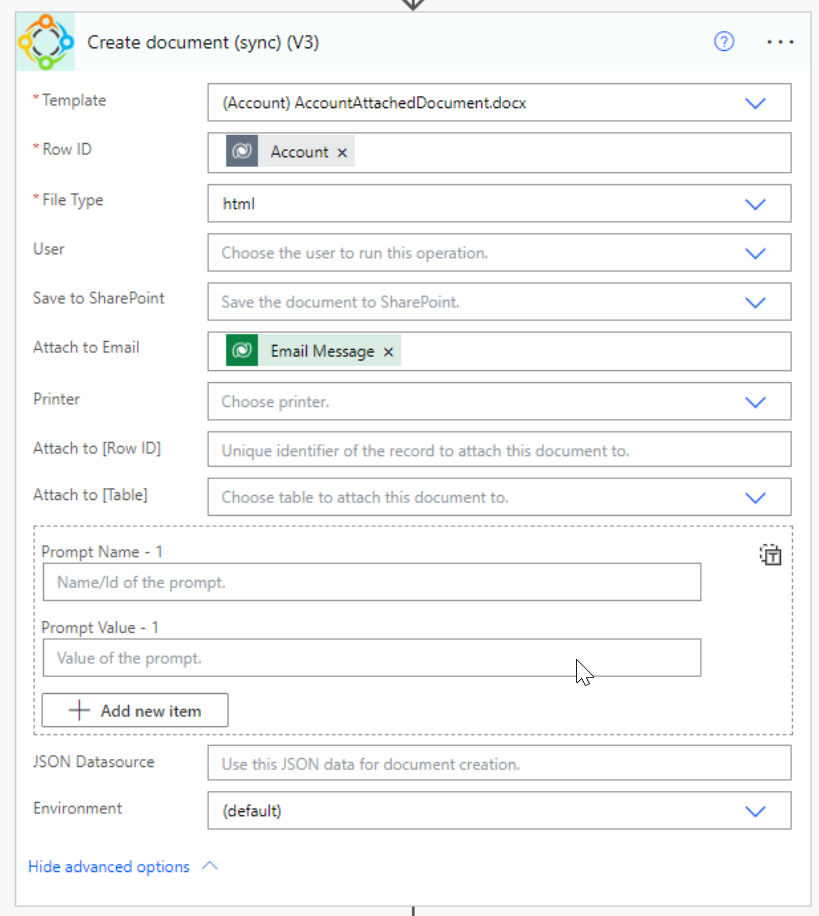
6. To add our email content, we can add another step and select Create document (sync) (V3) from the list again. This step is similar to the previous step. However, we will be using a different template for our email content, and the file type must be set to HTML. 

Figure 6: Adding the email content.

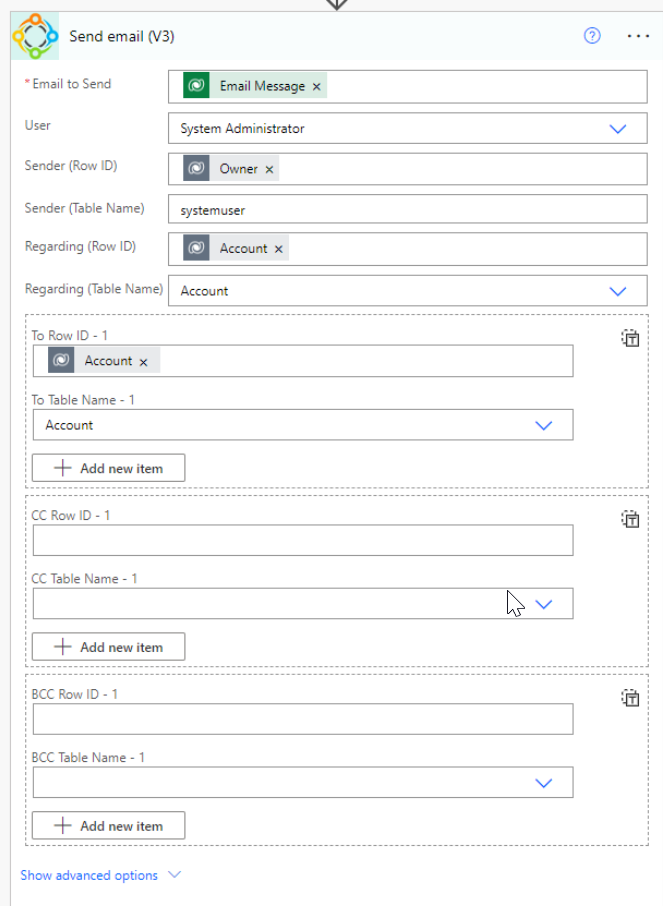
7. Finally, select + Next Step and select Send email (V3) under the DocumentsCorePack connector. Here, provide the email record, a sender, and a recipient before saving your Flow. 

How to generate & send a document using the DocumentsCorePack connector for MS Flow
Figure 7: Providing the email information.

Executing your Flow 

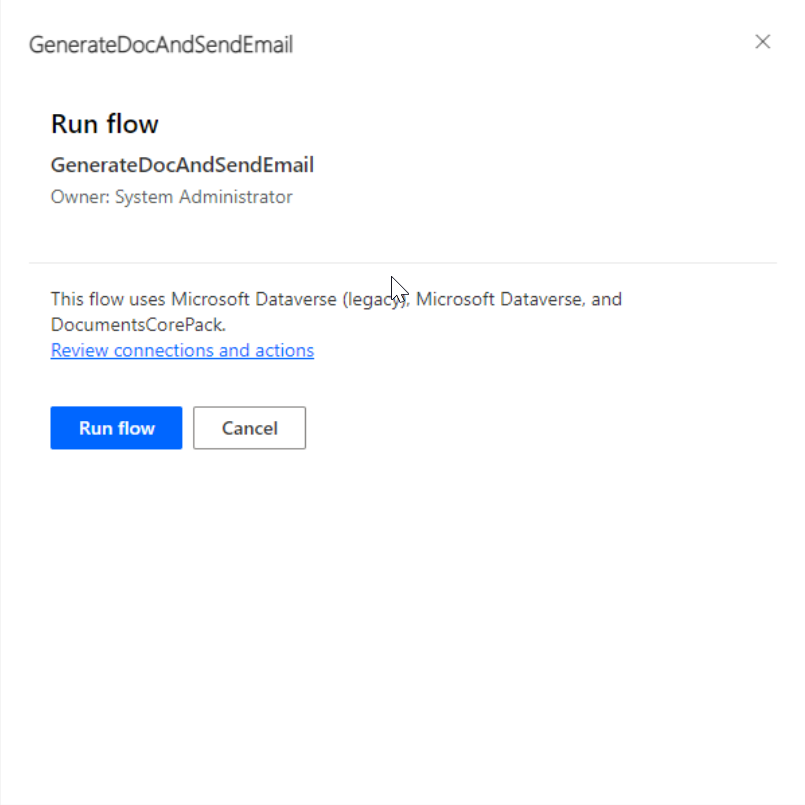
We created our Flow for the Account entity, so we can run this Flow from any Account record. To start it, go to an Account record and click the Flow button.

How to generate & send a document using the DocumentsCorePack connector for MS Flow
Figure 8: Activating the Flow.

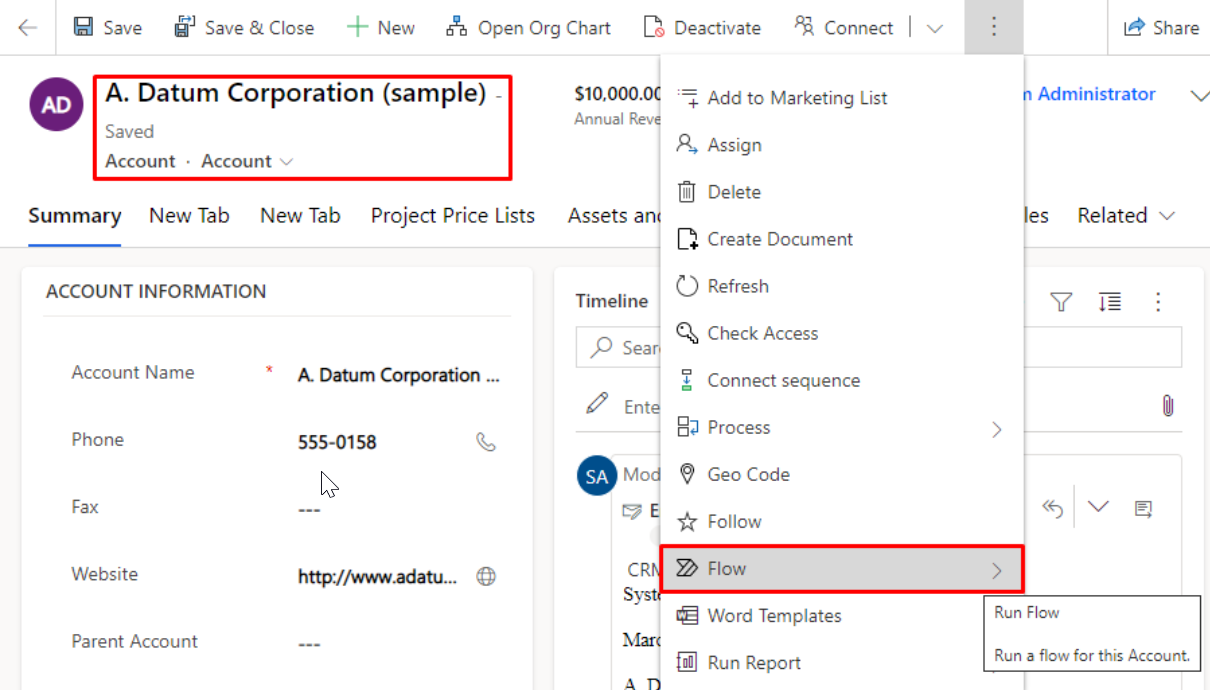
From there, select the created Flow, and then select the Run Flow button. 

How to generate & send a document using the DocumentsCorePack connector for MS Flow
Figure 9: Running the flow

A sample result: 

How to generate & send a document using the DocumentsCorePack connector for MS Flow
Figure 10: The final result

Try it out yourself! 

Try yourself to generate and send a document using DocumentsCorePack for Microsoft Flow. To try the Flow described in this example, please download the .zip below in the “Attached File” section and follow the steps shown in this article to import it. 

IMPORTANT: The Template and User fields in the Flow must be set to a value from within your own environment. Additionally, please note that you will need to create the following connections in Power Automate to import this Flow: 

  • Microsoft Dataverse (legacy) 
  • Microsoft Dataverse 
  • DocumentsCorePack 

Back to “The DocumentsCorePack connector for PowerApps and PowerAutomate (Microsoft Flow)“.

That’s it! We appreciate your feedback! Please share your thoughts by sending an email to support@mscrm-addons.com.

Attached Files
#
File Type
File Size
Download
1 .zip 3.83 KB GenerateDocAttachandSendEmail

Was this helpful?

1 Yes  No
Related Articles
  • Deploying DocumentsCorePack: Setup, Automation, and Real Business Impact in Dynamics365
  • Introducing the DocumentsCorePack Template Designer Office Add-In (Beta)
  • 3 Ways DocumentsCorePack Transforms Proposal, Quote, and Contract Creation
  • DeepSign for DocumentsCorePack 
  • Generate and send a document for e-signing using DeepSign
  • How to prepare a document for DeepSign
Leave A Comment Cancel reply

You must be logged in to post a comment.

Latest Articles
  • What Happens After You Deploy AttachmentExtractor: Storage & Cost Savings in Dynamics 365
  • Deploying DocumentsCorePack: Setup, Automation, and Real Business Impact in Dynamics365
  • Introducing the DocumentsCorePack Template Designer Office Add-In (Beta)
  • How to Eliminate Excess Storage Costs in Microsoft Dynamics 365 Without Losing Access to Emails and Attachments
  • 3 Ways DocumentsCorePack Transforms Proposal, Quote, and Contract Creation
Popular Articles
  • DocumentsCorePack Template Designer – Getting Started
  • Step-by-Step: How to configure a One-Click-Action
  • Application Access for Dynamics 365
  • How to find your environment’s unique name in Microsoft Dynamics 365
  • How licenses are counted
Top Rated Articles
  • “Undefined”-labels in Chrome and Edge 114 and higher
  • Important information for Dynamics 365 online customers using DocumentsCorePack and/or AttachmentExtractor
  • How to activate the DocumentsCorePack Connector for PowerApps & Microsoft Flow
  • How to insert Condition Fields in DocumentsCorePack Templates designer
  • How licenses are counted
Categories
  • *News and General Infos* 64
  • Webinars 45
  • Template Designer(DCP 196
  • DocumentsCorePack(DCP 258
  • TelephoneIntegration (TI 65
  • AttachmentExtractor (AE 75
  • PowerSearch (PS 50
  • ActivityTools (AT 61
  • SmartBar (SB 54
  • GroupCalendar (GC 47
Our Vision

“We see it as our purpose to provide products that simplify and speed up our customers’ Microsoft Dynamics 365 experience.”

Knowledgebase
LogIn
mscrm-addons.com
  • Products
  • Online Shop
  • Downloads
  • My Account
About Us
  • About Us
  • Case Studies
  • Newsletter
  • Partner Program
  • Contact
Support
  • Support
  • Terms & Conditions
  • Documentation
  • Webinars
  • Legal Documents
  • Impressum
  • © 2025 www.mscrm-addons.com. All Rights Reserved.