In this article, we will showcase how DCP allows us to generate and process documents in Power Automate (Microsoft Flow) using the Dataverse connector.
Note: We highly recommend using the certified DocumentsCorePack (DCP) connector rather than the alternative method described in this article to create documents via DocumentsCorePack. This option helps in scenarios where you cannot use the Connector.
Power Automate is becoming more powerful every day and will potentially replace the long-standing classic Dynamics 365 workflows. Continue reading if you prefer to learn more about the alternative method like Power Automate using the Dataverse connector.
Step by Step guide on Power Automate using the Dataverse connector
How it Works:
When using DCP, every document that has to be generated is defined by a record of an entity called AutoMergeWorkingItem. Here is the record of all mandatory definitions to generate the document:
- Record to use: Defines what record the document should be generated for (account, quote, etc.).
- Template to execute: Defines the DCP template that should be used to generate the document.
- Output format: The file type that the document should be generated and returned as (pdf, docx, HTML, etc.).
- (Optional) Processing settings: DCP allows you to not only generate a document but to also process the document by definitions on the AutoMerkeWorkingItem record (e.g. Print, Save to SharePoint, Send for e-Signing, etc.).
Once you create an AutoMergeWorkingItem, the DCP service generates the document and delivers it back as an attachment to this record. Essentially, to generate a document within Flow, you must Create an AutoMergeWorkingItem Record.
Note: You can bring the mandatory parameters into the flow in various ways.
For example, you could build a Canvas App that passes the parameters to the Flow, or you can simply use the Dataverse connector or Dynamics 365 connectors within Flow to load them (see figure below).

Figure 1: Document generation request schema of DocumentsCorePack
Step-by-Step: Create an AutoMergeWorkingItem
Now that we know what is needed, let’s examine what a document generation request looks like. Our use case is to generate a quote document in PDF format upon activation of the quote.
Note: In our scenario, we are using the Dataverse connector.
Step 1
The Trigger of the flow: In our scenario, the flow triggers when the status field of the quote entity changes. Start with the “When a row is added, modified, or deleted” step and then fill out the information as follows:

What’s important: We will need the context of this step as it defines the record our document needs to pull the data from. So, we have the first required parameter: The record to use.
Step 2
Get Template to execute: Here we use the Dataverse “Get a row by ID” action to load our template. Since we always want to use the same quote-template, we make it simple and “hardcode” our template.
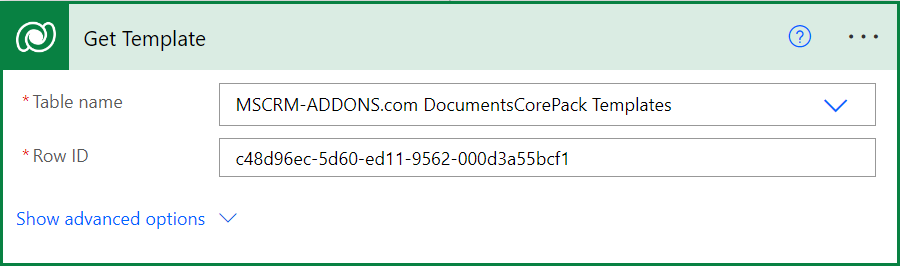
So where does this GUID in the item identifier come from? To answer this, you must know that the system stores every template designed with the DCP Template Designer as a record in the mscrm-addons.com DocumentsCorePack Template entity. As shown in the image below, this is the entity we are getting a record of.
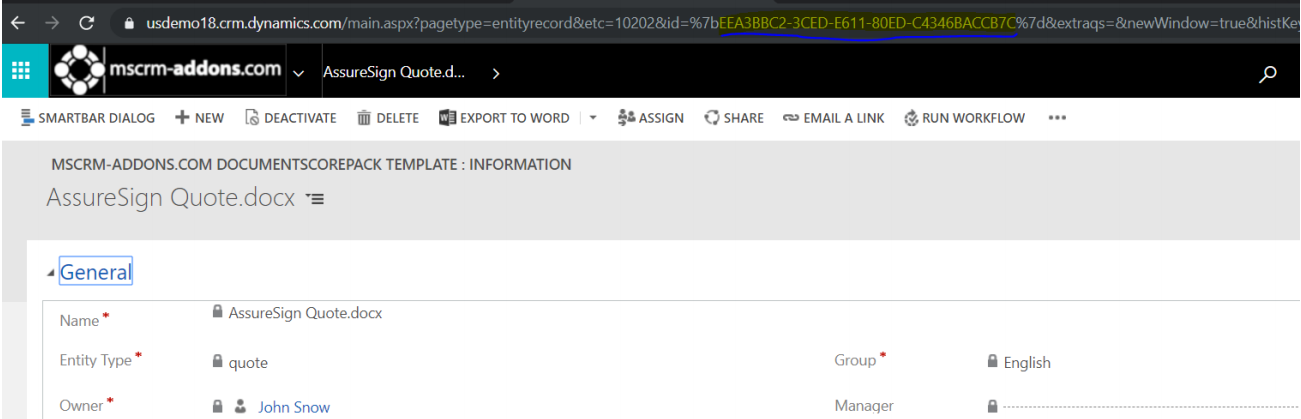
You can open the template record you want to use and copy the GUID from the URL, as highlighted below.
To summarize: This Get a row by ID step will provide us with the second parameter: The template to use. As we know that our output format should be PDF, we are all set to finally define our document generation request.
Step 3
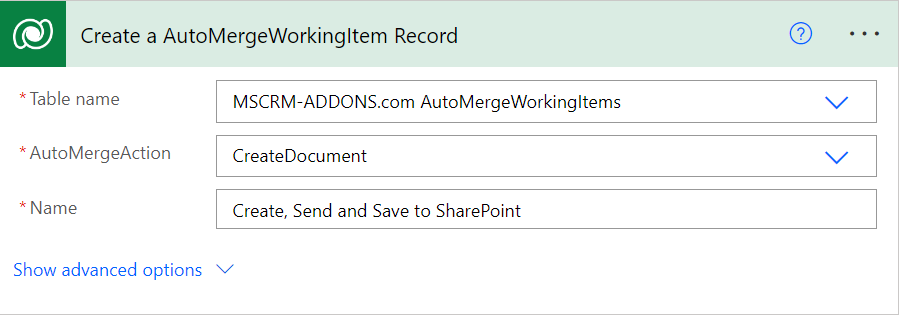
Create AutoMergeWorking Item: As all parameters are now clear, we can use the Dataverse “Add a new row” action to create our document generation request as follows.
We create a record of the entity MSCRM-ADDONS.COM AutoMergeWorkingItem and choose the action to be Create Document. We can also give it a name to later identify and review the documents generated via this Flow. Now we need to set our parameters.
a. Record to pull data from (PrimaryRecordUrl).

In the PrimaryRecordUrl simply insert the ID of the record (Unique identifier of the quote from our Flow-Trigger action).
b. Template to Execute (TemplateToExecute).

Here we reference the Unique Identifier parameter of our Get a row by ID step, where we loaded the template above. This needs to be specified with the schema name of the template entity ptm_mscrmaddons_dcptemplateses(DocumentsCorePack Template).
c. FileType (SaveAs Value): This is a simple one – we simply select “PDF” from our pick list.

Figure 8: FileType (SaveAs Value)
And that’s it Every time a quote activates, a document now generates.
Next Steps
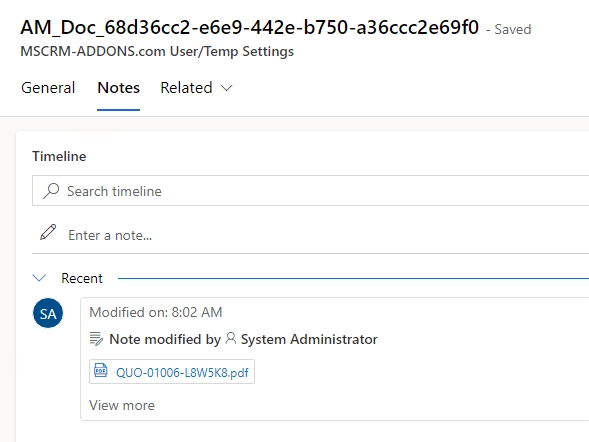
Naturally, you want to take action with the document once it is generated. As outlined above, you can either use the AutoMergeWorkingItem to process the document, or you can process the document within your flow. You can find the generated document in the AutoMergeWorkingItem record -> Created Document section.
Note: DCP will fill this field when it successfully creates the document. You will have to wait for the AutoMergeWorkingItem record to become inactive. This tells you that the document is ready.

The created document as a note:
That’s it! We appreciate your feedback! Please share your thoughts by sending an email to support@mscrm-addons.com.