This blog article outlines how to change the result and add additional fields to the drop down- menu in order to create user defined result fields.
Requirements: SmartBar 2013/2015/2016, an XML editor is recommended
Please note: There is no designer for the result fields. This is why the changes must be applied manually using an XML-file. For the creation of the XML-file, we recommend to use an XML editor.
XML definition
The XML consist of the main node dropdown, which supports the following two attributes:
- width: Is used to define the width of the dropdown. To create a fixed width, simply define a number (in pixel). Using * sets the dropdown to be the same width as every other result field combined. If you do not define this attribute, the value of the Global SmartBar Configuration will be used.
- height: Is used to define the maximum height of the dropdown. If you do not set this attribute, the value of the Global SmartBar Configuration will be applied.
On the next level below, the fields node is inserted. It’s just a container without further options. Under this level, there is an f node per result field.
The following attributes are supported:
- name: the logical name of the CRM field, which will be used as result field.
- width: the available width of this field. If you do not define this attribute, a standard width will be applied.
For every f a header-node can be subordinated. It serves as container in order to define the column heading.
For each CRM-language, an h tag can be added. Please define the language code using the id attribute. The content of this tag will display the according header.
Example
The following example dropdown has an automatic width.
The result values of the fields are defined in the below manner:
subject (Header: Subject), with the width of 150 pixel and the field createdon (Header: Erstellt am, or Created on) with the width of 100 pixel.
<dropdown width=“*“> <fields>
<f name=“subject” width=“150“> <headers>
<h id=“1033“>Subject</h> </headers>
</f>
<f name=“createdon” width=“100“> <headers>
<h id=“1031“>Erstellt am</h> <h id=“1033“>Created on</h>
</headers> </f>
</fields> </dropdown>
Sorting
There are a few possibilities to sort the results:
If a date field is defined at the first position, the entries will be sorted ascending.
<dropdown width=“*“> <fields>
<f name=“createdon” width=“100“> <headers>
<h id=“1031“>Erstellt am</h> <h id=“1033“>Created on</h>
</headers> </f>
<f name=“subject” width=“150“> <headers>
<h id=“1033“>Subject</h> </headers>
</f> </fields>
</dropdown>
Furthermore, you may define an order-field. Once defined, it will be used for the sorting.
Name is the logical name of the CRM-field. With desc and the value true, the entries can also be sorted descending.
<dropdown width=“*“> <orders>
<o name=“createdon” desc=“true“></o> </orders>
<fields>
<f name=“subject” width=“150“> <headers>
<h id=“1033“>Subject</h> </headers>
</f>
<f name=“createdon” width=“100“> <headers>
<h id=“1031“>Erstellt am</h> <h id=“1033“>Created on</h>
</headers> </f>
</fields> </dropdown>
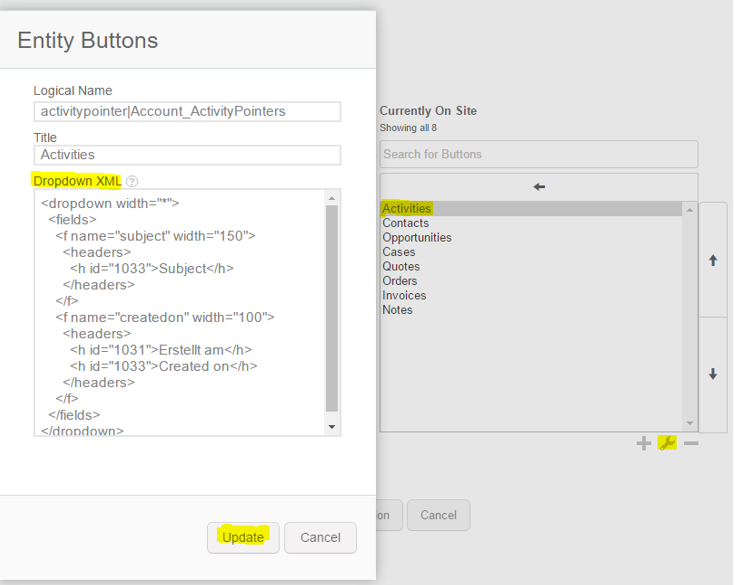
How do I add an XML to a button?
Please open the SmartBar config, select a random button and click on the [Edit]-button. Next, paste the previously defined XML into the Dropdown XML–field, then click on the [Update]-button and save the config.

Figure 1: Add an XML-file to a button
Get your result
Next, please reload the SmartBar. The result should be pretty close to the below example.
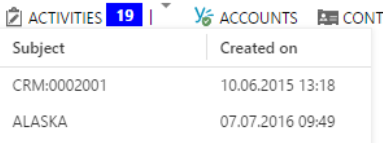
Figure 2: The result
That’s it! We appreciate your feedback! Please share your thoughts by sending an email to support@mscrm-addons.com.
#reworkneeded .. intro with screenshot would be nice