mscrm-addons.com logomscrm-addons.com logo
  • Release History
  • Knowledge Base
  • Documentation
  • Contact Support
  • Release History
  • Knowledge Base
  • Documentation
  • Contact Support
home/Knowledge Base/DocumentsCorePack(DCP)/Dynamic document Header & Footer selection via the DocumentsCorePack Dialog

Dynamic document Header & Footer selection via the DocumentsCorePack Dialog

829 views 2 Updated on October 30, 2023

When generating documents, there may be some circumstances where it would be beneficial to be able to allow users to select a header and/or footer to be used.  For example, if you are sending letters that require certain headers, it would be nice if it was possible to select which header/footer to use instead of having to create multiple templates with basically the same content but only different headers. 

This article will cover how to prepare your templates and enable this functionality in the DocumentsCorePack Dialog. 

Prerequisites:  

  • DocumentsCorePack Template Designer version 10.43   

Note: This article requires an understanding of our look-up prompt, filter, and Master Template features.  Please refer to these features’ corresponding documentation for more information. 

Step 1: Setting up the header/footer template(s) 

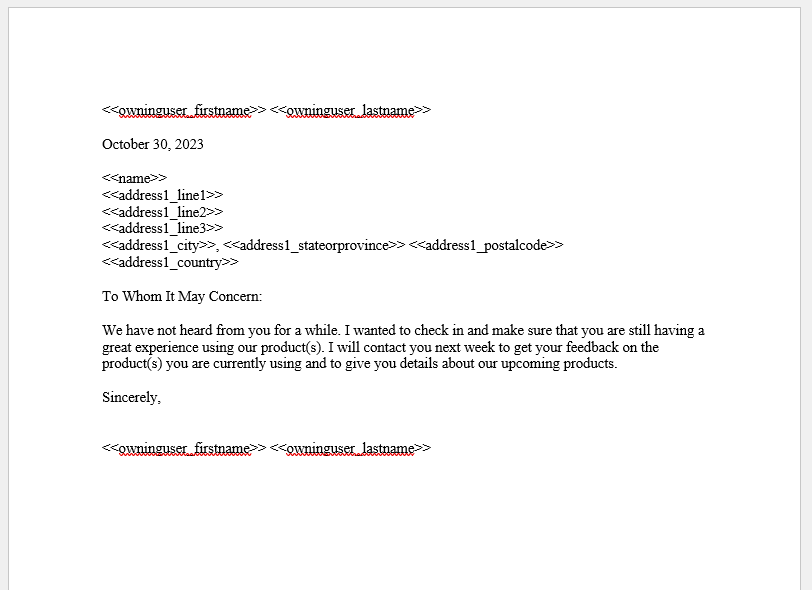
Before beginning, you must already have a static template with a header/footer saved to your environment.  A static template is a document that contains only static content. In our case, we want to use a static template that only has a header and/or footer.

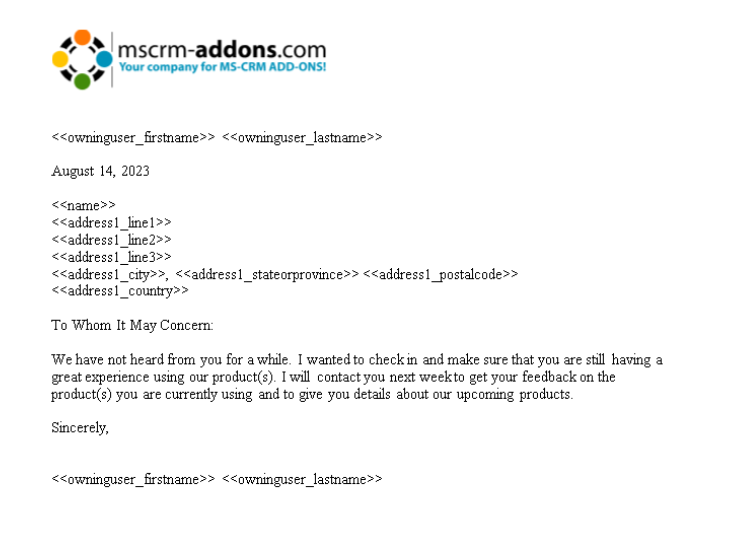
For reference, this is the static template we will be using: 

header in static template
Figure 1: Our header, in a static template

Step 2: Setting up the prompt in our main template

Once the static template has been created and saved, we will also need to create another template. This template will be our main template. It will be separate from the static template above, as this main template will hold the content we want to generate (e.g.: our dynamic fields and tables).

This is what our main template looks like:

main template
Figure 2: Our main template

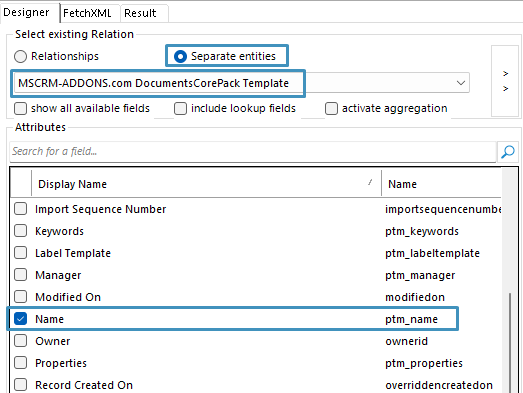
To configure the dialog to display our headers/footers, we must first open our main template and establish a relationship with the MSCRM-ADDONS.com DocumentsCorePack Template entity by opening the Relationship Designer.  This must be selected after selecting the Separate entities option.  Then, select the Name field.  This will be done in order to set up our filter later. 

Establishing a relationship
Figure 3: Establishing a relationship to the MSCRM-ADDONS.com DocumentsCorePack Template entity

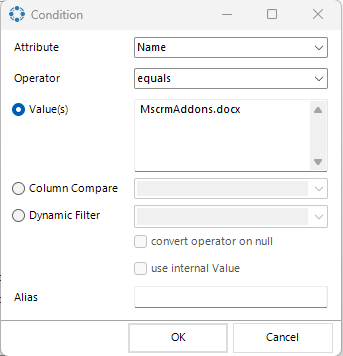
Then, we will create a filter.  This filter should be set up so the Name attribute is selected, the Operator is set to equals, and the Value is set to the name of whichever saved template that contains the header/footer you want to use.  This process should be repeated for however many headers/footers you want the user to be able to select. 

Setting up the condition for our filter
Figure 4: Setting up the condition for our filter

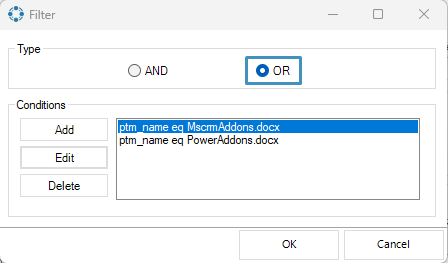
If you aim to allow the selection between multiple headers/footers, it is important to set the filter type to OR and add all the different header /footer documents: 

setting filter type
Figure 5: Setting the filter type to OR

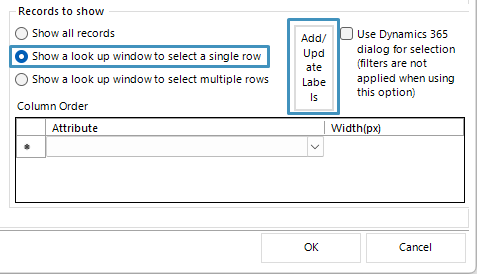
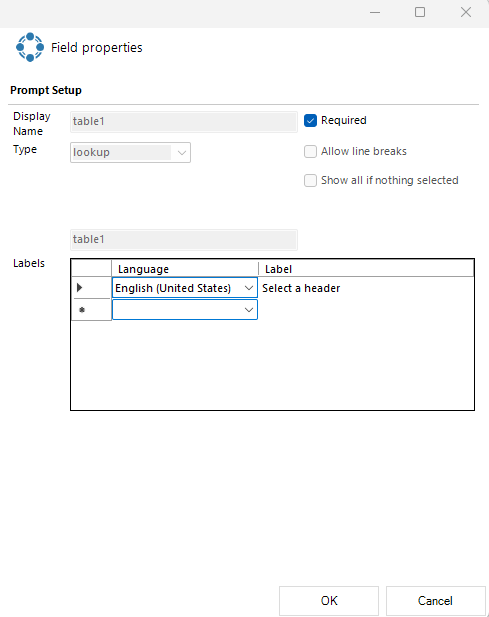
After configuring the filter, navigate to Records to show and select “Show a look-up window to select a single row.” Then, click Add/Update Labels.  In the next window, select a language and add a label. 

Setting up the label
Figure 6: Setting up the label
setting up the lookup
Figure 7: Setting up the lookup

Once finished, click OK in the Relationship Designer window to save your changes. 

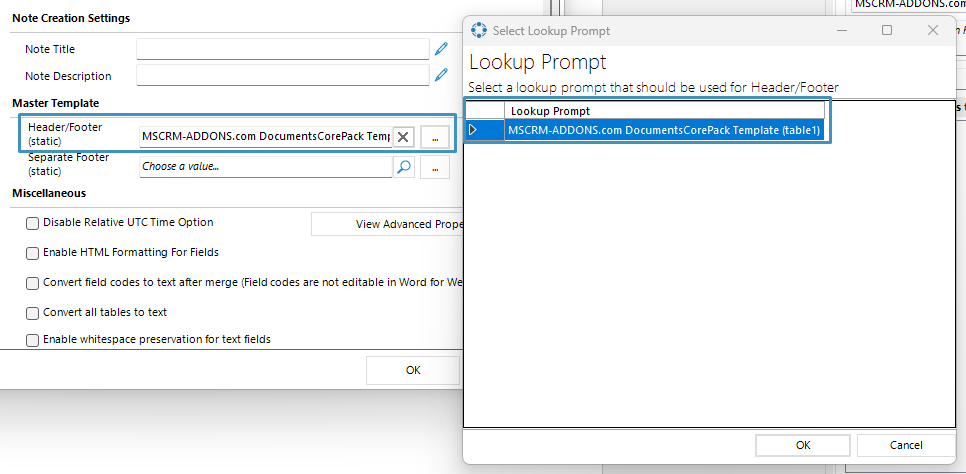
To finish setting up your document, go to the Advanced Template Settings in the Template Designer and click on the General tab.  Under Master Template, click the ellipses (…) button to select the lookup prompt you have already configured.  Once selected, click OK and save your template. 

Selecting our configured lookup prompt
Figure 8: Selecting our configured lookup prompt in the Advanced Template Settings

Step 3: Generating the document 

Return to your environment and run the dialog, selecting your configured template.  If everything was set up correctly, an additional step should appear in your dialog, displaying the previously configured lookup prompt. 

lookup prompt in the DocumentsCorePack Dialog
Figure 9: Our configured lookup prompt in the DocumentsCorePack Dialog

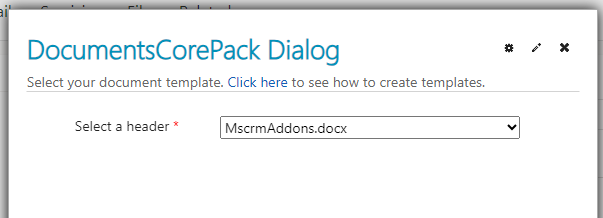
Select a header and proceed through to the next steps.  Once the document has been generated, you should see your header at the top of the document. 

the result document
Figure 10: The result document

That´s it! We appreciate your feedback! Please share your thoughts by sending an e-mail to support@mscrm-addons.com 

Was this helpful?

2 Yes  No
Related Articles
  • Deploying DocumentsCorePack: Setup, Automation, and Real Business Impact in Dynamics365
  • Introducing the DocumentsCorePack Template Designer Office Add-In (Beta)
  • 3 Ways DocumentsCorePack Transforms Proposal, Quote, and Contract Creation
  • DeepSign for DocumentsCorePack 
  • Generate and send a document for e-signing using DeepSign
  • How to prepare a document for DeepSign
Latest Articles
  • What Happens After You Deploy AttachmentExtractor: Storage & Cost Savings in Dynamics 365
  • Deploying DocumentsCorePack: Setup, Automation, and Real Business Impact in Dynamics365
  • Introducing the DocumentsCorePack Template Designer Office Add-In (Beta)
  • How to Eliminate Excess Storage Costs in Microsoft Dynamics 365 Without Losing Access to Emails and Attachments
  • 3 Ways DocumentsCorePack Transforms Proposal, Quote, and Contract Creation
Popular Articles
  • DocumentsCorePack Template Designer – Getting Started
  • Step-by-Step: How to configure a One-Click-Action
  • Application Access for Dynamics 365
  • How to find your environment’s unique name in Microsoft Dynamics 365
  • How licenses are counted
Top Rated Articles
  • “Undefined”-labels in Chrome and Edge 114 and higher
  • Important information for Dynamics 365 online customers using DocumentsCorePack and/or AttachmentExtractor
  • How to activate the DocumentsCorePack Connector for PowerApps & Microsoft Flow
  • How to insert Condition Fields in DocumentsCorePack Templates designer
  • How licenses are counted
Categories
  • *News and General Infos* 64
  • Webinars 45
  • Template Designer(DCP 196
  • DocumentsCorePack(DCP 258
  • TelephoneIntegration (TI 65
  • AttachmentExtractor (AE 75
  • PowerSearch (PS 50
  • ActivityTools (AT 61
  • SmartBar (SB 54
  • GroupCalendar (GC 47
Our Vision

“We see it as our purpose to provide products that simplify and speed up our customers’ Microsoft Dynamics 365 experience.”

Knowledgebase
LogIn
mscrm-addons.com
  • Products
  • Online Shop
  • Downloads
  • My Account
About Us
  • About Us
  • Case Studies
  • Newsletter
  • Partner Program
  • Contact
Support
  • Support
  • Terms & Conditions
  • Documentation
  • Webinars
  • Legal Documents
  • Impressum
  • © 2025 www.mscrm-addons.com. All Rights Reserved.