• Release History
  • Documentation
  • Back to www.mscrm-addons.com
  • Release History
  • Documentation
  • Back to www.mscrm-addons.com
home/Knowledge Base/Template Designer(DCP)/Step-by-Step: How to create an account sales report template

Step-by-Step: How to create an account sales report template

397 views 1

This article outlines how to create a simple sales report template for an account. 

In this step-by-step description, we will create a template that gives an overview of an account’s related sales entities.  This template will make use of the following features: 

  • Adding fields from Dynamics 365 
  • Advanced String 
  • Creating relationships 
  • Aggregation  

This guide is based on a sample template. To view the finished sample template, please see the attached document at the bottom of this article. 

For a video version of this guide, please see the video below: 

(Provider details)

Step 1: Setting the base entity 

When creating a template, it is always important to set your base entity first.  This is because the fields displayed in the Template Designer will be determined by this base entity, and once a field has been inserted into a template, the base entity can no longer be changed.  In this case, our base entity is Account, so we will set the Type accordingly. 

setting the document type
Figure 1: Setting the type

Step 2: Creating the document title with Advanced String 

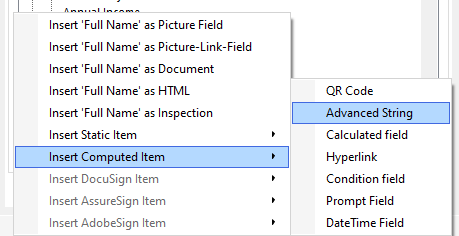
To create the title for our document, we can use the Advanced String feature.  You can do this by going to the Insert Field menu in the Template Designer and selecting Insert Computed Item->Advanced String. 

selecting advanced string
Figure 2: Selecting Advanced String

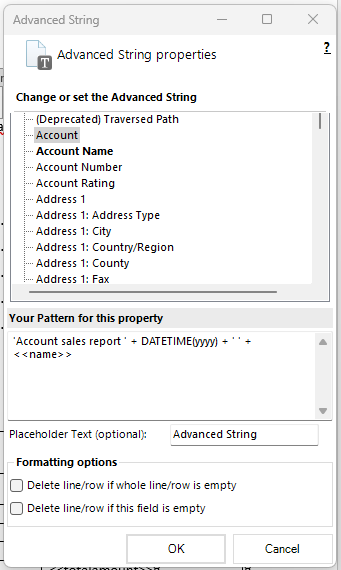
In the window that appears, you can enter a value that will dynamically appear when the document is merged.  For our template, we will set our value to the following: 

advanced string pattern
Figure 3: Creating the pattern for our Advanced String field

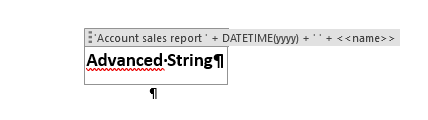
This results in our Advanced String field looking like so: 

advanced string field
Figure 4: Our Advanced String field

You can also set the document’s dynamic name by following the steps here. 

Step 3: Creating our Overview table 

For our Overview table, we want to list the total number of Opportunities, Quotes, and Invoices.  Additionally, we want to list the total revenues for each entity.  To do this, we will take advantage of the relationship aggregation feature within the relationship designer. 

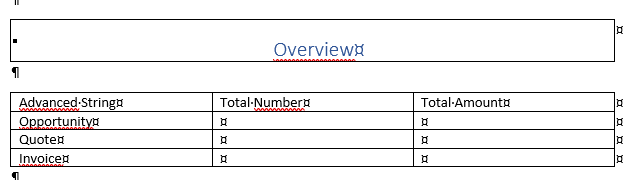
First, we will create a simple 3×4 table using Word’s own table creator.  We will populate it with the names of our entities, the table column names, and an Advanced String field that will give us the current year after merging. 

overview table
Figure 5: The structure of our Overview table

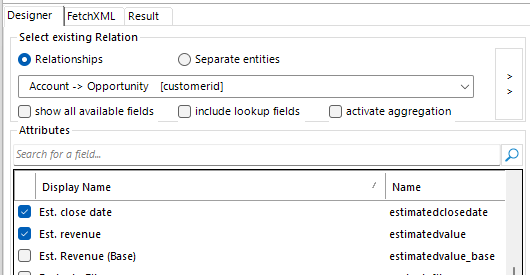
Next, we need to open the Relationship Designer.  Under the relation dropdown, select “activate aggregation.”  This will enable the aggregation feature, which can be used to give us the aggregate amount of a particular attribute in our environment.  In our case, since we need the total number of records and total revenue for each entity, we can set the “Attribute” and “Aggregate/Group by” columns to the following values: 

activating aggregation for quote
Figure 6: Activating aggregation for our Quote table. This set up should be similar for the Invoice table.

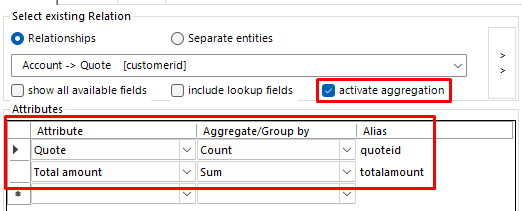
Quote aggregated by Count will give us the total number of quotes in our environment.  Total amount aggregated by Sum will give us the total revenue generated from all quotes in our environment. 

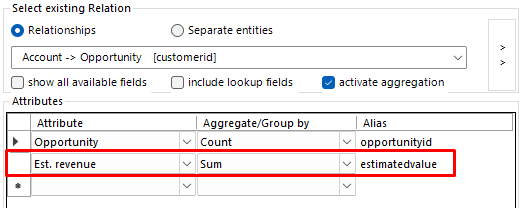
This information should be set for each entity, except for Opportunity.  Instead of Total amount, we aggregate it by Est. revenue instead. 

aggregation for opportunity
Figure 7: Using aggregation for our Opportunity table

Once the relations have been established, we can insert our newly created fields into the table. 

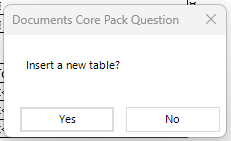
IMPORTANT: When inserting the fields into the table, select No if you are prompted to insert the field as a new table.  In this case, we just want to insert them as fields. 

selecting no
Figure 8: Select ‘No’ here. Selecting ‘Yes’ will create a new table instead.

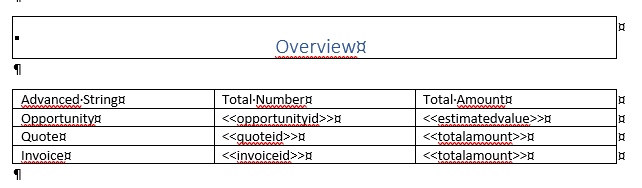
Once all the fields have been inserted, your table should look something like this: 

the final overview table
Figure 9: The final Overview table

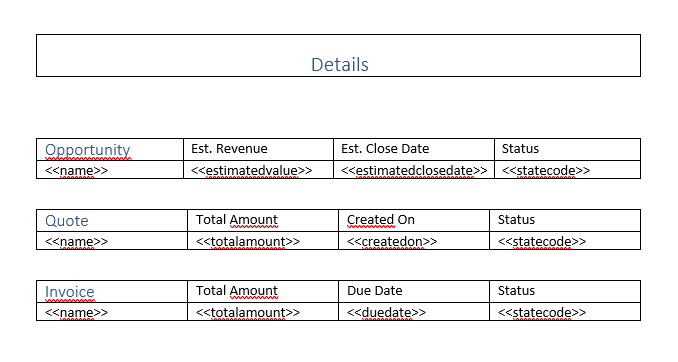
Step 4: Creating our detailed tables 

Our last step is to add a more detailed table per entity.  In our case, we want to include four fields from each entity into their respective table. 

This can be done by establishing another relation with each entity in the Relationship Designer.  However, this time, we will leave the activate aggregation unchecked, and just select the fields we need from the list. 

opportunity table
Figure 10: Create a normal Opportunity table

Once the relationships have been setup, we can create our tables. 

During the table setup process, we will create our table with the following settings: 

table set-up
Figure 11: The table set-up

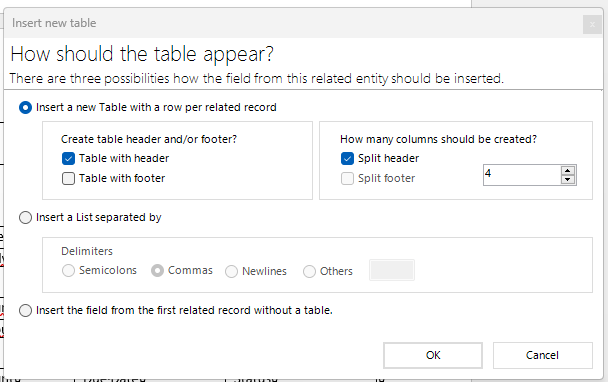
After the table is created, we can then populate it with our fields.  We’ll also add our column names. 

opportunity table
Figure 12: The Opportunity table as it appears in the template

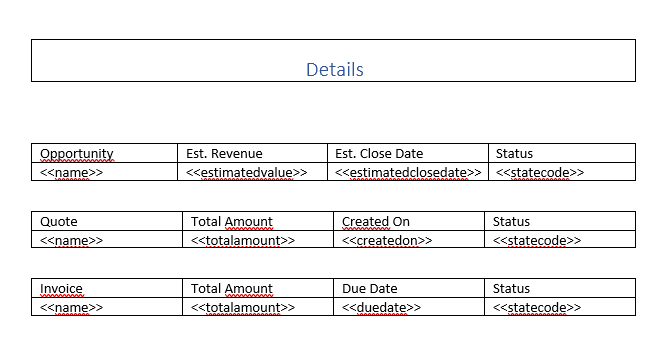
We can do the same with our other tables as well.  After adding them all, this is what our “Details” section looks like: 

details section
Figure 13: The ‘Details’ section

Optional step: Adding a Table of Contents 

If you want to organize this template, a Table of Contents (or TOC) can be helpful.  The TOC can be added via Word under the References tab. 

table of contents
Figure 14: Adding the Table of Contents

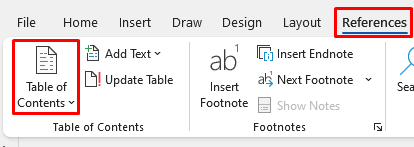
To add your tables to the TOC, you can highlight the first column header of each table and give it a Heading style. 

heading applied
Figure 15: The ‘Details’ section, with the ‘Heading’ style applied

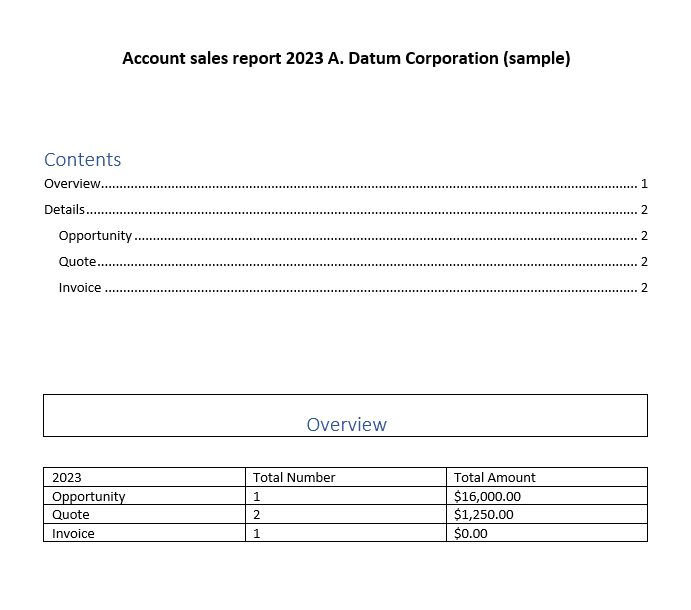
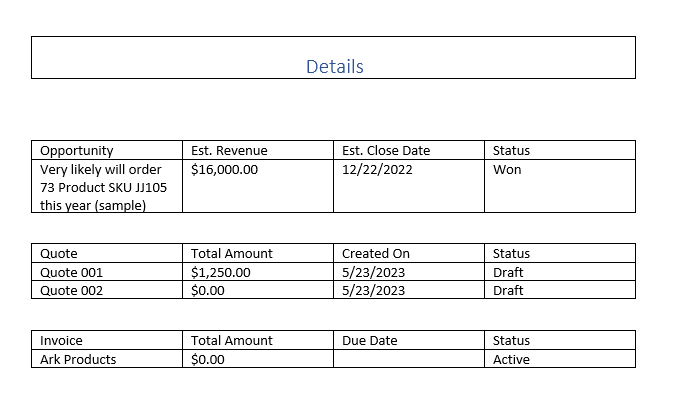
Final step: The merged document 

When your template is finished, save it and merge it with your data.  Once merged, your generated document should contain the data from your environment. 

part one merged
Figure 16: The first part of the merged document
part two merged
Figure 17: The second part of the merged document

That’s it! We appreciate your feedback! Please share your thoughts by sending an email to support@mscrm-addons.com. 

Attached Files
#
File Type
File Size
Download
1 .docx 422.26 KB Account Sales Report

Was this helpful?

1 Yes  No
Related Articles
  • Ensuring correct time zone display for DateTime fields
  • How to compare a date-fields with the current date 
  • Create a template for XML or plain text
  • E-Invoicing with DocumentsCorePack
  • How to add content from SharePoint to a document
  • Using MS Word field codes in DocumentsCorePack templates
Latest Articles
  • DocumentsCorePack: Best practices for Dynamics 365 on-premises to online migration projects
  • Multilingual Support in DocumentsCorePack
  • Recap: ColorCloud 2025
  • Configure DocumentsCorePack within custom pages
  • AI-Powered Document Generation with Copilot in Sales
Popular Articles
  • DocumentsCorePack Template Designer – Getting Started
  • Step-by-Step: How to configure a One-Click-Action
  • Application Access for Dynamics 365
  • How to find your environment’s unique name in Microsoft Dynamics 365
  • How licenses are counted
Top Rated Articles
  • “Undefined”-labels in Chrome and Edge 114 and higher
  • Important information for Dynamics 365 online customers using DocumentsCorePack and/or AttachmentExtractor
  • How to activate the DocumentsCorePack Connector for PowerApps & Microsoft Flow
  • How licenses are counted
  • How to insert Condition Fields in DocumentsCorePack Templates designer
Categories
  • *News and General Infos* 62
  • Webinars 44
  • Template Designer(DCP 196
  • DocumentsCorePack(DCP 250
  • TelephoneIntegration (TI 65
  • AttachmentExtractor (AE 72
  • PowerSearch (PS 50
  • ActivityTools (AT 61
  • SmartBar (SB 54
  • GroupCalendar (GC 47
Our Vision

“We see it as our purpose to provide products that simplify and speed up our customers’ Microsoft Dynamics 365 experience.”

Knowledgebase
LogIn
mscrm-addons.com
  • Products
  • Online Shop
  • Downloads
  • My Account
About Us
  • About Us
  • Case Studies
  • Newsletter
  • Partner Program
  • Contact
Support
  • Support
  • Terms & Conditions
  • Documentation
  • Webinars
  • Legal Documents
  • Impressum
  • © 2022 www.mscrm-addons.com. All Rights Reserved.

We use cookies and other technologies.
This website uses cookies and similar functions to process end device information and personal data. The processing serves the integration of content, external services and elements of third parties, statistical analysis/measurement, personalized advertising and the integration of social media. Depending on the function, data may be passed on to third parties in the process and to third parties in countries where there is no adequate level of data protection and is processed by them, e.g. the USA. Your consent is always voluntary, not required for the use of our website and can be rejected or revoked at any time on our site. You give your consent for all websites of PTM EDV Systeme GmbH.
Imprint Privacy Policy Settings
BlueOcean Privacy
Please Choose Policies for Authorization
Here are all technically necessary scripts, cookies and other elements that are necessary for the operation of the website or the operator has a legitimate interest under GDPR Art6, para. 1.
For the site, visitors, web page views and various other data are stored anonymously.
Google Ads as well as various other Ads providers are used whose conversion tracking is integrated here. If you agree here, personal data will be transferred to the Ads providers.
All social media channels the current page uses are listed here.
Here are other scripts and cookies that do not fit any of the above categories.
Imprint Privacy Policy
BlueOcean Privacy