The DocumentsCorePack (DCP) connector brings the document generation and processing options of DocumentsCorePack to Power Automate. This article gives an overview and explanation of the actions of the DocumentsCorePack Connector for Power Automate.
Note: The DCP Connector is certified and therefore available to all customers when creating flows using Power Automate. Simply search for “DocumentsCorePack” to find the premium connector and its actions in your flow.

Once selected. You will be able to see and use the following actions to create and process documents
Document generation actions
Create document (sync) (V4)
Create DocumentJob (async) (V4)
Create Multipart document (async) (V4)
Create Multipart document (sync) (V4)
Run One-Click-Action (sync) (V4)
Run One-Click-Action (async)(V4)
Document processing actions
Attach DocumentJob to email (V4)
Attach DocumentJob as note (V4)
Attach file as note (V4)
Attach file to email (V4)
Concatenate two DocumentJobs (V4)
Concatenate two documents
Sign DocumentJob (sync) (V4)
Send email (V4)
Print File (V4)
Print DocumentJob (V4)
Support actions
Create SharePoint folder (V4)
Get DocumentJob result (V4)
Get DocumentJob status (V4)
Get One-Click-Actions
Get Printers
Get document templates
Process batch in customer journey (sync/async) (V4)
* = Mandatory fields
The sections below detail each action available in the DocumentsCorePack Connector
Document generation actions
Create document (sync) (V4)
❶ *Template: Select a template for the generation process (learn more)
❷ *Row ID: Unique identifier of the record to run this template for
❸ *File Type: Choose a file type
❹ User: Choose the user to run this operation for
❺ Save to SharePoint: Save document to SharePoint (learn more)
❻ Attach To Email: Unique identifier of the email to attach the document to (learn more)
❼ Printer: Choose a printer (learn more)
❽ Attach To [Row ID]: Unique identifier of the record to attach this document to (learn more)
❾ Attach To [Table]: Choose table to attach this document to
❿ Prompt: Enter the name and value of the prompt or add a new item (learn more)
⓫ JSON Datasource: Use this JSON data for document creation (learn more)
⓬ Environment: Select the Environment for this operation

Create DocumentJob (async) (V4)
❶ *Template: Select a template for the generation process (learn more).
❷ *Row ID: Unique identifier of the record to run this template for.
❸ *File Type: Choose a file type
❹ User: Choose the user to run this operation for
❺ Save to SharePoint: Save document to SharePoint (learn more)
❻ Attach To Email: Unique identifier of the email to attach the document to (learn more
❼ Printer: Choose a printer (learn more)
❽ Attach To [Row ID]: Unique identifier of the record to attach this document to (learn more)
❾ Attach To [Table]: Choose table to attach this document to.
❿ Prompt: Enter the name and value of the prompt or add a new item (learn more)
⓫ JSON Datasource: Use this JSON data for document creation (learn more)
⓬ Environment: Select the environment for this operation

Create Multipart document (async) (V4)
❶ User: Choose the user to run this operation
❷ Use External Storage: Save only in alternative location
❸ Save Location: External SharePoint or Blob URL
❹ Environment: Select the environment for this operation
❺ Multipart XML: Multipart XML definition for the DocumentJob (More information)

Create Multipart document (sync) (V4)
❶ User: Choose the user to run this operation
❷ Use External Storage: Save only in alternative locations
❸ Save Location: External SharePoint or Blob URL
❹ Environment: Select environment for this operation
❺ Multipart XML: Multipart XML definition for the DocumentJob (More information)

Run One Click Action (sync) (V4)
❶ *Row ID: Unique identifier of the record to run the One-Click-Action
❷ *One-Click-Action ID: Unique identifier of the One-Click-Action to apply (Run an OCA from a flow)
❸ Environment: Choose the environment for this operation
❹ User: Only retrieve One-Click-Actions accessible to this user (More information)

Run One Click Action (async) (V4)
❶ *Row ID: Unique identifier of the record to run the One-Click-Action for
❷ *One-Click-Action ID: Unique identifier of the One-Click-Action to apply
❸ Environment: Choose the environment for this operation
❹ User: Only retrieve One-Click-Actions accessible to this user (More information)

Document processing actions
Attach DocumentJob to email (V4)
❶ *DocumentJob ID: Unique identifier of the DocumentJob to attach to the email
❷ *Email ID: Unique identifier of the email the document should be attached to
❸ User: Choose the user to run this operation
❹ Environment: Select the environment for this operation

Attach DocumentJob as note (V4)
❶ *DocumentJob ID: Unique identifier of the DocumentJob to attach the note
❷ *Table Name: Choose table to attach the note
❸ *Row ID: Unique identifier of the record to attach the note to
❹ User: Choose the user to run this operation
❺ Environment: Select the environment for this operation
❻ Note Description: Text of the note
❼ Note Subject: Subject of note

Attach file as note (V4)
❶ *Document Content: A content-object or base64 encoded string representing the files content
❷ *File Name: File name of the note attachment
❸ *Table Name: Choose table to attach the note to
❹ *Row ID: Unique identifier of the record to attach the note to
❺ User: Choose the user to run this operation
❻ Environment: Select the environment for this operation
❼ MIME Type: Content MIME type for handling of the file, eg: application/pdf.
❽ Note Description: Text of the note
❾ Note Subject: Subject of the note

Attach file to email (V4)
❶ *Document Content: A content-object or base 64 encoded string representing the file’s content
❷ *File Name: Filename of the attachment
❸ *Email ID: Unique identifier of the email the document should be attached to
❹ Users: Choose the user to run this operation
❺ Environment: Select the environment for this operation
❻ MIME Type: MIME type of the attachment, eg: application/pdf.

Concatenate two DocumentJobs (V4)
❶ *First DocumentJob ID: Unique identifier of the first DocumentJob
❷ *Second DocumentJob ID: Unique identifier of the second DocumentJob
❸ *Combine Type: Choose a combination type (learn more)
❹ *Output Filetype: Choose file type for the result
❺ User: Choose the user to this operation
❻ Environment: Select the environment for this operation

Concatenate two documents. Supported filetypes: pdf, docx
❶ *First Filename: Filename of the first document
❷ *First Mime-Type: MIME type of the first document, eg: application/pdf
❸ *First Document Content: A content object or base64 encoded string representing the files content
❹ *Second Filename: Filename of the second document
❺ *Second Mime-Type: MIME type of the second document, eg: application/pdf
❻ *Second Document Content: A content-object or base 64 encoded string representing the files content
❼ *Combine Type: Choose combination type (learn more)
❽ *Output Filetype: Choose filetype for the result
❾ User: Choose the user to run this operation
❿ Environment: Select the environment for this operation

Sign DocumentJob (sync) (V4)
❶ *Row ID: Unique identifier of the record the eSign record will be attached to
❷ *Table Name: Table name of the record the eSign record will be attached to
❸ *DocumentJob ID: Unique identifier of the DocumentJob to sign
❹ *Signing Provider: Choose e-Signature provider (learn more in this video)
❺ User: Choose the user to run this operation
❻ Email Default Subject: Default subject in signing request email
❼ Email Default Message: Default message in signing request email
❽ Environment: Choose an environment for this operation
❾ Signee: Add new signee

Send email (V4)
❶ *Email to Send: Unique identifier of the email to send
❷ Environment: Choose the environment for this operation
❸ User: Choose the user to run this operation
❹ Sender (Row ID): Unique identifier of email sender
❺ Sender (Table Name): Table name to set as sender
❻ Regarding (Row ID): Unique identifier of the table to set as regarding
❼ Regarding (Table Name): Table name to set as regarding
❽ To: Add new recipient
❾ CC: Add new recipient
❿ BCC: Add new recipient

Print File (V4)
❶ *Document Content: A content-object or base64 encoded string representing the files content
❷ *File Name: Choose file name
❸ *Printer: Choose printer (learn more)
❹ Environment: Choose the environment for this operation
❺ Print Copies: Enter the number of copies to be printed

Print DocumentJob (V4)
❶ *DocumentJob ID: Unique identifier of the DocumentJob to print
❷ *Printer: Choose a printer (learn more)
❸ Environment: Choose the environment
❹ Print Copies: Enter the number of copies to be printed

Support Actions
Create SharePoint folder (V4)
❶ *Row ID: Unique identifier of the record to create the folders for
❷ *Table Name: Table name of the record to create the folders for
❸ Environment: Select environment for this operation
❹ Folder Names/*Folder Names Item: Supply all folder names to create
❺ User: Choose the user to run this operation
❻ DocumentLocation ID: Choose a document location to create the folders in
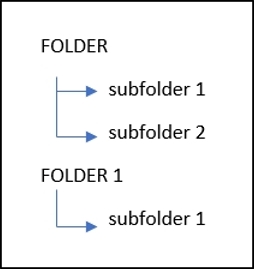
Syntax: “;” separates list of folders
“/” creates subfolders
Example: FOLDER/subfolder 1; FOLDER/subfolder 2; FOLDER1/subfolder 1
Creates folders as follows:

Get DocumentJob result (V4)
❶ *DocumentJob ID: Unique identifier of the DocumentJob
❷ Environment: Choose environment for this operation

Get DocumentJob status (V4)
❶ *DocumentJob ID: Unique identifier of the DocumentJob to retrieve the status of
❷ Environment: Select environment for this operation

Get One Click Actions
❶ Environment: Choose environment for this operation

Get Printers
❶ Environment: Choose an environment for this operation
❷ User: Optional. Lists printers accessible to this user (learn more)

Get document templates
❶ Environment: Choose the environment for his operation
❷ Table Name: Filter by entity (etc or etn). Optional wildcard *[etn]*
❸ Template Filter: Filter by template name. Optional wildcard *[name]*
❹ Group Filter: Filter by group name. Optional wildcard *[name]*
❺ User: Only retrieve templates accessible to this user

Process batch in customer journey (sync and async) (V4)
Basic parameters
❶ *[Table]: Choose the table to run this document for
❷ *Row ID: Unique identifier of the record to run this template for
❸ *Template: Select a template for the generation process (learn more)
❹ *Journey: Select the journey this action should be run for (learn more)
❺ *File Type: Choose the file type

Advanced parameters
❶ User: Choose the user to run this operation
❷ Save To SharePoint: Choose to save the document to SharePoint
❸ BatchDelay: First, set the number of hours the action will wait before continuing. Next, If the BatchSize has been met, then this action will continue after roughly fifteen (15) minutes have passed.
❹ BatchSize: The maximum number of items required to trigger the document processing.
❺ Sort Column: Specify the sort value for the records in the document
❻ Sort Direction: Set the column order sort
❼ Save Location: Set a custom save location (Azure Blob or SharePoint)
❽ Printer: Choose a printer (learn more)
❾ Print Copies: Set the number of document copies to be printed
❿ Attach to [Row ID]: Unique identifier of the record to attach this document to (learn more)
⓫ Attach to [Table]: Choose table to attach this document to.
⓬ Environment: Choose environment for this operation

Back to “The DocumentsCorePack connector for PowerApps and PowerAutomate (Microsoft Flow)“.
That’s it! We appreciate your feedback! Please share your thoughts by sending an email to support@mscrm-addons.com